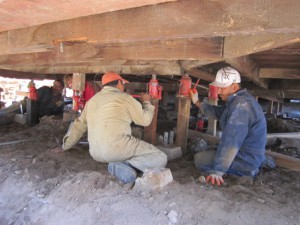
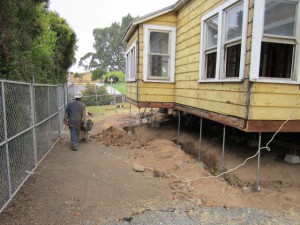
 So we finally got started this week on the huge foundation repair in which we are completely leveling the house and adding a new perimeter concrete stem wall. Before this huge stem wall can be formed and poured, we had to level the house and dig the 24″ trench around the sides. The house was only 2″ off at the most so the leveling was easy and we got the entire house within 1/4″ with a digital level going from one side to the other. I hired a foundation guy who has worked for me in the past even though I had a cheaper bid from a new guy, I just felt it’s such an important part of the rehab and I didn’t want to go down that road with a new sub contractor, especially on my first project back in San Diego. The only downside was I had to wait for him to finish another job so it slowed me down a bit. I’m not sure that I would have wanted to be under this huge house with jacks on a Friday the 13th! The next step now will be to set all the wood forms for the stem wall and tie all the rebar inside per building code.
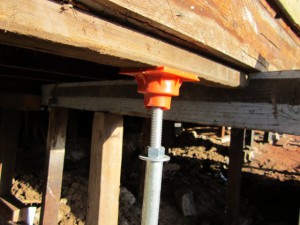
My sub contractor has been doing foundations for over 25 years so he’s got cool little tricks to make things easier for himself. I always enjoy learning these little tidbits from a true experienced professional in their field. As you can see here he’s got the outside of my house sitting on “sacrificial homemade screw jacks” we made out of 3/4″ galvanized pipe with 5/8″ all-thread inside and nuts and washers for the adjustments. Once everything is level he uses these jacks to hang the rebar on, and they’ll actually remain inside the new 8″ wide concrete stem wall permanently. Inside the trench they are sitting on small 8″ pier blocks, additionally he’ll hang the j-bolts from the new treated bottom plates so the house will be anchored to the new stem wall once its poured. It’s looks crazy to see this huge, heavy house sitting on these skinny legs but most of the weight is actually on the beams underneath a short distance away. Hopefully by the end of this week we’ll have the forms built and new foundation poured so we can get on to the framing. After the framing I’ll do the roof, plumbing, hvac and electric. Everyone is ready to go for these trades so stay tuned as things shall move along a little faster soon. I
  pulled off some of the Sears metal siding that’s probably been on the house since the 70’s and as I guessed, the original 1909 ship lap wood was in perfect preserved condition with only one coat of faded yellow paint. I’m pretty stoked as this could have gone either way with what I was going to find under there. On a side note, I had to rent a temporary construction fence this week to keep out the local kids who’ve evidently adopted the house as their local hang out at night. Every morning I’ve arrived to small surprises such as spilled ice cream, candy and even an egging. While nothings been stolen, construction sites are just not safe places to play so for the first time I’ve had to go on total lock down. This flimsy fence wouldn’t have kept me out 30 years ago but it gives me a little more piece of mind now knowing it’s not wide open.

I can’t wait to see how this house turns out. I think a lot of people would be scared by the amount of work. My wife and I were just looking at a place that we thought would be too much work/money to fix. I remember you were working with a budget under 200k on this one. I know you do a lot of work yourself and are your own general contractor. Can you tell me what percentage more a homeowner would expect to pay a contractor for a project this size? Do you take on renovation projects for homeowners?
Thanks,
Travis
Hey Travis,
Thanks for following! Nothing to get scared about once you break it down, really. A mid grade renovation this size would easily cost $200k from a general contractor. Guys are charging $100/ s.f. for a TOTAL gut remodel with foundation and roof. I usually can pull it off for $50.00/s.f. This house is 2000 s.f. The $200k I mentioned was my spread between purchase price and estimated sales price, not the budget. I’d say it’s safe to say a homeowner would pay $75k more that I can do it for. I’ve always said I earn most of my profit on these deals from the construction side and the product I can deliver, not through real estate investing hokus pokus or cosmetic smoke and mirrors. Let me know if I can be of any help.
I think the fear comes from lack of experience. While my wife and I are ok with a place that needs work, we are worried about buying a money pit. Of course, we’ll do our inspections, but we don’t have the experience to estimate what all the fixes may cost. We’ll also bring in contractors during the contingency period, but I think the short timing of it all has us concerned we won’t foresee everything. I enjoy following your blog to educate myself. Thank you for sharing all your work.
Tom,
If you can consistently do remodels with a 100 percent gross margin, then why take the added risk of owning the property? I am sure you get asked this all the time, and if you respond with something under the subheading, “Joys of dealing with Homeowners, etc.” Trust me, you will hear no argument from me. Just curious.
Hey Gabe,
I’m not sure it would be as easy to find homeowners wanting to spend $200k for big remodels, especially with all the G.C. competition out there. I don’t think I’d want to be a general contractor but you never know what lies ahead. It’s just not my bag to work for someone else, I guess it’s what I found appealing about my business model. I enjoy making all the design calls and getting to use my own ideas and creativity. There’s way more fixer upper houses out there than $200k+ clients wanting to hire me, at least for now anyway; ) Great question and thanks for taking the time to ask.
Travis, thanks for following and good luck with your project too! Let me know if you need any help looking at something.
Great stuff. I found your blog through biggerpockets.com I really enjoy your blog posts.
I have also adopted your driving for dollars techniques by the way!
Those sacrificial house jacks are brilliant. I am closing on a house next week that has a full basement but the concrete only comes up 4 feet with 3 foot knee walls up to the first floor. Not usually a problem, but 1 foot of the framing is below grade with stucco on it. I want to add a small addition to the back but I know that once I disturb the stucco I would need to deal with that subgrade framing. On the back of the house the floor joist run parallel to the foundation wall and I could use these jacks to replace the knee wall and just leave them in when I pour a higher foundation. Wow, that is just cool.
Who did your foundation in San Diego? We need his help!
Hey John,
Call Joe Chavez at Precision Foundation (619) 464-6625. He’s a cracked slab specialist but also does great stem wall repair as you can see from my pictures. I’ve used him multiple times and am very happy with the service and expertise.
Let em start out by saying great blog. I appreciate the effort it takes to keep these things running. Are those rebar safety caps on the end of your “sacrificial screw jacks”? Did you leave them on permanently, and how did your inspector feel about leaving them in the wall? I know that California has about the same codes as we do here in Oregon. Did you pour your stem walls to bottom of your sill plate? I would greatly appreciate any feed back you can give as I am doing something similar to our house now. Thanks in advance.
yea u got it. rebar caps. Inspector was fine with it. First I bolted new sill plate to the house and formed up to sill plate. Yes, poured up to sill plate. left “windows” to pump in concrete.
Tom, Thank you for a reply, Just one more question, did you run the all-thread all the way through the pipe or only so far down then run another piece into the lower pipe and the concrete block? Seams like a lot of all thread. I was thinking you could get away with a 8′ piece in the top with a piece of rebar and washer on the bottom stopping the pipe from any lateral movement. My Dad in Sac. did the same type of pour left holes he cut out then covered over as he pumped it full.
Yea only need about 8″ all thread adjustment section. Bolt and washer at top to adjust. Bottom has to sit on small “dobie” because no metal can reach edge of your new pour or it will rust after time. Suppose to be 3″ encapsulated from any side of new stem wall. That goes for the rebar too.