It’s Heatin’ Up

It’s Heatin’ Up

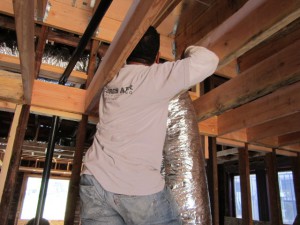
Even with the short week we still managed to get a lot done. The plumber is almost done now and I had the hvac guy come through and he roughed in the whole house in 2 days. I installed a Goodman 70,000 btu central heat system only with all new ducts. It was a breath of fresh “air” not to have to do the full central air system because in most areas in San Diego you don’t even need air conditioning. These guys don’t mess around in this town, he rolled in with 6 helpers and they knocked it out. What a change from “Land of Manana” as we called San Antonio, where most workers only did the bare minimum, never showed up and just squeaked by since the cost of living is so low there. Thanks to my buddy Curtis Gabhart from Gabhart Investments for the referral! Check out his site if you want to see how the big boys are rehabbing here in San Diego.

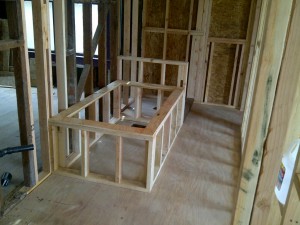
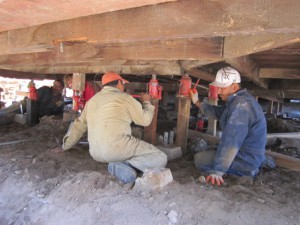
I always bring the hvac sub contractor through second, then finally my electrician will come Monday and start with my 200 amp rewire and new service. The best news all week was that I finally appear to have approval from the Historical Review Board. The City Planner emailed me late Friday and said I could come pick up my plans. My project has been under review for over 4 weeks now, luckily they stamped my structural and mechanical plans right away so I could get started. If everything was approved then I officially have the permit and I’m free to start calling for inspections and can move forward faster. I’ll call for the foundation inspection first so he can check our forms and rebar, then we can pour Wednesday. Next I’ll call in for framing inspection so I can then put the roof on. Finally I’ll call for rough-in inspections on all 3 trades so I can then hang insulation and drywall the house up. It seems like a lot but I’m really not that far away from getting it sealed up.

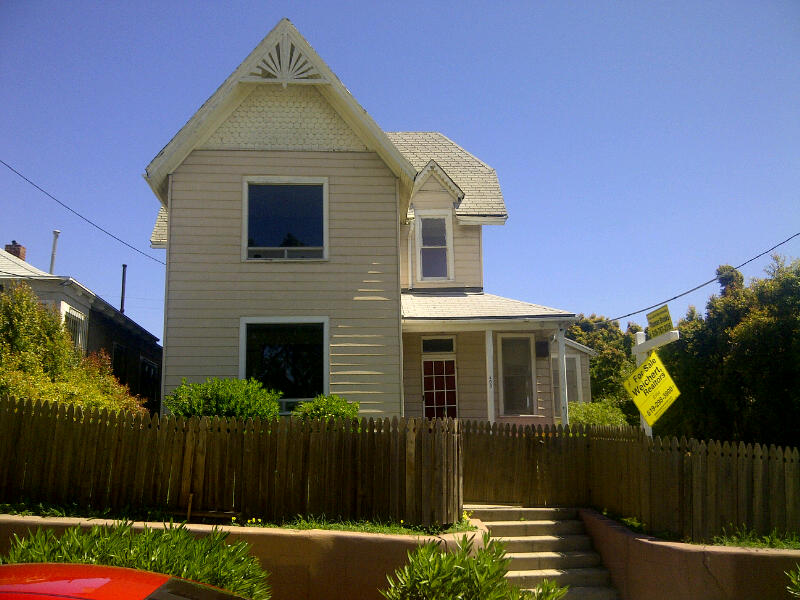
I was a little surprised about code differences between here and in Texas, seems with all the regulations here in California they would be a little more strict on the duct work but evidently you don’t even have to put “pookie” on the registers or plenum. In Texas with the summer heat they were really strict on the system install but then again this is heat only and no a/c. Right now it’s 68 degrees and sunny. Sorry, to my friends in San Antonio already sweating in 100 degree, 80% humidity.. its going to be a long summer!

The San Diego Real Estate market saw some price slippage, in May there was a 4% decrease from year-over-year prices. Nationally, the 20-City Case Shiller Metro home prices are already in double-dip territory but we aren’t there yet even with the large decrease. I attribute most of this to the artificial market and tax credit last Spring, if the government would just stay out of everything and let the markets correct naturally I think we’d be in a better place. Here’s a good article by Rich Toscano over at Voice of San Diego.org.

An Old Familiar Friend

An Old Familiar Friend

My new master bathroom in The Painted Lady is coming together nicely, it’s generous in size at 6′ x 15.’ Every time I frame up one of these tub boxes for the drop in tub I get a sense of Deja Vu, like seeing an old friend. It seems like just yesterday when I was doing a similar configuration on the Target House project only this time I’m just going with a standard 3′ high pony wall separating the tub and the shower instead of the full wall with the window opening, which will also also keep my tile price down. Every bathroom I design is a bit different, this time I’ve got everything in a line down the left hand wall and then the water closet at the end on the right. You kinda just gottta play with the space and do what works best. I’ve also got the whole right hand wall available for towel bars with this design, I’ve learned this the hard way after doing killer bathrooms and then finding out there no place for towel bars. The door swings in and onto the right hand wall, a 60″ dual vanity is first on the left, then the jacuzzi tub in the middle with a 3′ x 4′ shower at the back. I planned on dropping in a regular soaker tub with no jets to keep the budget down but after pricing them I could get the American Standard Plebe model 32″ x 60″ jetted tub for the same price of $399.00 so it’s a no brainer. There’s a window in the center of the back wall but I’ve got it temporarily sealed now.  Natural light is key for bathrooms, ideally I probably would have had another window in the shower and one in the water closet too but I’m trying to stay within budget so I’m forced to pull back in some areas. Code states that if you don’t have an opening window you must have an exhaust fan but I’ll have both.

As you can see we got started roughing in the plumbing this week,  I got a great quote of $4800.00 for the complete new system with gas lines, I supply the fixtures. I was also reminded that black ABS is used here in California and not white PVC as in Texas and on the East Coast for the waste lines.  I think PVC is better and cheaper but the only upside on ABS is that you don’t have to use primer with the glue.  ABS also gets brittle from UV exposure so it’s now common place to paint the roof stacks in California. I still like PVC better, even though it takes more time to install using the primer but I’m sure there’s some tree hugger issue with it so that’s why California uses ABS. After framing I always get the plumber in first before the electrician or hvac sub contractors, it works best because the vent pipes and waste lines are not flexible. I also wait until the plumber is done before putting on the new roof so we don’t have to butcher the new roof for the vent pipe roof jacks.  Your roof job comes out far superior if all jacks are in place before install, this trick came with experience.  After these waste lines are complete we’ll run the new black pipe gas lines and then finally the copper supply side lines. I’m still going back and forth with the San Diego Historical Review Board, they have made me change 13 items on my plans including window type, siding material, roof type & color and they even want to know the exterior paint colors. Furthermore, they are making me re-stack the exterior brick chimneys even though they’ve been eliminated inside the house. It’s really slowing me down because until I get everything approved from them I cant call for any inspections. As frustrating as it is, I’m stoked to learn exactly what needs to be done to pull off a renovation of this caliber in San Diego so I’ll chalk the delay up to contractor school.

Don’t forget the men and women who died while serving in the American military protecting our great country, this holiday weekend is not just all about beer and barbeques in the park. Have a happy and safe Memorial Day and God Bless our troops!

Skinny legs, old yellow dress

Skinny legs, old yellow dress

So we finally got started this week on the huge foundation repair in which we are completely leveling the house and adding a new perimeter concrete stem wall. Before this huge stem wall can be formed and poured, we had to level the house and dig the 24″ trench around the sides. The house was only 2″ off at the most so the leveling was easy and we got the entire house within 1/4″ with a digital level going from one side to the other.  I hired a foundation guy who has worked for me in the past even though I had a cheaper bid from a new guy, I just felt it’s such an important part of the rehab and I didn’t want to go down that road with a new sub contractor, especially on my first project back in San Diego. The only downside was I had to wait for him to finish another job so it slowed me down a bit. I’m not sure that I would have wanted to be under this huge house with jacks on a Friday the 13th! The next step now will be to set all the wood forms for the stem wall and tie all the rebar inside per building code.

My sub contractor has been doing foundations for over 25 years so he’s got cool little tricks to make things easier for himself. I always enjoy learning these little tidbits from a true experienced professional in their field. As you can see here he’s got the outside of my house sitting on “sacrificial homemade screw jacks” we made out of 3/4″ galvanized pipe with 5/8″ all-thread inside and nuts and washers for the adjustments. Once everything is level he uses these jacks to hang the rebar on, and they’ll actually remain inside the new 8″ wide concrete stem wall permanently. Inside the trench they are sitting on small 8″ pier blocks, additionally he’ll hang the j-bolts from the new treated bottom plates so the house will be anchored to the new stem wall once its poured. It’s looks crazy to see this huge, heavy house sitting on these skinny legs but most of the weight is actually on the beams underneath a short distance away. Hopefully by the end of this week we’ll have the forms built and new foundation poured so we can get on to the framing.  After the framing I’ll do the roof, plumbing, hvac and electric. Everyone is ready to go for these trades so stay tuned as things shall move along a little faster soon. I pulled off some of the Sears metal siding that’s probably been on the house since the 70’s and as I guessed, the original 1909 ship lap wood was in perfect preserved condition with only one coat of faded yellow paint.  I’m pretty stoked as this could have gone either way with what I was going to find under there. On a side note, I had to rent a temporary construction fence this week to keep out the local kids who’ve evidently adopted the house as their local hang out at night. Every morning I’ve arrived to small surprises such as spilled ice cream, candy and even an egging. While nothings been stolen, construction sites are just not safe places to play so for the first time I’ve had to go on total lock down. This flimsy fence wouldn’t have kept me out 30 years ago but it gives me a little more piece of mind now knowing it’s not wide open.

Remodeling Plans & Permitting

Remodeling Plans & Permitting

After hearing all the horror stories about how hard it is to work with the City of San Diego with regards to permitting your rehab project I have to say that it really isn’t that bad. After designing my floorplan on graph paper I hired a draftsman to put it together for me. Since my company is the owner of the house I’m able to pull an owner/builder “Combo Permit” myself without being a licensed GC.

I actually found my draftsman’s number on a bandit sign believe it or not, and he’s doing drafting work while putting himself through architecture school downtown. A real smart young guy and his price was great at $700 for a full set of plans showing all mechanicals, framing, foundation, connections, elevations and it even included him to accompany me downtown to submit the plans for approval. It’s always good to have your architect go with you because sometimes they let you make changes on the spot. Here’s my boy making changes to the 3 sets of plans during our appointment.

In order to submit the plans I had to provide 3 complete sets, the County building records and 4 photos of the house, one from each side as well as the jpeg images on disc. Once you arrive downtown you check in with the receptionist and tell them you are there for an over-the-counter permit and plan check. They do take appointments but I opted to just go early in the morning and wait as they open at 7:30.


First you get sent to a preliminary desk that makes sure you have everything you need, then they send you across the building to wait for plan checking. The plan checking is very intensive and I found it to be completely opposite than in Texas. Here they look at every little detail, framing connections and sizes, mechanical placement, setbacks, elevations, demo plans, structural, and even smoke alarm/CO2 placement.

Additionally, there are all these other disclosures you have to show on your plans, you even have to designate trash areas, concrete clean out areas and account for storm water run off with regards to keeping your debris on your lot in case of a downpour. In Texas to the contrary, the City didn’t even want to look at the plans but rather left the responsibility up to the inspectors as they went through for rough-in and final inspections to make sure everything is correct.

It’s a little more red tape up front here but at the end of the day its easier to build it once you have such detailed plans for all your subcontractors to refer to. All in all, we had a great experience with our plan checker and even learned that we can request her in the future if we want to. On the second visit downtown we got stamps on the plans showing approval but now we have to wait the mandatory 10-day historical department review.

The only item on my plans that’s still unclear is with regards to what type of siding they are going to request for the new rear portion of the house. Total cost for the permitting and plan check was about $2700. A far cry from what would have cost $300 in San Antonio.

While we wait for the historical department approval I’ll have my foundation guy start doing some prep work so we are ready to start leveling the house the day we get the permit. With the arrival of dumpster #4 yesterday, all of the big demo work is done minus pulling nails and some small framing stuff which we’ll do at the time I frame the master suite.


I’m still spending a lot of time getting bids from sub contractors, its always one of the most important parts of any project but once I get my team in place on this first project, then I can just improve from there. It’s a lot of work acting as your own GC and now I’m essentially starting over without all my valuable San Antonio contacts but with a good team of subs I’ll be able to really stretch my budget thus enabling me to compete in this competitive market.

New Project – The Painted Lady

New Project – The Painted Lady

74 days after arriving home in sunny San Diego we’ve finally bought our first rehab project, The Painted Lady. I’m real excited about it, she’s a 1909 Folk Victorian Gingerbread. The house is located in an Urban Redevelopment neighborhood just 1 mile from Petco Park and Downtown, with incredible views of the Coronado Bridge and all the way to Tijuana.

There are original hardwood floors under the carpet, 10 foot ceilings, and a lot of original details still intact. This is a huge project and needs just about everything a rehab could require. I’ll be leveling the foundation by adding a new perimeter stem wall and 40 new footings, new roof, re-framing a 360 square foot master suite on the back, replacing all the mechanicals, new kitchen, 2.5 new baths including adding a half bath under the staircase, some new windows and complete landscaping and fencing with an automatic gate on the alley. The house has aluminum siding that’s probably been on there since the 70’s. I peeked underneath it and there’s fiber shingles probably from the 50-60’s . Under the shingles I found the original wood board and bat siding which I’ll expose and also add some of the missing period details like the gingerbread ornamentation and porch decoration the Victorians are famous for.

The Victorian era began in the 1830’s and ran until roughly 1940. Our house is a Folk Victorian, more simple in design than the ornate Gothic or Italianate Victorians, and was usually built more modestly for the middle class. I’m excited to see the scalloped shingles under the gables which I’ll paint multi-color and the decorative gable bracket. This architecture can really hold color well so I’m planning on using a minimum of 6 bold colors to bring her back to life. I’ve done a lot of Craftsman style houses but this will be my first Victorian and only the second 2-story house we’ve rehabbed. With the huge scope of this project it will be a perfect welcome home project and enable me to become reacquainted with the City permitting, historical and inspection departments this summer as well as dial in my sub contractor team. If you can’t see the potential in what we have here, Google “Painted Ladies San Francisco” and you can get an idea of where I’m going with this project. Stay tuned for demo and a walk through design video!

Mid Century Modern Making a Splash

Mid Century Modern Making a Splash

One things for sure, in every city across America you’ll find an abundance of 50’s ranch houses in great established neighborhoods and San Diego is no different. The post war Ranch style house is know for its sprawling lay out and horizontal orientation with the street, usually being single story and having an attached 2 car garage as this was the first decade where families actually had 2 cars. Low profile roof lines and fairly open floorplans are also indicative of this time period as are huge overhanging eaves and exposed beams. Sliding glass doors leading to outdoor patios were first introduced in this era as well. Looking at these homes makes you realize how perfect these traits align themselves with todays homebuyer, even 50 years later.  

Recently its become very popular to put the modern twist on these homes. Being in San Diego now I’m not sure if I’ll continue with the Craftsman Bungalow affair we had in Texas but with what I’m seeing done to these 1945-1968 Ranchers its looking pretty fun. You’ve got the large rooms, open beams and open floorplan. To get the modern element into the exterior all you need are aluminum windows, smooth stucco and some natural elements such as stained redwood or teak. These style homes already typically have minimal exterior ornamentation. Metal windows, dark wood and frosted glass, Bam. You got it. I really like this house a friend showed me this week during our property hunt, I’m so excited about this design style I think I’ll try my hand if I land a rancher. The interiors are semi-minimalist but Modern with clean lines, high end finishes and trendy material choices, no travertine here. Formica countertops were also introduced during this period but there’s a variety of other new materials of course that mimic the clean, smooth look for counters.    

Hopefully I’ll find the right house to transform into a Mid Century Modern project, were making tons of offers. REO’s, short sales, traditional equity sales and to private party non-mls stuff. Somethings bound to stick soon, stay tuned.