by Tom | Sep 26, 2010 | Bathrooms, Electrical, Landscaping, Target House, Tile, Tubs and Showers
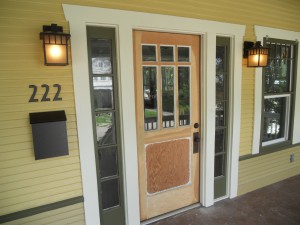
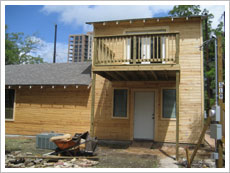
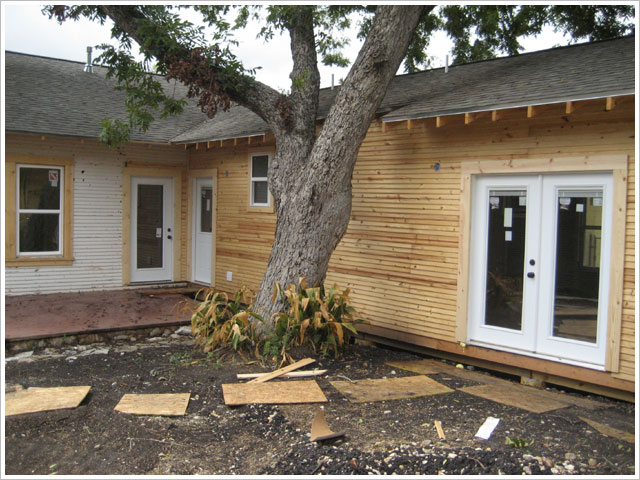
I’m getting close now so I’m feeling a bit relieved. Even with ongoing rain delays I’m making progress. I installed all the electrical fixtures and this time I spent a little more on Craftsman Style sconces for the porches. Really worth the extra money, check out Lumens.com for some killer stuff. The house numbers and mailbox are from Restoration Hardware again. I replaced the front door with an extra gem I’ve been holding onto after acquiring it from the Hat Trick House last year (some of these old bungalows come with 2 front doors and I always remove one to modernize the floorplan). I’ll paint it my same brown color when I second coat the porch. This Pine, 6 panel, beveled glass door came from renowned San Antonio developer H.C. Thorman’s personal residence in Mahncke Park that we flipped, it was the first house he built there in 1900 and appropriately on Thorman Place. It looks right at home on our project and seals tighter than new with a modern threshold and new weatherstripping all around. A building envelope test will be coming our way shortly as part of new code changes this year in order to pass final inspections, so the house can’t be drafty.

The 2 ceiling fans on the porch are a nice added touch. Just makes you want to pull up some chairs and have a cold beverage. As you can see I am flying the” Tarrant Realty ~ Coming Soon” sign in the window, we’re getting some warm bites already. I’ve weeded the yard and we’ll be laying out some river rock beds and putting down sod this week while the floors get refinished.

This door knob is older than you, unless you are 111 years old. It’s the original from our 1900 door that I refurbished. Note the modern weatherstripping, this thing shuts like an airplane door.

The tile job kicked my butt but was worth the effort. The hall bath was fairly easy but this master bath stand up shower and tub box seemed to go on for an eternity. I used white subway tile, river rock floor and a modern white/grey marble accent liner. The shower is tiled inside and out and all the way to the ceiling. Custom frameless glass for the door and picture window are on order from Thad Ziegler Glass. If you guys are flipping houses and not putting shower doors on your new showers at least give them a cheapo, so many times I see all this fancy tile work and expensive fixtures in a brand new bathroom with no shower door. It ranks right up there on my pet peeves list with no rods or build out in the walk in closet.

The see thru fireplace in the master is my sizzle feature on this project, while the tub side of the fireplace is surrounded by white ceramic to match the bathroom, I chose white and grey marble for the master bedroom side. Very romantic to say the least and all with a flip of the switch. There is a direct line of sight from the master bed location through the fireplace, and to the spa tub and into the shower. It’s sure to keep the fire burning in the future owners love life.

Good fences make great neighbors. In this case we have really cool great neighbors already but its very common with the older neighborhoods not to have good fencing. Part of my business model with redeveloping these urban properties is not only to give the potential buyer a complete package but also make them feel safe living close to downtown. A 6 foot privacy fence and automatic driveway gate (coming soon) usually does the trick. Any attorney, doctor or young professional could feel safe here and these are our target clients. My friend and I rented a hydraulic auger and jackhammer and it still took us 2 days to dig the 20 holes for this section. Nothing comes easy in the South Texas heat. A menagerie of rocks, roots, glass, and ancient plumbing were thrown our way but nothing can get between a cowboy and building his fence.
by Tom | Aug 29, 2010 | Bathrooms, Tile, Tubs and Showers
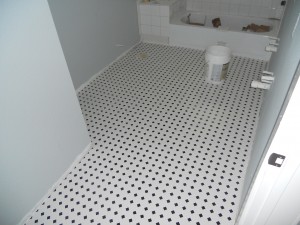
That’s what my tile guy heard earlier this week. As I mentioned on my last post, the Friday before he snuck off to another job and left his helper there to lay the bathroom floor. By the time I noticed this goofball had done such a crappy job I told him to pull it all up before the thinset dried. I called my guy and told him if he didn’t personally do the job that I would find someone else, I know this guy does excellent work but he’s bouncing around from job to job having helpers do most of the work now. As a general contractor (or homeowner acting as one) you constantly have to watch your subs, even if you know they’ve done great work before. Monday rolls around and who shows up? A different guy still. Of course I asked him where’s Elijio? Oh, he’s coming right now, he’ll be here in 10 minutes. By 1 pm he still wasn’t there so I told his worker “no mas trabajo aqui.” If I wanted to spend all day showing him how to lay it and looking over his shoulder I might as well do it myself, so that’s where I’m at. I got the hall bath floor re-laid after going and buying all new material with a cool ceramic hexagon/dot pattern in black and white. It’s really historic looking and since this bathroom is in the original part of the house and visable from the dining room I wanted to keep the feel. It’s grouted now so I’m ready to set the vanity and linen closet in there Monday when my cabinets arrive.
In the master bathroom I put down beach pebbles again but this time I found a better supplier. In the last house the rocks were different sizes and it felt odd on your feet, this time its way more consistent but you still get the spa therapy feel. I’ve started the white subway tile that will make up most of the tile job with the exception of a small amount of Carrera Marble for the accent liner in the shower and around the double-sided fireplace. I’m staying with all clean and sharp lines in the master bath, it’s going to be elegant and modern.

Lastly I re-tiled the fireplace hearth. We decided to go with a red to tie in with the dining room wall color and also match the historic stained glass windows above. They are 4″ ceramic, laying them was the easy part, first I had to demo all the old pieces and then float it out with mortar so I had a smooth surface for the new tile. The dark red looks killer, all I need to do now is install the oak transition pieces for a border before the hardwood floor guys start refinishing.

We are known for the attention to detail in our rehabs. Here’s a tip that a lot of flippers are blowing it on and its really inexpensive to correct. A long time ago we became conscious of the fixtures and finishes we were choosing for the rehabs, and how to use them correctly. Every house we do now we chose a finish for the hardware and keep it consistent throughout the whole house. Oil rubbed bronze (ORB) looks great with travertine and typical tan flip house colors. Brushed nickel looks clean and modern and goes with everything. Nobody uses gold, don’t even think of going here. Chrome is usually reserved for modern style homes. If you are going to use oil rubbed bronze for instance then make sure you buy ORB shower trims, ceiling fans, faucets, cabinet pulls, door knobs and hinges for your doors. Everything should match. Sounds basic right? You would be amazed at how many flips I’ve walked through that have gold door hinges, brushed nickel door knobs (yes, on the same frickin door!) and then ORB ceiling fans. This is a total rookie move and will cheapen the look of your rehab, I’m just sayin’ with a little planning and about $100 bucks for replacement door hinges you can bring a way better product to market and see the results at closing. All prehung doors at Home Depot and Lowe’s come with gold hinges, not sure why. What’s happening is that investors who are not contractors themselves and just hire out all their work, don’t have the eye for detail so they don’t get changed out. We don’t buy our prehung doors at the big box stores anyway and actually get to chose the hinge finish they come with, so before painting I usually put “dummies” on and then switch them back after everything is done. I keep this box of paint covered dummies and reuse them on every house. Additionally, I don’t care how good you are at taping, there’s no better look than crisp new hinges and knobs with no over-spray or drips on them. A lot of new home builders are actually spraying over the gold hinges when they paint their trims, this is a big no-no also as the paint will surely scratch off eventually. Take a bit of advice from me please, change out your hinges guys and reap the rewards!

For this house we chose chrome door hinges with brushed nickel door knobs. All the faucets, cabinets pulls etc will also be chrome, this is the only instance when you should mix two finishes in a house unless you are doing a “theme” room as we’ve also done in the past.
by Tom | Jun 6, 2010 | Bathrooms, Hardwood Flooring, Tile, Tubs and Showers
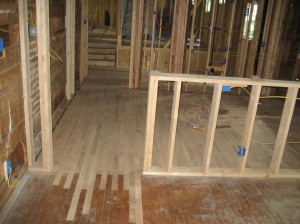
I picked up 1200 s.f. of hardwood flooring last week from Home Depot and we got started putting it down. On a full gut rehab I always put down the new wood floors before hanging drywall (if they are unfinished).
We patched into the dining room, staggering the joints and have run the new 2 1/4″ unfinished Red Oak all the way through the kitchen, utility room and we are half way through the master bedroom. In the old portion of the house the wood nails right to the floor joists but in my new addition it nails to the plywood sub floor with some felt paper in between as a moisture barrier.
Most of the Craftsman Homes in San Antonio originally have Red Oak flooring but occasionally you’ll see Long Leaf Pine used and especially in kitchens. After some deliberation I decided to have all hardwoods in my master suite instead of using high end carpet for the bedroom and tile for the bath floor.
On the last couple of houses I used carpet and didn’t really hear any complaints but these Arts and Crafts style homes are really all about having hardwoods throughout. By the time I looked at what I would spend on the carpet, tile and installation it made more sense to just put down all wood and I’ll end up with a way finer product.
Like the last house, I’ll even run the hardwood floors through the master bathroom which got great feedback and will really give my new addition some character. I usually buy this flooring at Lumber Liquidators for $1.99/s.f. but their price went up to $2.89 now.
Home Depot has it for $2.39 plus I got a little bit more off the order since it was over $2500.00 we got to send it to the bid room. I’ll still have to have these floors sanded and refinished with the rest of the house once the renovation is complete but on the flip-side putting down a prefinished engineered wood just wouldn’t give you that old house feel.

I’ve been doing extra dark stains like Dark Walnut & Ebony on my last few projects but for this house I think I am going to go lighter with Golden Oak just to change it up.
The dark floors are really trendy right now and very dramatic but they get so dusty and are a nightmare to keep clean during the period the house is on the market for sale. When the flooring got delivered the driver didn’t show up until 7 o’clock. Wouldn’t have been so bad but he dropped the pallets curbside so I had to lug all 63 bundles up 15 steps myself after a long week.

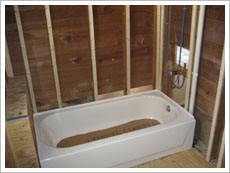
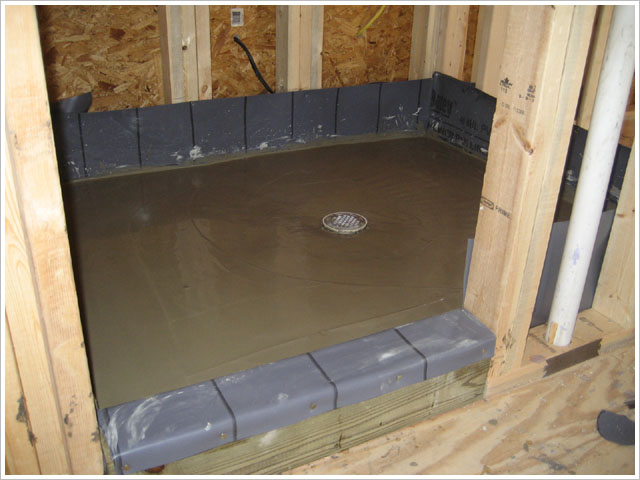
Here’s another item that I always do before the house gets drywall, I install all the HardiBacker in the areas that I have planned for tile. In the hall bath (not shown) I am doing the floor and tub surround. In the master bath pictured here I’ll do the entire new shower all the way up, inside and out of the 9 foot walls, and the box for the spa tub with a mini surround.
Before the backer board could go up I had to do the shower pan. I use the rubber membrane and a dry mortar bed and slope to the drain. It takes about 2-3 hours to complete. The backer board is easy as well, it cuts great with a skil saw and goes in with tons of screws.
You want a real stable base so your tile job doesn’t crack. I’ve seen some remodelers using that blue board the sell at Lowe’s, don’t do it, your tile job will crack in a few short months! That would suck to have your flip on the market for sale and a tile job start cracking. I’ve seen it happen, multiple times. Always use 1/2″ HardiBacker and screw it down, even if the guys on DIY Network nail it.
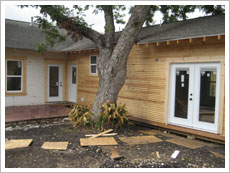
by Tom | Sep 12, 2009 | Electrical, HVAC, Neighbors House, Siding, Tubs and Showers
I had my first theft at the jobsite this week, someone came in the backyard after hours and stole my 45 dollar extension cord. Since it’s been raining all week the thief left some good footprints when he tracked mud onto the driveway. I’ve taken photos, made castings and measured the prints and concluded the perp is a size 8. This happened the night before I installed the exterior doors and locks so we’re Fort Knox now if he decides to come back for a second helping of construction materials. My bad for leaving it out anyway. Before the rain started this week I got all the #117 siding on the room addition and the front of the guest house, also building a cool balcony deck. The rear unit is turning out swell and will make someone a great rental unit, granny flat or at home office space.
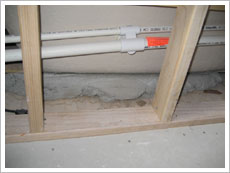
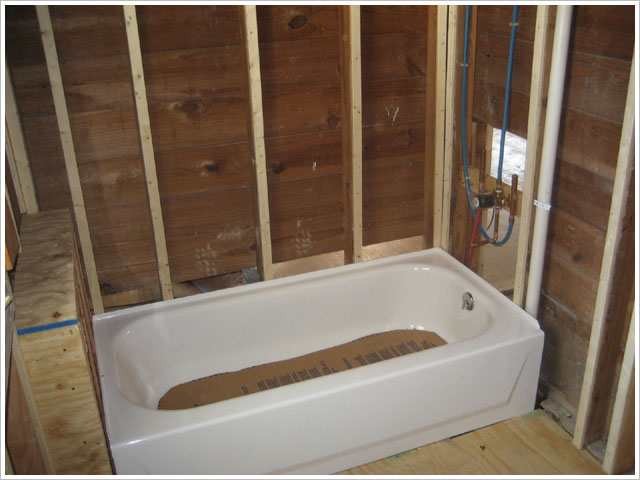
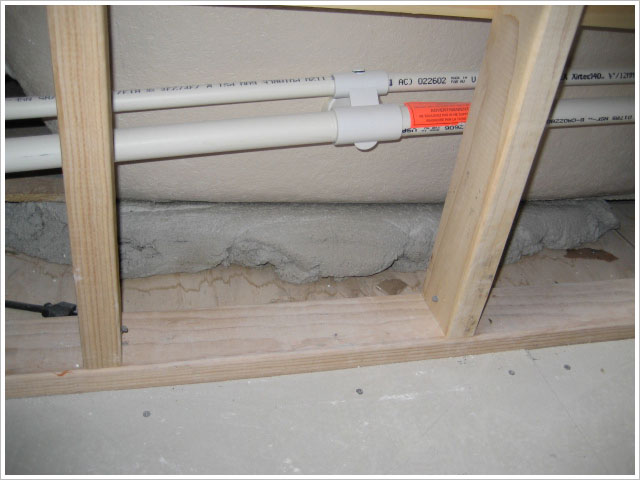
I failed my mechanical rough-in inspection this week due to multiple small items that my sub-contractor overlooked. They left off a little insulation on the copper and also drilled through the furnace exhaust vent with a small screw when strapping it in the attic. Additionally they “forgot” the secondary overflow from the drip pan under the coil. It’s hard for me to believe he can still keep failing inspections for basic stuff as we’ve gone through this so many times and he knows what needs to be in place to be legit and pass. I never saw him personally in the attic during the job…maybe that explains it. The inspector also called me out for my placement of the dryer vent from the laundry room. The V in HVAC stands for ventilation. When he comes to inspect the rough-in of new heat and a/c equipment he also looks at the dryer and hot water heater vents even though my a/c sub-contractor has nothing to do with these items. I have the dryer vent placement about 2 feet from the back door and he said it is a fire hazard to leave it that close. It needs to be a minimum of 3 feet from any opening to meet code, chalk that one up to another learning experience. Also, keep your dryer vents clean, there is a serious fire risk from lint build up and it reduces energy waste. I also handled the hall bathroom subfloor on Friday and set the tub Saturday morning.
After my regular electrician burned me on the last project I was back to square one getting bids from new guys. 3 out of the 4 bids were twice as much as I usually pay. I ended up finding a good price from my plumber’s referral and the guy rocks, literally. This master electrician is also the lead singer in a local San Antonio Judas Priest cover band called Sad Wings of Destiny. He can hit Rob Halfords’ lyrics note for note. Still waiting for him to bust out while we are working.
by Tom | Mar 22, 2009 | Hat Trick House, HVAC, Plumbing, San Antonio Real Estate Market, Tubs and Showers
We passed plumbing this week but failed A/C inspection yesterday due to some minor details overlooked by my sub-contractor, which have already been addressed. Second mechanical inspection is set for Monday.
After passing plumbing I went ahead and installed the new plywood sub floor and set the tub in the hall bath and shower pan in the master bath.

As soon as we pass the mechanical inspection I can call for the framing inspection. It seems odd and out of order the way San Antonio does it, they inspect framing after all the tradesmen have finished.
If something were incorrect you would have to rip out all those sub contractors new work, weird. So the schedule is: pass mechanical Monday. Call in framing inspection for Tuesday.
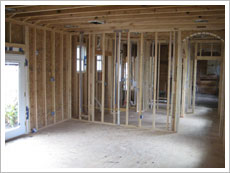
Pass framing Tuesday and schedule the insulation inspection for Wednesday. Once we pass the insulation inspection we can hang all the drywall. My drywall crew is chomping at the bit and ready to get started. I am going to have it delivered Thursday, 225 sheets to do the whole 1930 s.f. house, 5/8” for the ceilings and 1/2” on the walls.
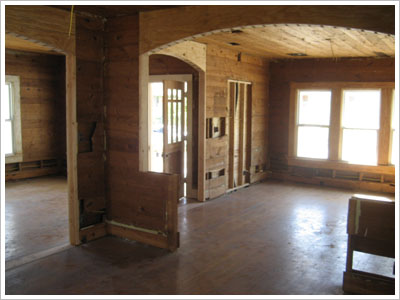
Take one last look inside these walls, next time you see the house it will be all sealed up. This is always a huge milestone for me; to see the house with all new drywall really shows how it will look. It blocks out all the “old house” smell and it’s all downhill from there, baby.
We’ve been monitoring sales activity a little closer lately and I ran some interesting reports out of MLS last night. In our little “area” there were only 9 sales in 2008, (2 of which were ours) and avg. price was 206k. In Q1 08 there were no transactions, so far this year we have 6 pending or sold. Average price on these 6 is 257k.
That’s an increase in sales activity of 600% and an avg. price increase of 19% Y.O.Y. Currently there are only 4 months of inventory making it essentially a sellers market. While the overall market has slowed down in San Antonio our area seems to be a bright spot. The Craftsman Bungalow sold for $174/s.f. last year setting a record for high comp based on $/s.f.
The avg. price per s.f. is closer to $155.00 so with Hat Trick being 1930 s.f. and the level of rehab we plan on listing it for around $289k –$299k. The only thing better than setting a high comp for a neighborhood is getting to come back and use that comp in your next sale!
by Tom | Jun 1, 2008 | Bathrooms, Craftsman Bungalow, Framing, Tubs and Showers
This week I spent a lot of time sanding and mudding to get the drywall ready for texture. After taping the baseboards and door casings off yesterday I sprayed a light pattern of orange peel texture with my hopper on the entire interior of the house, walls and ceiling.
We’re ready tomorrow to go in there and spray a good coat of primer on everything and then spray the ceilings only with flat white ceiling paint. I’ll use a brush and roller for all the rest of the interior walls a little later in the project.
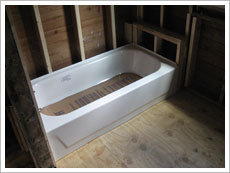
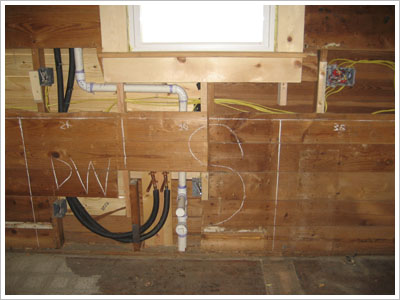
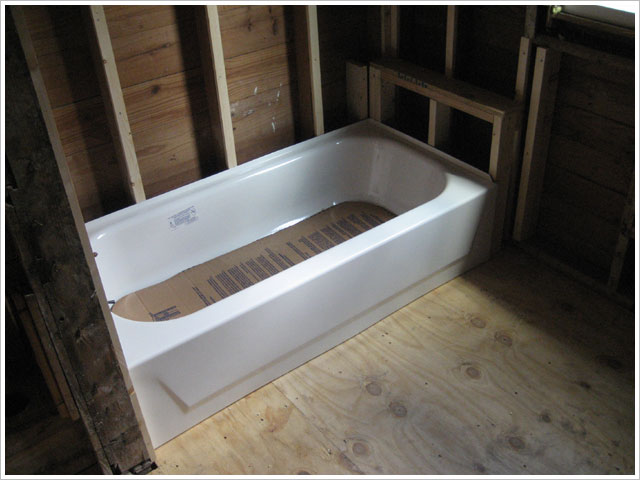
I also put a lot of work into the bathroom this week. I started out by putting in a new plywood subfloor and a toilet ring. I also framed out a box for the new jetted tub.
This tub requires a designated 110 circuit so we pulled a wire from under the house into the tub box. Code calls for a GFI protection but you don’t want to use a receptacle underneath the tub where the motor plugs in becuase if it trips you won’t be able to get in there to reset it.
We’ll obtain our protection from a GFCI breaker on the panel instead. I had to go under the house to remove the old lead drum trap and change the system over to PVC with a P-trap.
After tying in the plumbing I mixed up 2 bags of mortar and dumped it into the tub box as a big blob. I then dropped in the tub and while doing so I pushed down gently and it squeezed the mortar bed out to a perfect thickness to fill the gap between the bottom of the tub and the subfloor.
This is really important so when you’re standing in the tub and using it as a shower the bottom won’t flex and all the weight of the water and the person isn’t supported by the outer rim of the tub. This is the correct way to install a jetted tub as per the manufacturer’s instructions.
I’ve seen other people use spray foam as a fill but it doesn’t provide as much support. I dropped in the tub unit and used hardibacker for the surround as well as the floor. For the walls in the bathroom I used blue board tile backer since these aren’t in direct wet areas. Now the bathroom is completely ready for tile.


