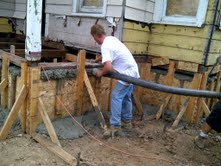
I’m getting close to the stem wall pour, the guys worked on the forms all week. Inside the forms we hung 12″ j-bolts that will anchor the house to the foundation once it’s poured. Then we laid 4 rows of #5 rebar and secured it to the screw jacks with tie wire. Anywhere the stem wall is more than 24″ high we will hang vertical rebar 24″ on center as well. This is over and above local building codes but worth the extra expense. All the load from the weight of a house is carried on the exterior walls and down to the footings, it’s totally different for me here doing this as in Texas when building a pier and beam room addition you don’t do this perimeter foundation. The plastic sheeting you see is to keep the concrete from blowing out the back once we pump it into the form cavity. All that’s left now is to set the outside forms, we’ll cut windows along the top of the outside so we can pump the concrete in.
I also got the new master suite all framed up, it’s 375 s.f. and includes 9′ ceilings, a big bathroom that fits dual vanities, soaker tub, stand up shower and water closet. There’s also a generous sized walk in closet and french doors off the back. While the framers were there I also had them raise the kitchen ceiling, move some closets around upstairs and add some really cool tray ceilings in the living room and dining room that I’ll use for my mechanicals and central heat ducting to get upstairs. We also added fire blocking to the entire house since I had all the walls open. I bumped up the room addition ceiling joist size to 2×8 and the roof rafters to 2×10 just to ensure the inspector likes what he sees and I get off on the right foot with him. It’s coming out pretty trick, I’m excited about how easy it was to really modernize this 100-year-old floor plan and am confident it’s going to help sell the house. The prices I’m nailing down for mechanicals on this 2000 s.f. house so far are as follows: Complete electrical with new 200 amp service: $5300. Complete plumbing with copper supply, gas lines and all new ABS waste lines: $5000. Complete new central heat system with new furnace and ducting: $1800. New roof: $2000 labor. These are killer prices and all from legal, licensed sub contractors, I couldn’t have done better in Texas. Thanks to everyone locally who has sent me referrals, after this huge project I’ll have a great team ready for any size project!
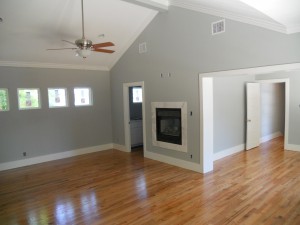
We ended up going with Golden Pecan floor stain after trying about 8 different stain color samples. After applying the stain we used 2 coats of semi gloss polyurethane (buffing between coats) and mixed in a little Colonial Maple color to tint it even more. I’m really happy with the way they came out, only new wood can look like this so I’m sure the future owner will appreciate it. In the original part of the house the floors are almost 100 years old so they aren’t this perfect of course but a little distress look is appropriate due to the style house and age. As I was saying before I didn’t want to stain the whole house dark just to hide a few imperfections up front and not get to appreciate all this new red oak in the addition.
Here’s a sneak peek at the master bath. As you can see the glass company showed up this week between floor coats and installed the custom frame-less glass for the shower. The door is 7 feet high with chrome hardware that matches the other interior doors, I always design them a little higher than the shower-head. The fixed glass picture window is suspended in the tile opening with more beautiful chrome hardware. Most builders put the clamps on either the tops or sides but I did something a little different by having 1 clamp on all 4 sides. This custom frame-less glass ran $1300.00 installed. My plumber is coming this week to set the spa tub and fixtures, with my last contractor I would have done this myself but the new plumber doesn’t want me to touch anything so he can give the future homeowner a 2-year warranty, cool with me, less work. Check out how the new wood even runs through the bathroom and into the walk-in closet, this is a killer upscale look and blows away any kind of floor tile I could have used.
I recently heard that 30% of Americans (myself included) don’t park in their garages, they only use them to store junk turning them into basically a drive-in closet. In California people have alot of pride in their cars, detailing businesses flourish with customers paying hundreds of dollars for hand waxing but then again it never rains so it makes sense to keep your car clean. Here in San Antonio we get an average rainfall of about 32 inches compared to 9 in San Diego. Even after a rain you’ll still see puddles a week later because the streets are so bad. With all this rain you’d think that garages would be hugely popular here. It’s not the case however, people would rather enclose their garages for more living space because they don’t go outside anyway as it’s too hot and humid. Plus, their car is going to stay dirty anyway, garage or not, because of the weather and the street conditions.
So, why the hell did I build this garage you’re asking? Our project is going to be priced around the $400k mark in a city where average home proices are around $150k. Theres an unspoken rule that if you are paying $400k in San Antonio you better get a garage. Even if the locals don’t appreciate them most of our buyers are moving in from other states and telling their realtor to do searches for 3/2/2’s so we dont want to miss any potential customers. Once they get used to the SA way of life I’m sure they’ll stop parking in there, their car will be filthy and it’ll be full of crap. Either way these historic houses don’t have much storage so it’ll get used. I designed the 500 s.f. garage to look historic and match the house architecture. I’ll be using “T117 House Siding” again and I’ve left the rafter tails open, included huge 28″ overhanging eves and even a clipped gable roof. There will be a vent under the gable and of course I’ll multi-color it as well to match the house.
House flipping tip of the week: Finding good contractors is a huge key to your success when flipping houses. There are 2 kinds of contractors, General Contractors, or GC’s, and Sub-Contractors. Most investors hire a GC who then brings in his own sub-contractors, oversees all their work and tacks on about 30% to your price.
This works great for people who have little construction knowledge or don’t want to spend the time ordering materials, checking in deliveries, writing checks on Fridays to subs and overseeing work.
My feelings are that most investors are doing this anyway and basically acting as their own GC, so shouldn’t be paying for one. Homeowners these days are even acting as GC to save the 30% and hiring subs themselves while building their new home.
There’s even a national company called U-BuildIt that sets you up with the list of subs for a fee. So, the key to the savings is finding the subs and managing them yourself. (more)
Another good tip for flipping is the get a mentor who can help you and you will fast track your career.
We have now passed all rough-in inspections for the Target House. Tomorrow I’ve called for the next inspection which is for the framing. This inspection is on the whole house permit that the owner or GC pulls. When inspecting framing they look for placement and relationship to all the trades’ fixtures as well as other items like foaming the windows and fire blocking the holes from the electrical wires. Once I pass framing I’ll be free to hang the insulation this week. Only after the City then inspects the insulation job can I hang the drywall. I’ll order it for a late week delivery and we’ll start hanging right after the insulation inspection.
Today I had the whole house sprayed for wood destroying insects (termites). This is the perfect opportunity to spray as the walls are all opened up. I don’t know any other rehabbers doing this, it’s a little more expensive but worth its weight in gold to the future homeowners and the life of this killer old house. The residue stays in the walls for up to 10 years and also kills roaches and other bugs who normally use those highways to enter your house. These old historic homes have tongue and groove wood all over the walls and ceilings so it’s a party if termites get in. I’ve heard of some people sprinkling seven dust in the wall cavities before drywalling but as you can see in the video we soaked everything to the hilt.
Here’s how my 900+ s.f. addition came out over at The Target House. The floorplan is flowing nicely even with the change in elevation to the master suite. That hallway is actually 46″ wide even though I mistakenly tell you 42″ in the video so its not cramped at all. As you can see I basically had to rebuild the entire floor in that back room this week because it was originally a screened-in porch so it sloped down for drainage. It’s all straight now and lines up perfectly with the new addition. As far as sales go, we are getting great showings at The Neighbors House, Spring is here, the weather is beautiful, flowers are planted and there is a strong smell of home buyer in the air: ).