In any other state I could have been all the way up to the second floor framing this week but here in San Diego the City inspector wants to see your floor system framed up first, verify the hold downs and framing, then come back and inspect the underfloor plumbing lines, then come back again and inspect the insulation. You lose a day in between each inspection so this would have dragged out for a week. It really makes sense to do it this way because its easier to do the under house plumbing now, rather than crawling under the house later to do it but the reason the inspector wants it done in this order really just comes down to the fact that he’s not crawling under the house no matter what.
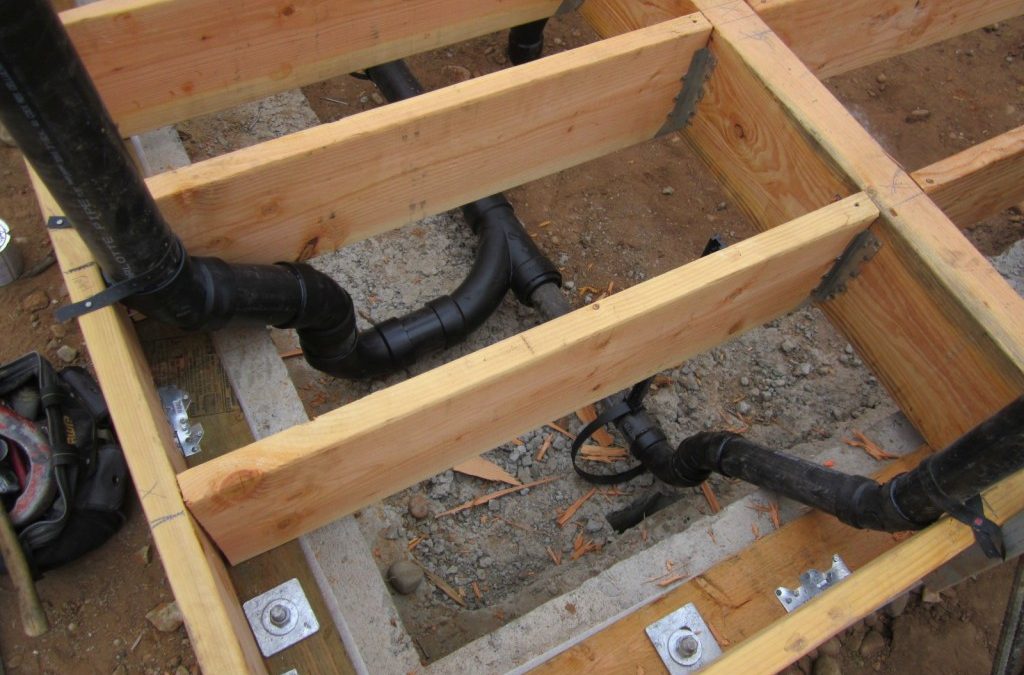
After framing up the floor system in a day I had my plumber come and set all the under floor ABS waste lines and fill them again with water to make sure there’s no leaks. Lastly the insulation got dropped in on nylon netting we strung between the floor joists. Its a real trick way to insulate the floor on a new construction raised foundation house. I’ve used wires in the past but the insulation always ends up falling down in some places. Once we pass then we just sheet over it. The threaded rod you see sticking up is for the Simpson HDU hold downs that secure 4X6 posts in the exterior walls all the way down into the concrete foundation footing. This is to securely hold the structure on the foundation in case of an earthquake and they are strategically placed in shear wall areas by the engineer on the plans.
Of course I had a better idea. I tried to speed things up by only calling once to have him come do all 3 inspections simultaneously. I had the insulation pulled back along the sides so he could see the framing, plumbing and hold downs thinking this would be fine, unfortunately he wasn’t really that excited about my idea. My regular inspector didn’t show up but rather a Senior Inspector who happens to be very thorough and whom I’ve dealt with before. He almost gave me the signature required in order for me to sheet the floor with CDX and start putting walls up, but he found one plumbing fitting that he said wasn’t correct so he’s coming back Monday after we change it and also wants me to pull more of the insulation back for a better look. Uggghhh. My plumber swears the fitting he used is allowed, its a Sanitee on its back for a 2″ vent pipe. The inspector wanted a sweep which is weird cause its only a vent, not a waste line. Who knows but I wasn’t going to argue with him, I told him he’s the boss but I kinda want to check the code book now though just out of curiosity.
The senior inspector asked who the general contractor was. Hesitantly, I told him I was an owner/builder. Seeming surprised he said it looked better than most jobs and kept congratulating me on doing such good work. Maybe he was just trying to make me feel better because he could see it on my face that I was bummed not being able to start putting up the walls. He knew I was totally ready to go, as he was doing his inspection I received the first delivery of truss material for the second story. I should pass on Monday and we’ll be back in action. I’m a Chevy guy but how cool is this early Ford extra cab delivery truck from La Mesa Lumber?
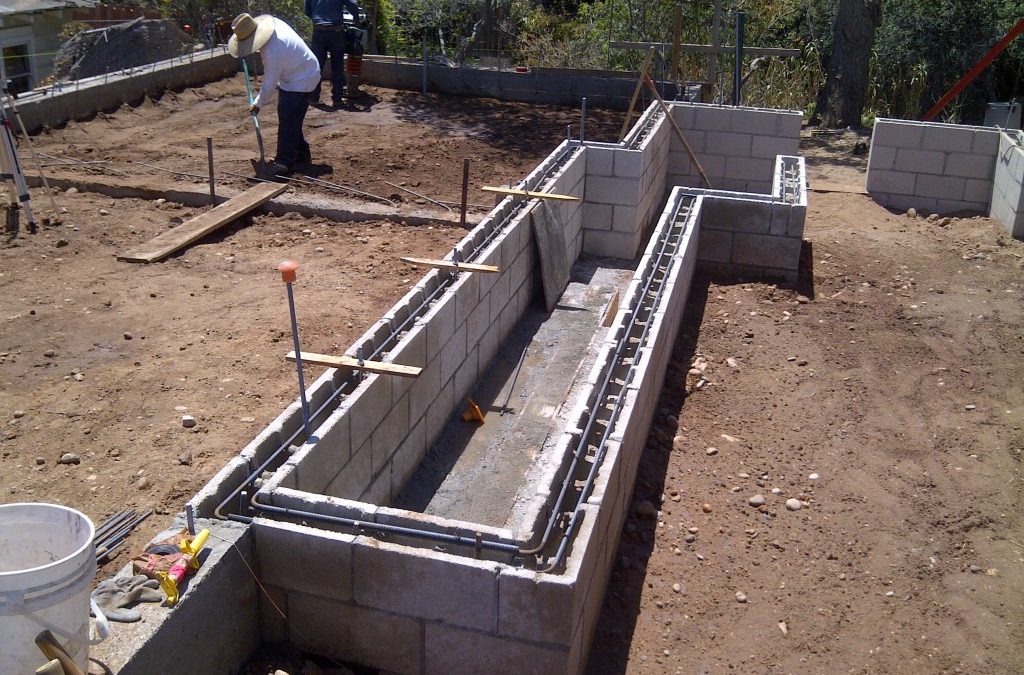
Just a little more concrete last week and now its time for framing. The first thing I did was have a third party inspector come and sign off on the construction of my block stem wall. He personally witnessed the mortar mixture and rebar placement inside. Then I called the City inspector also to sign off on it once it was completed. The reason for the extra stemwall is because the outside wall is the balloon wall and the inside wall supports the load from the upstairs floor joists. The stairs go up in between these two foundation walls and each has its own footing.
When the truck came to fill it up we also had to have the third party “special inspector” on site to take a sample of the mixture that came out of the truck. He packaged it into a small box that he’ll send to a lab for analysis. They test part of it at 7 days and the balance at 28 days for compression strength by putting it in a crushing machine. Inside the stem wall I used 2500 PSI grout mix. I only normally use big rock but this is the only place that its o.k. to use the pea gravel mix. I would never use it in a concrete footing , foundation or driveway. The cost for the 2 trips from the special inspector and the lab test was about 500 bucks. I don’t know what would happen if the lab discovered I got a bad batch from the concrete company, probably make me tear down the wall and start over. I’d rather know now though before I move in that’s for sure!
Next I poured the garage floor. First I rented a compaction machine for the dirt, then put down plastic moisture barrier, topped it with 3-4 inches of manufactured sand and then my #4 rebar 18″ on center tied into the perimeter footing as the plans called for. Once the City came and inspected it we just backed the truck right up to it and poured 7 more yards of 3000 PSI 3/4″ concrete. Once again you’ll see a lot of guys using pea gravel mix but its not nearly as good and tends to crack faster. The larger the rock size in concrete the better. I’m ready for framing now and getting material price quotes from Home Depot, Lowes and Dixieline. Hopefully we’ll be starting on the floor system by mid week if I can get a quick delivery, the framers are anxious and cant wait to get started. I’ll order my custom Milgard windows and exterior doors this week as week so they will arrive about the same time we are done with framing.
Friday was a great day, after all those weeks of digging, removing dirt, building forms and setting rebar we finally got to fill ‘er up. My South Park Modern Craftsman is finally coming out of the ground. It took a little more mud than I expected because of the 6 foot deep footing at the rear of the garage. 6 trucks delivered a total of 49.5 yards of 3000 PSI “big rock” concrete and we used a pump truck to get it into the forms. The whole process took about 4 hours and then the next day we ripped off all the wood forms and started stacking the CMU block. In any area where the stem wall was higher than 30″ I stepped down the forms so I could stack block.
When you use block for any portion, the City requires a special inspection by a third party inspector. He comes by periodically to check mortar mix, rebar placement and then finally the grout mix that you fill the walls with. Once we get all the block stacked and filled we’ll move right into pouring the garage floor, and then removing all the extra dirt and doing more minor grading to get ready for the framing material delivery which we’ll drop in the driveway location. Once we get ready I think its only going to only take 2 weeks to frame her up.
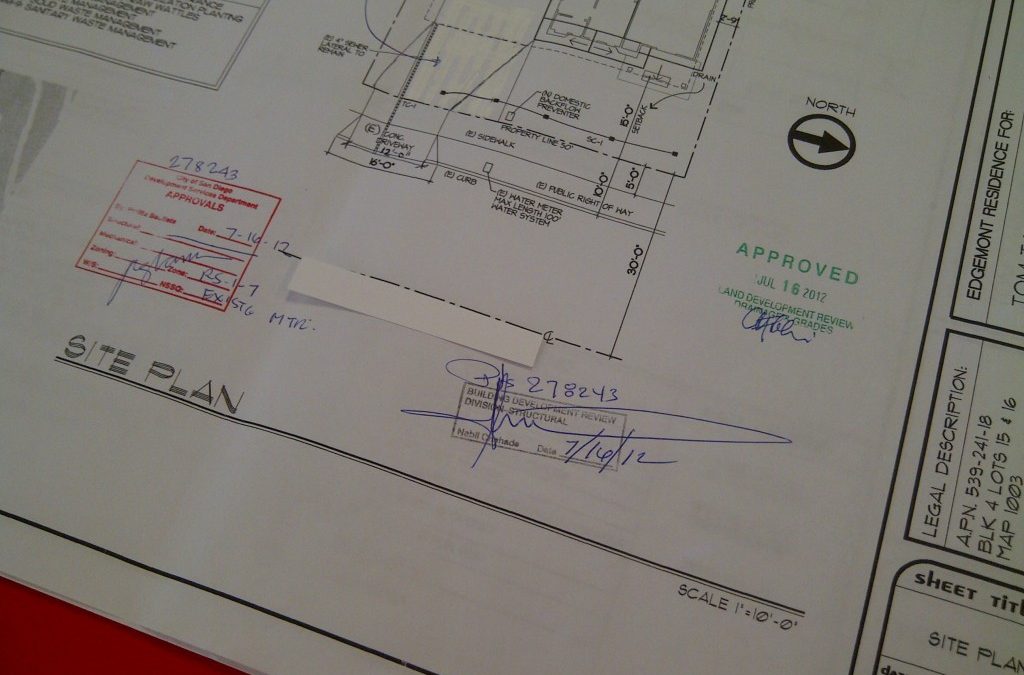
This Monday, July 16, I finally got approval stamps on my plans. As you might remember I had a huge setback and changed the whole house design around and had to start over. In this go round, it only took 2 rounds of changes on the new plans. I paid an extra $1500 bucks for the expedite plan check which guarantee’s a 8 business day turn-around. Had I not coughed up this extra fee it would take a month to get through the structural department because they are so backed up. There were a lot of minor changes to the plans that the City asked for, these requests are called “cycle issues.” Once you change your plans to reflect their instructions, then you go down and resubmit which means basically drop them off for another 8 business days. So I waited the first 8 days, changed them once and dropped them back off, waited another 8 business days and then we were so close that they allowed us to go “over the counter” which means that you make appointments with the structural, engineering and combined review departments and show that you’ve made the changes and they stamp them on the spot. Its pretty interesting and way different than a remodel or room addition.
Everyone has been asking about the crazy fees they gouge you for here in California. Its no secret the City is almost bankrupt but I know I did my part this week when we paid for the permit fee. Yes folks, its $3.20/sf Just for the School District impact fees. They figure you are adding more kids to the neighborhood I guess. I could have got a credit for the 880 s.f. old structure that was torn down but only if it was occupied 2 of the previous 3 years before demo and if the new development commences within 4 years from the demo date. Unfortunately my lot had a house that was torn down in 2005. Total permit fees with plan check and impact fees for this 1850 s.f. home were $24,956.00 or $13.48 /sf. The City of San Diego put a value on this project of $237,747.00 to calculate their fees, not sure how they got this number but it comes to $128.51/s.f. Maybe its the average that most people would pay to build it. Permit fees would have been even higher had I not already had the water meter and sewer lateral so I guess I cant complain. I think these fees are a bit excessive, no wonder nobody is building new homes in California. They tacked on an extra $1,000 Recycling Deposit also, if I show them receipts from the landfill and prove that I recycled at least 50% of the construction mess, I get it back. FYI, The school impact fees also apply for any room addition over 499 s.f. in San Diego in case you are considering remodeling.
So you are probably wondering why I started working on the foundation before I had stamps, in theory you are not suppose to, but I felt confident enough after seeing the first request for changes that there were no gray areas with the City with regards to the footprint, setbacks or structural. After all, we only dug trenches and made forms but you’re really not suppose to start. I gained 3 weeks by taking the chance but was nervous the whole time someone would complain.
I had 2 inspections this week, the first was for the plumbing underground, this is the sewer lateral that brings 2 waste lines into the structure. You have to run the ABS through the footing, sleeve-ing and wrapping it. The trenches were dug and I laid the waste lines in pea gravel.
The big inspection was the foundation footing inspection, I passed it today. The inspector verified that all rebar placement and sizing is per plans and that the important Simpson hold down hardware is the right size and in the right location. We used 4,040 linear feet of rebar for this foundation. Rebar and wood forming materials came to around $4,500.00. I’m all clear now for the first concrete pour for the footings and stem wall, I have 30+ yards of 3000 psi 3/4″ “big rock” coming tomorrow so we are officially off to the races!
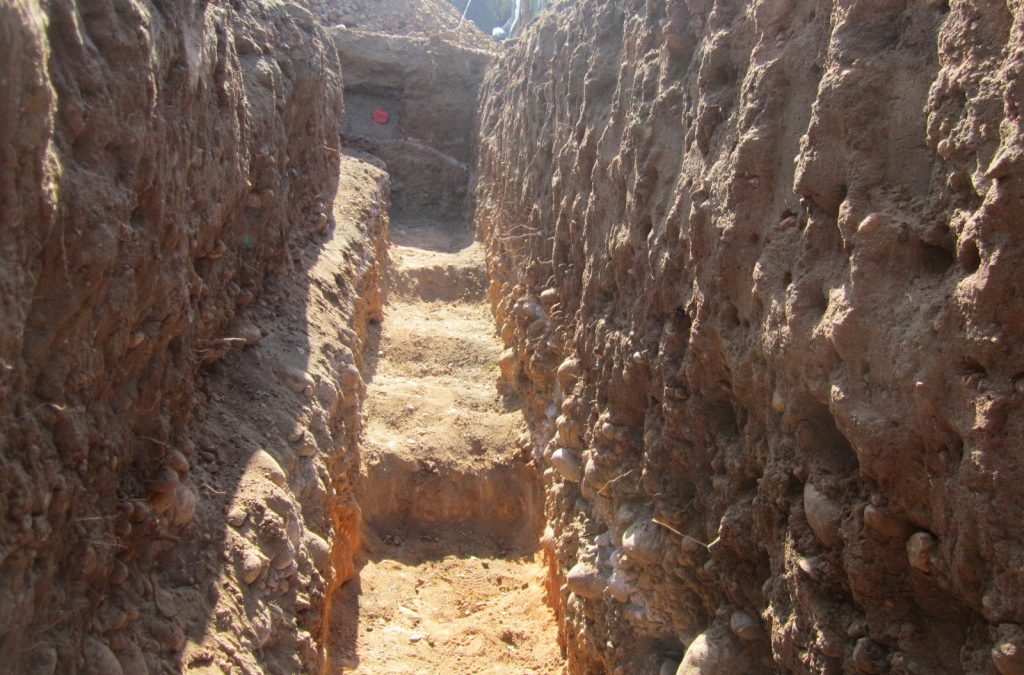
While the City of San Diego only requires footings for a 2 story house to be 18 inches deep, went close to 5 feet in some spots. You can see here that the bottom of all my trenches remain level with steps, so gravity doesn’t take our house down the canyon. The reason the footing trenches vary in depth is due to the distance to reach native soils. No lot is perfect, in our case with this house one main challenge besides having the rear 30% unusable due to the canyon is unstable fill that’s been there for years. The only alternative to digging all the way down to native soils would be to have the whole site compacted to 90%. I could have done a slab on grade at that point but at the end of the day I felt this way will be the most structurally sound. While these deep footings will eat up expensive concrete at $95/yard, a slab on grade foundation would still need deepened grade beams and since the lot slopes down towards the back, the foundation is 3 feet high and end up being about the same amount of concrete. Note the existing 4″ sewer lateral ready to go.
The excavator we rented made quick work of the foundation dig but after the soils engineer came and inspected our footing trenching, he requested us to go farther into the native soils. You can easily see here where the brown, silty cobble fill changes to a rock hard gold color at my spray paint line. This stuff is so hard to dig we used a jackhammer for 3 days to deepen the trenches to satisfy the soils engineer. He’ll now give me a certificate which I’ll hand to the City inspector when he comes to inspect the foundation forms and rebar placement. As previously mentioned, you could roll the dice and not have a soils test but if the City inspector feels there is fill he’ll make you take all the forms apart and get the report anyway. I want to build it right so in my mind this is the only way to do it.
The first step in forming a raised foundation is pulling some control lines from which you can set your exterior forms. We build them all with 2×4’s and OSB, setting the outside of the house footprint first and then starting with hanging the rebar inside. All rebar has to be 3″ away from dirt or forms. Finally after cleaning out and debris that might have fallen into the trenches you then set the inside form. After inspection we’ll pump concrete in from the top.
Once again the City only calls for (4) 1/2″ horizontal rebar inside the foundation with vertical bars 24″ on center. For just a little extra cost I upped the ante to (6) horizontal 5/8″ bars with verticals 16″ on center. Raised foundation houses in California have this exterior stem wall. In the interior of the foot print the load is typically carried by4x6 treated sills that the floor joists rest on. These beams usually sit on posts and piers. My raised foundation design is far superior with one more stem wall running down the middle of the house like a spine. I’ll be using TJI floor joists which will span the whole width of the house without any posts and piers. We’ve fixed so many foundations on old pier and beam bungalows, with this method you’ll also have the convenience of a wide open crawl space to run mechanicals without any posts in the way. A little extra cost but by far a superior design for a raised foundation. Most of the neighbors have stopped by now, its the talk of the street that something is going up on “old man Fred’s” lot. I’ve been extremely respectful to everyone, even buying car washes for neighbors whose cars got dusted out by all the digging. I also rented a construction fence with privacy mesh so no one has to look at the mess all summer. We should be done with the forms mid week and then we’ll get started with the underground plumbing that needs to go in before we pour concrete. Stay tuned, once I get past the undergrounds and pumping this foundation it will get framed up real quick.