Lately I’ve been fielding some great questions privately and have always kinda thought everyone else would benefit from hearing my answers so I’m taking this email public as a test to see how it goes. It’s from Steve Parry, location unknown.
Hi Tom,
First off let me say I love your website. I’ve been following it for a while now and it is the most informative, honest flipping blog I can find.
The reason for the email is I’m a young guy. My dream has always been to flip houses. I went to Columbia university, majored in engineering, minored in business. I work now for a construction management company as a superintendent so I am getting more and more familiar with construction techniques. I have the capital to start but think I need more experience to be anywhere as close to successful as you are.
My question for you is:
1) How did you get started?
and
2) What would you recommend for a guy like me just starting out trying to get the experience to successfully do what you do? Would you get involved, hands on as a superintendent so that later down the road I can act as my own contractor, or as a project manager so that I know the contracts and estimation side of the job or an engineer so I can pull virtually every permit I need and stamp my own drawings?
Any other advice you want to shed on me that maybe you would have done differently if you started over now….feel free to school me.
I know you’re a busy guy so I’ll keep my many questions to just those two.
Thanks for taking the time.
Steve
Thanks for the comments Steve and I’m glad you find inspiration here. It sounds like you have a great start to building the skills you would need to succeed in house flipping. Engineering and business will both help you tons. Having the capital to get started is also something that alot of other guys are not lucky enough to enjoy and they still make it happen using hard money loans, so here’s another strong point you have on your side.
1. I never set out to become a house flipper. Its been told, do what you love and the money will follow. I grew up around tools my whole life and was lucky enough to have a dad (r.i.p.) that took the time to teach me how to use them. He always was taking on remodeling projects around the house although his profession was a computer programmer. I always found myself helping even if it was just cleaning up. At an early age I learned about tools and I think it led me to be more mechanically inclined than other kids later on in life. I’ve had a lifetime of other careers in sales, manufacturing, construction, marketing, real estate and more. I think at some point everything just clicks and you take experiences and skills you’ve learned throughout life and they all come together and your path becomes clear.
Having tool knowledge and odd construction jobs throughout college enabled me to take on my own projects when I first became a homeowner. I was never really taught the right way to do anything (except painting) but rather just jumped in and did it the best I could, figuring it out as I went along. I always say you can learn how to do anything you want by asking questions (at home depot). In addition to growing up around tools with my dad, I was also lucky enough to have a mother who was a Real Estate Broker. I didn’t realize it at the time but I was absorbing everything from my parents that I would be using today being self employed.
Don’t quit your day job to become a house flipper. Build it up slowly and jump in full time after you’ve proved to yourself mentally and financially you can do it. After buying and rehabbing several homes for myself I took on my first official flip while still working a 9-5 job. It was a full gut 3 bedroom, 1 bath house in my neighborhood. You can find a video of it here called The Probate House. It was in my neighborhood and I new the local market like the back of my hand. I spent evenings and weekends rehabbing that house and had all my friends help me. I made more from that house in those 4 months than my job paid all year. To buy that first house I sold all my fun toys to raise the down payment and rehab money. After the first one went so well I rolled straight into 2 more. All 3 I made great money on. I had once heard somewhere If you make money on your first 3 real estate deals then you’ve got it wired. Looking back on it that was a bit naive, but it gave me the courage to quit my job and jump in full time.
2. This is a great question. You see on my site that I do alot of the work myself. This business model is not scalable however, so in theory you want to just oversee everything at some level but be able to delegate the work. Not to say that its not valuable to get your feet wet on the first few deals by doing some of the work if you are capable. There’s nothing like knowing how its suppose to be done, even if you are overseeing it. In todays market its important to produce a good product so dont compromise on quality just so you can learn how to do tile jobs yourself. I found it appealing initially that I could do alot of the work thus saving me tons of money on the rehab budget and hedging my bet for making a profit. This model works, but you’ll never be able to do 10-15 house a a year. Most of the construction knowledge you need revolves around what order to do things in. It’s really not that hard to do a big rehab if you just break it down into steps and hire qualified sub contractors for each step. Being a project manager is great but you probably wont need an engineers designation and if you do rarely need one, you can easily pay a few hundred bucks. You cant do everything yourself and thats one thing I’ve rarely had to use. I’d say being a draftsman would rank very high on the personal skill wish list. Being able to use auto-cad and draw up your own floor plans would definitely aid you down the road. If you have time I would learn this. Just about every house we do now needs floorplan changes and being able to put it all on paper is great. My last recommendation for you is to get your real estate license. Knowledge in this field is just as, or more important, than the construction side. Also, network with other local investors and investment clubs. Its great to surround yourself with like minded people. Be prepared also to hear negative reactions from some friends about your new career idea, its best to not even associate with anyone who expresses negative feelings on this because it could make you second guess your actions. People don’t like to see you make money, especially when they are stuck in their crappy low paying jobs, that they hate, just waiting for the day they are going to get laid off. What I do is not rocket science, anyone who puts their mind to it, and has passion for it, can be successful.
Good luck in your future and thanks for the great questions!
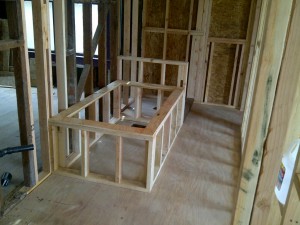
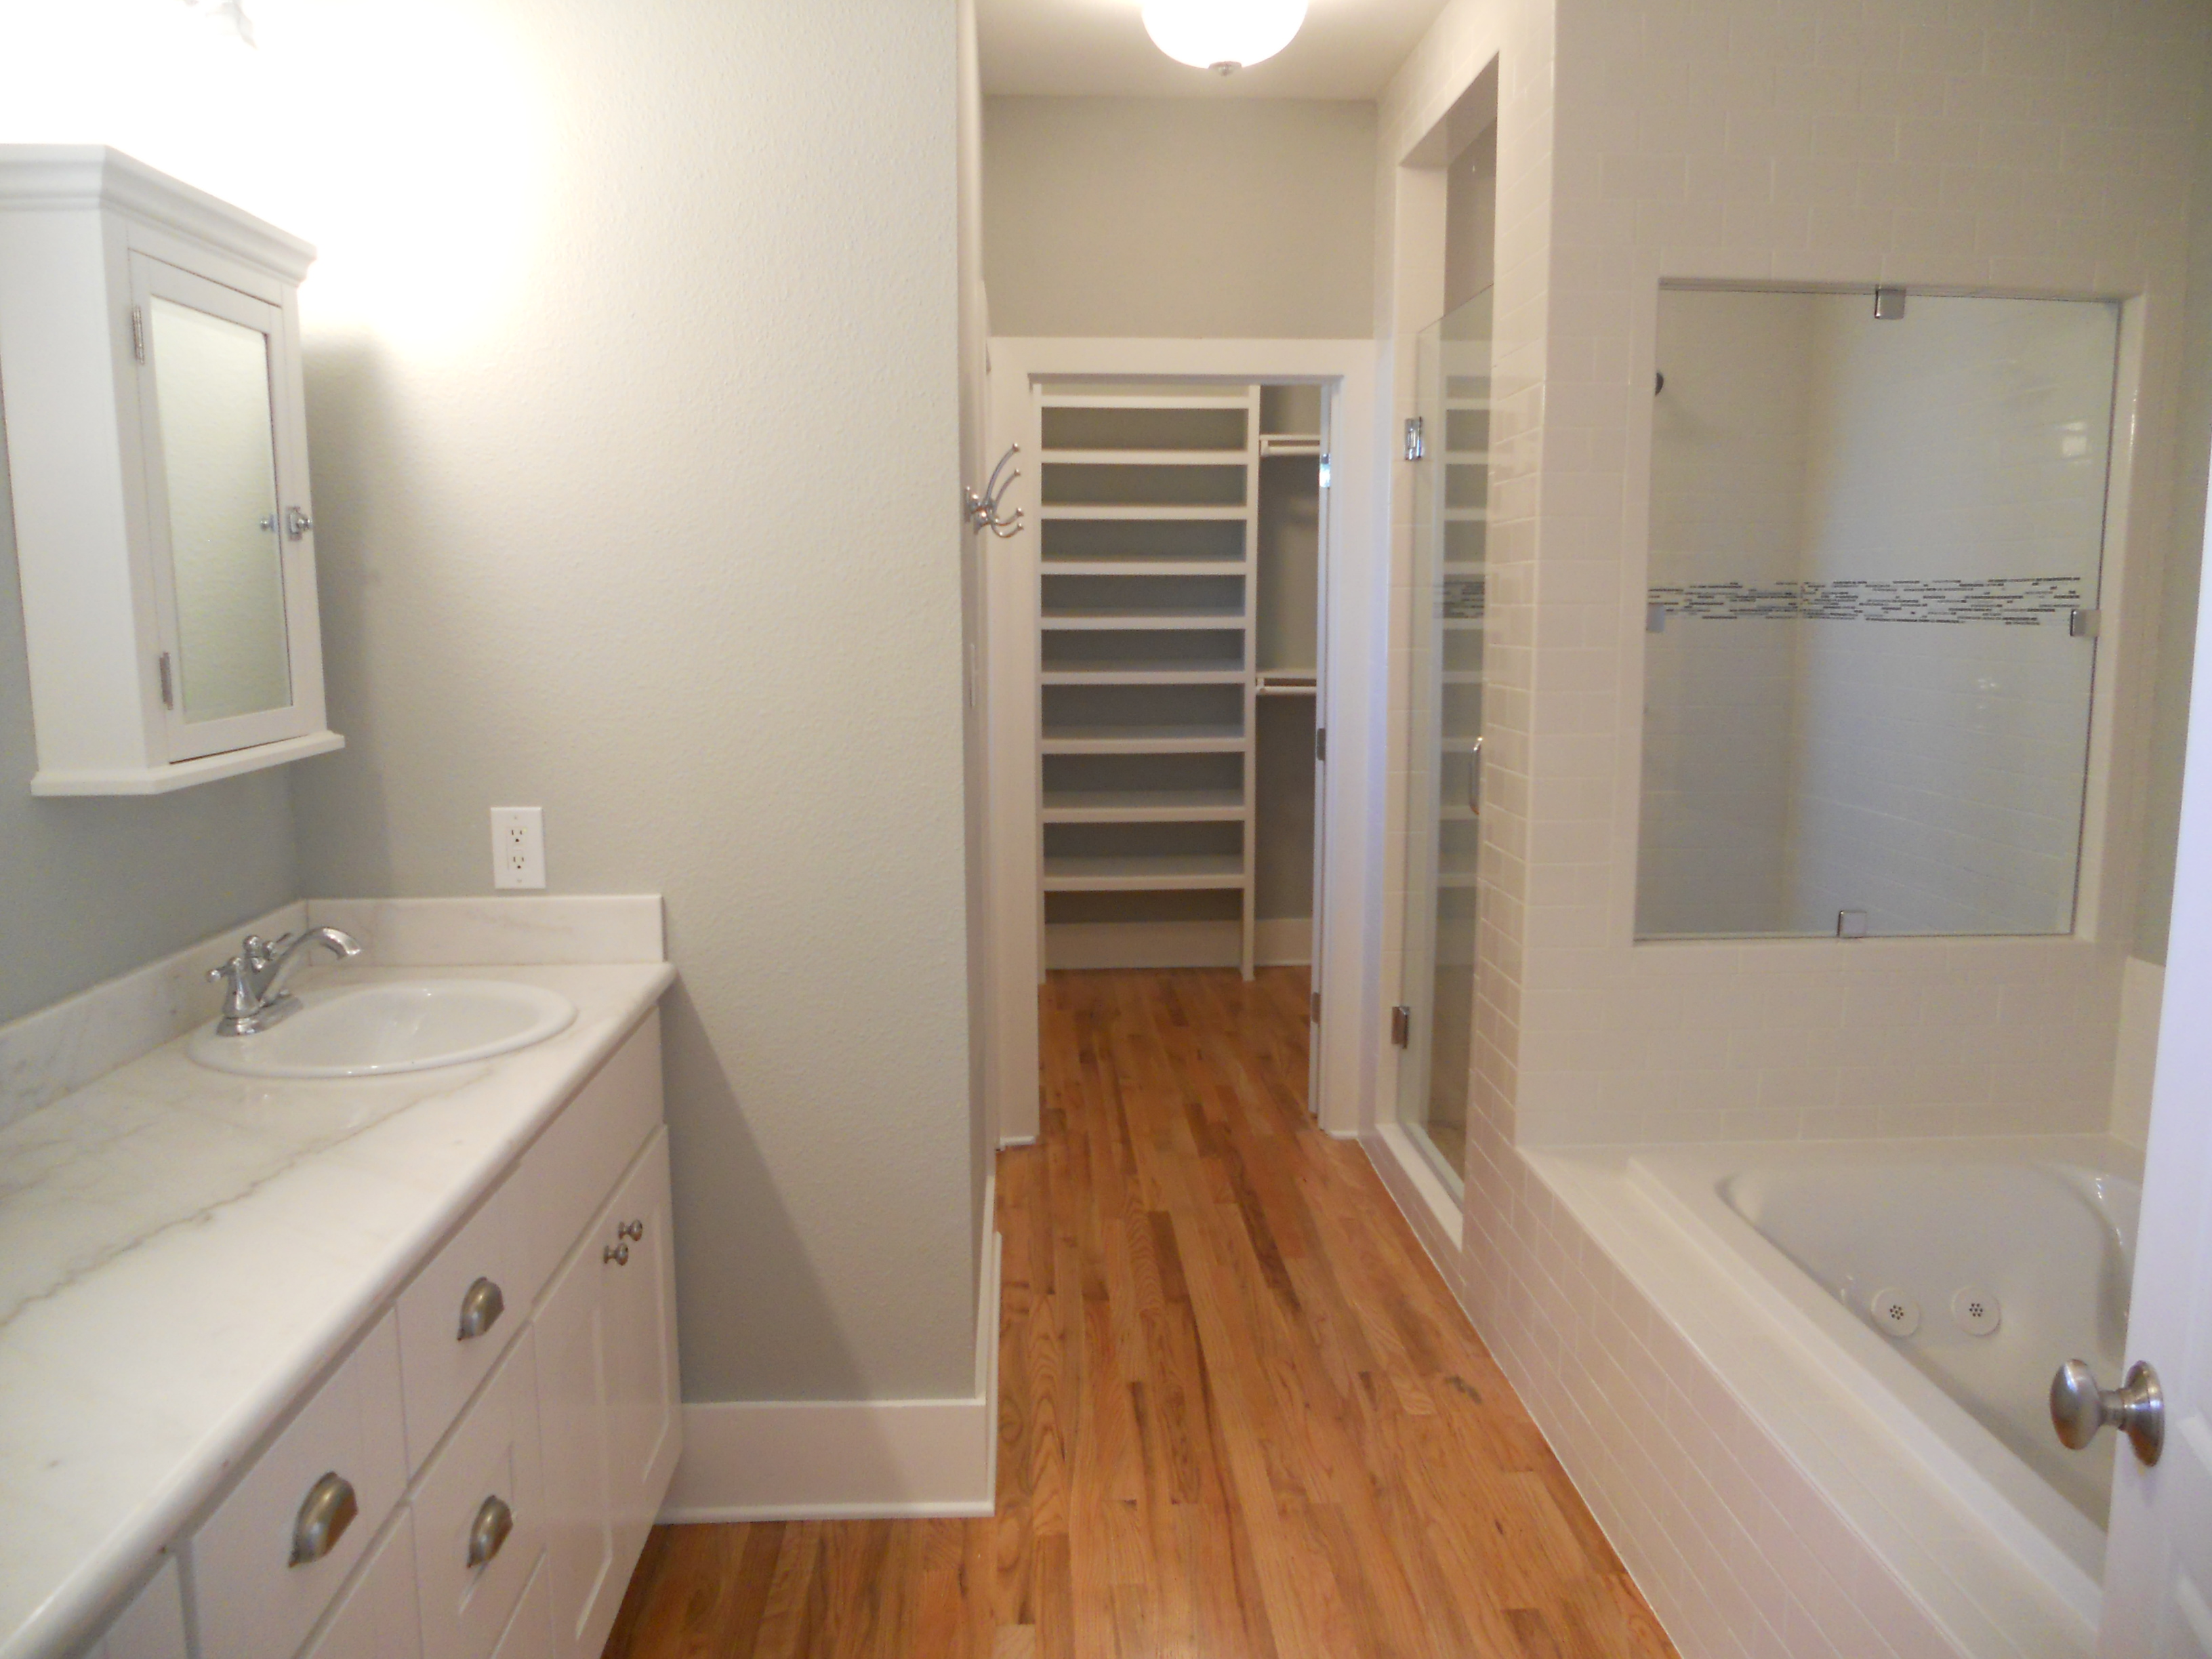
My new master bathroom in The Painted Lady is coming together nicely, it’s generous in size at 6′ x 15.’ Every time I frame up one of these tub boxes for the drop in tub I get a sense of Deja Vu, like seeing an old friend. It seems like just yesterday when I was doing a similar configuration on the Target House project only this time I’m just going with a standard 3′ high pony wall separating the tub and the shower instead of the full wall with the window opening, which will also also keep my tile price down. Every bathroom I design is a bit different, this time I’ve got everything in a line down the left hand wall and then the water closet at the end on the right. You kinda just gottta play with the space and do what works best. I’ve also got the whole right hand wall available for towel bars with this design, I’ve learned this the hard way after doing killer bathrooms and then finding out there no place for towel bars. The door swings in and onto the right hand wall, a 60″ dual vanity is first on the left, then the jacuzzi tub in the middle with a 3′ x 4′ shower at the back. I planned on dropping in a regular soaker tub with no jets to keep the budget down but after pricing them I could get the American Standard Plebe model 32″ x 60″ jetted tub for the same price of $399.00 so it’s a no brainer. There’s a window in the center of the back wall but I’ve got it temporarily sealed now. Natural light is key for bathrooms, ideally I probably would have had another window in the shower and one in the water closet too but I’m trying to stay within budget so I’m forced to pull back in some areas. Code states that if you don’t have an opening window you must have an exhaust fan but I’ll have both.
As you can see we got started roughing in the plumbing this week, I got a great quote of $4800.00 for the complete new system with gas lines, I supply the fixtures. I was also reminded that black ABS is used here in California and not white PVC as in Texas and on the East Coast for the waste lines. I think PVC is better and cheaper but the only upside on ABS is that you don’t have to use primer with the glue. ABS also gets brittle from UV exposure so it’s now common place to paint the roof stacks in California. I still like PVC better, even though it takes more time to install using the primer but I’m sure there’s some tree hugger issue with it so that’s why California uses ABS. After framing I always get the plumber in first before the electrician or hvac sub contractors, it works best because the vent pipes and waste lines are not flexible. I also wait until the plumber is done before putting on the new roof so we don’t have to butcher the new roof for the vent pipe roof jacks. Your roof job comes out far superior if all jacks are in place before install, this trick came with experience. After these waste lines are complete we’ll run the new black pipe gas lines and then finally the copper supply side lines. I’m still going back and forth with the San Diego Historical Review Board, they have made me change 13 items on my plans including window type, siding material, roof type & color and they even want to know the exterior paint colors. Furthermore, they are making me re-stack the exterior brick chimneys even though they’ve been eliminated inside the house. It’s really slowing me down because until I get everything approved from them I cant call for any inspections. As frustrating as it is, I’m stoked to learn exactly what needs to be done to pull off a renovation of this caliber in San Diego so I’ll chalk the delay up to contractor school.
Don’t forget the men and women who died while serving in the American military protecting our great country, this holiday weekend is not just all about beer and barbeques in the park. Have a happy and safe Memorial Day and God Bless our troops!
I’m getting close to the stem wall pour, the guys worked on the forms all week. Inside the forms we hung 12″ j-bolts that will anchor the house to the foundation once it’s poured. Then we laid 4 rows of #5 rebar and secured it to the screw jacks with tie wire. Anywhere the stem wall is more than 24″ high we will hang vertical rebar 24″ on center as well. This is over and above local building codes but worth the extra expense. All the load from the weight of a house is carried on the exterior walls and down to the footings, it’s totally different for me here doing this as in Texas when building a pier and beam room addition you don’t do this perimeter foundation. The plastic sheeting you see is to keep the concrete from blowing out the back once we pump it into the form cavity. All that’s left now is to set the outside forms, we’ll cut windows along the top of the outside so we can pump the concrete in.
I also got the new master suite all framed up, it’s 375 s.f. and includes 9′ ceilings, a big bathroom that fits dual vanities, soaker tub, stand up shower and water closet. There’s also a generous sized walk in closet and french doors off the back. While the framers were there I also had them raise the kitchen ceiling, move some closets around upstairs and add some really cool tray ceilings in the living room and dining room that I’ll use for my mechanicals and central heat ducting to get upstairs. We also added fire blocking to the entire house since I had all the walls open. I bumped up the room addition ceiling joist size to 2×8 and the roof rafters to 2×10 just to ensure the inspector likes what he sees and I get off on the right foot with him. It’s coming out pretty trick, I’m excited about how easy it was to really modernize this 100-year-old floor plan and am confident it’s going to help sell the house. The prices I’m nailing down for mechanicals on this 2000 s.f. house so far are as follows: Complete electrical with new 200 amp service: $5300. Complete plumbing with copper supply, gas lines and all new ABS waste lines: $5000. Complete new central heat system with new furnace and ducting: $1800. New roof: $2000 labor. These are killer prices and all from legal, licensed sub contractors, I couldn’t have done better in Texas. Thanks to everyone locally who has sent me referrals, after this huge project I’ll have a great team ready for any size project!
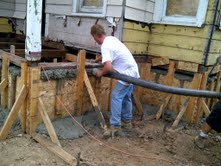
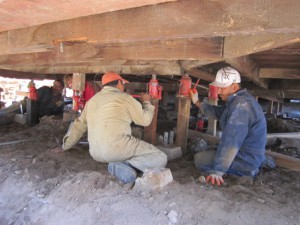
So we finally got started this week on the huge foundation repair in which we are completely leveling the house and adding a new perimeter concrete stem wall. Before this huge stem wall can be formed and poured, we had to level the house and dig the 24″ trench around the sides. The house was only 2″ off at the most so the leveling was easy and we got the entire house within 1/4″ with a digital level going from one side to the other. I hired a foundation guy who has worked for me in the past even though I had a cheaper bid from a new guy, I just felt it’s such an important part of the rehab and I didn’t want to go down that road with a new sub contractor, especially on my first project back in San Diego. The only downside was I had to wait for him to finish another job so it slowed me down a bit. I’m not sure that I would have wanted to be under this huge house with jacks on a Friday the 13th! The next step now will be to set all the wood forms for the stem wall and tie all the rebar inside per building code.
My sub contractor has been doing foundations for over 25 years so he’s got cool little tricks to make things easier for himself. I always enjoy learning these little tidbits from a true experienced professional in their field. As you can see here he’s got the outside of my house sitting on “sacrificial homemade screw jacks” we made out of 3/4″ galvanized pipe with 5/8″ all-thread inside and nuts and washers for the adjustments. Once everything is level he uses these jacks to hang the rebar on, and they’ll actually remain inside the new 8″ wide concrete stem wall permanently. Inside the trench they are sitting on small 8″ pier blocks, additionally he’ll hang the j-bolts from the new treated bottom plates so the house will be anchored to the new stem wall once its poured. It’s looks crazy to see this huge, heavy house sitting on these skinny legs but most of the weight is actually on the beams underneath a short distance away. Hopefully by the end of this week we’ll have the forms built and new foundation poured so we can get on to the framing. After the framing I’ll do the roof, plumbing, hvac and electric. Everyone is ready to go for these trades so stay tuned as things shall move along a little faster soon. I pulled off some of the Sears metal siding that’s probably been on the house since the 70’s and as I guessed, the original 1909 ship lap wood was in perfect preserved condition with only one coat of faded yellow paint. I’m pretty stoked as this could have gone either way with what I was going to find under there. On a side note, I had to rent a temporary construction fence this week to keep out the local kids who’ve evidently adopted the house as their local hang out at night. Every morning I’ve arrived to small surprises such as spilled ice cream, candy and even an egging. While nothings been stolen, construction sites are just not safe places to play so for the first time I’ve had to go on total lock down. This flimsy fence wouldn’t have kept me out 30 years ago but it gives me a little more piece of mind now knowing it’s not wide open.
After hearing all the horror stories about how hard it is to work with the City of San Diego with regards to permitting your rehab project I have to say that it really isn’t that bad. After designing my floorplan on graph paper I hired a draftsman to put it together for me. Since my company is the owner of the house I’m able to pull an owner/builder “Combo Permit” myself without being a licensed GC.
I actually found my draftsman’s number on a bandit sign believe it or not, and he’s doing drafting work while putting himself through architecture school downtown. A real smart young guy and his price was great at $700 for a full set of plans showing all mechanicals, framing, foundation, connections, elevations and it even included him to accompany me downtown to submit the plans for approval. It’s always good to have your architect go with you because sometimes they let you make changes on the spot. Here’s my boy making changes to the 3 sets of plans during our appointment.
In order to submit the plans I had to provide 3 complete sets, the County building records and 4 photos of the house, one from each side as well as the jpeg images on disc. Once you arrive downtown you check in with the receptionist and tell them you are there for an over-the-counter permit and plan check. They do take appointments but I opted to just go early in the morning and wait as they open at 7:30.
First you get sent to a preliminary desk that makes sure you have everything you need, then they send you across the building to wait for plan checking. The plan checking is very intensive and I found it to be completely opposite than in Texas. Here they look at every little detail, framing connections and sizes, mechanical placement, setbacks, elevations, demo plans, structural, and even smoke alarm/CO2 placement.
Additionally, there are all these other disclosures you have to show on your plans, you even have to designate trash areas, concrete clean out areas and account for storm water run off with regards to keeping your debris on your lot in case of a downpour. In Texas to the contrary, the City didn’t even want to look at the plans but rather left the responsibility up to the inspectors as they went through for rough-in and final inspections to make sure everything is correct.
It’s a little more red tape up front here but at the end of the day its easier to build it once you have such detailed plans for all your subcontractors to refer to. All in all, we had a great experience with our plan checker and even learned that we can request her in the future if we want to. On the second visit downtown we got stamps on the plans showing approval but now we have to wait the mandatory 10-day historical department review.
The only item on my plans that’s still unclear is with regards to what type of siding they are going to request for the new rear portion of the house. Total cost for the permitting and plan check was about $2700. A far cry from what would have cost $300 in San Antonio.
While we wait for the historical department approval I’ll have my foundation guy start doing some prep work so we are ready to start leveling the house the day we get the permit. With the arrival of dumpster #4 yesterday, all of the big demo work is done minus pulling nails and some small framing stuff which we’ll do at the time I frame the master suite.
I’m still spending a lot of time getting bids from sub contractors, its always one of the most important parts of any project but once I get my team in place on this first project, then I can just improve from there. It’s a lot of work acting as your own GC and now I’m essentially starting over without all my valuable San Antonio contacts but with a good team of subs I’ll be able to really stretch my budget thus enabling me to compete in this competitive market.


