
Not Just a Big Box
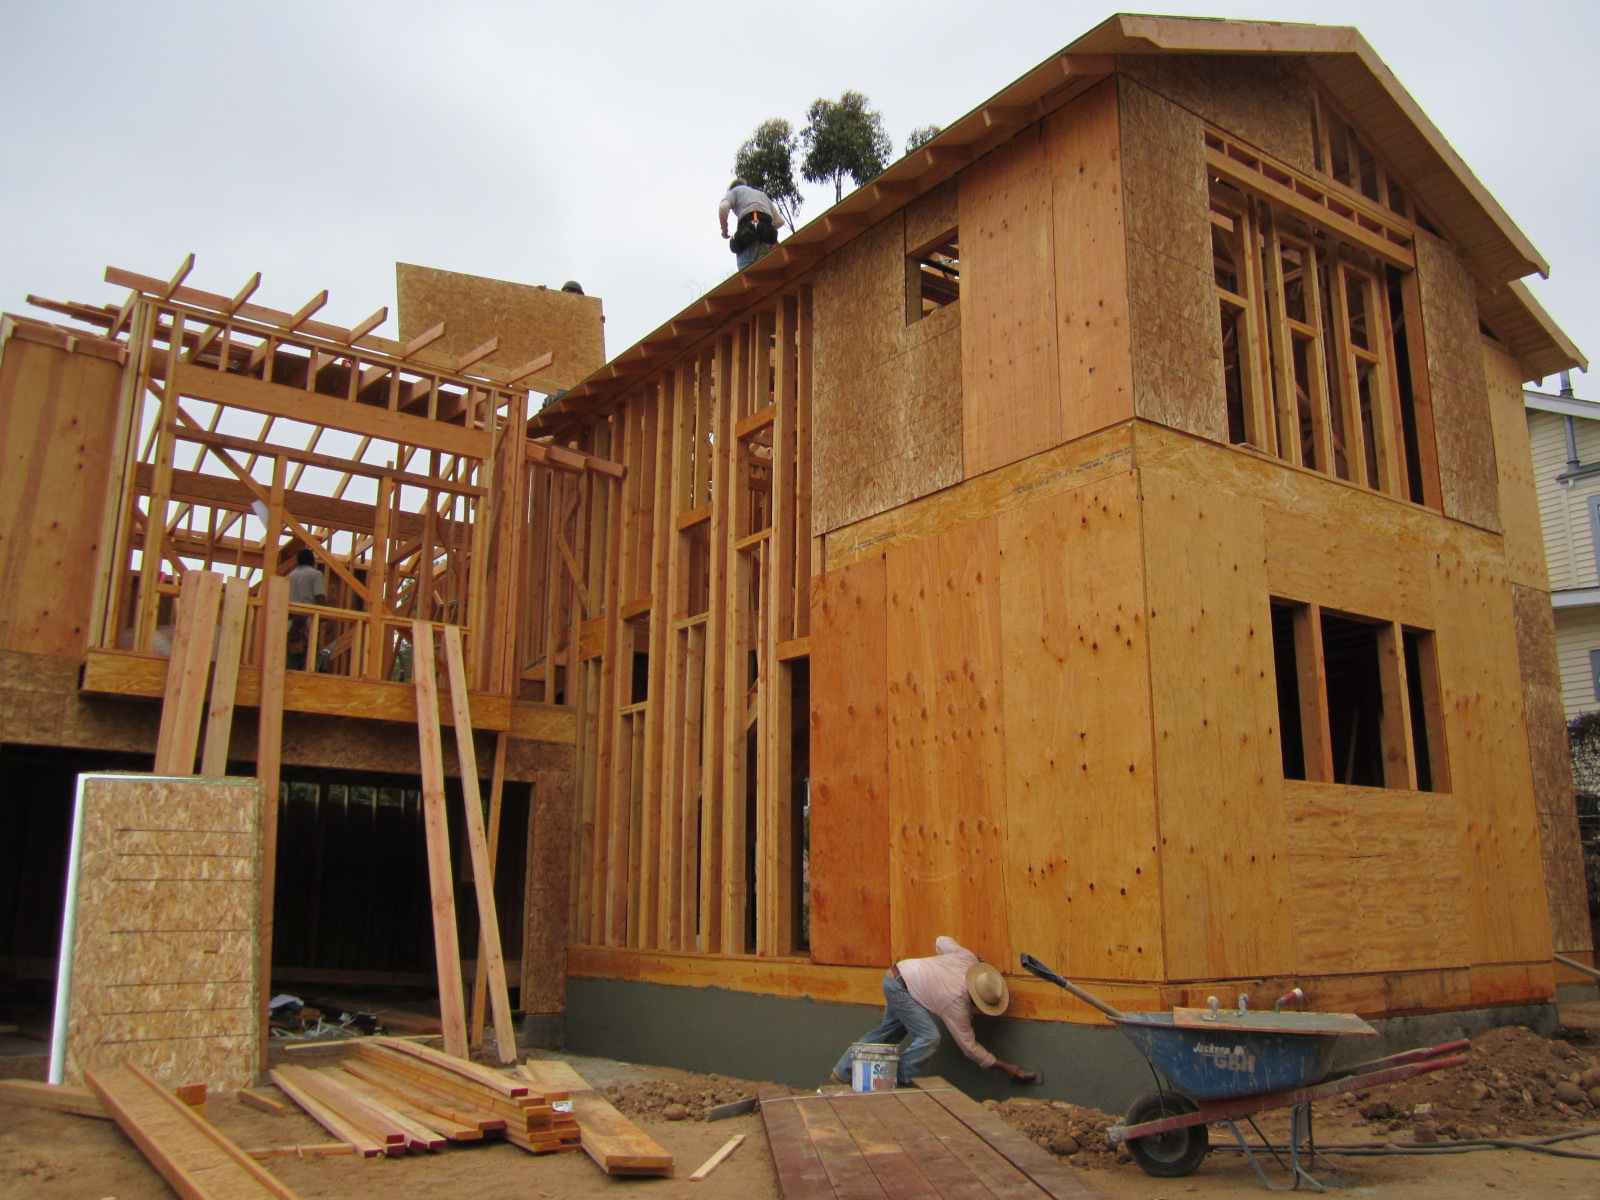
Week 3 got us pretty close to being done with the rough framing on the Modern Bungalow. We have a lot of features and angles with this house, its not just a big box so its taking a little longer than originally planned but well worth it. You can see we got the trusses up and the roof is almost completely sheeted. I left the rafter tails open with no facia board to replicate the craftsman bungalow style. The barge rafter also has a nice detail to add some interest.
The trusses were a breeze and went up really fast, but things slowed down we moved to the conventional “stick” framing of the roof line for the master suite above the garage. There are 3 more big parallam beams up there that allow us some really fun and unique ceiling angles, I’ll save that one to show you in the walk through video.

Under the eaves I used 2×6 tongue and groove on the 18″ rafter tails. It’s a great detail that many guys skip because it adds extra cost but its the right way to do open rafter tails and really also mimics the craftsman style. There are going to be several prominent Modern elements also to the home design, so I thought it was important to have as many period details alongside them to balance the blend.

For the roof sheathing I used OSB with a Tech Shield radiant barrier on the under side. It cost about 2 bucks more per sheet but it will be another huge energy saving feature of the home and save money on electric bills. Keeping your attic cool, and well ventilated is key to saving energy as we learned while building in Texas. This product blocks 97% of the radiant heat from entering through your roof sheathing.
Adding this radiant barrier will reduce attic temperatures by 30 degrees and result in a 17% savings in cooling costs. Before putting the roof on I have to get the nail spacing inspected by the City. You have to have a big ladder available but I don’t see this guy climbing up there its so high, it’ll be fun to see what he does.
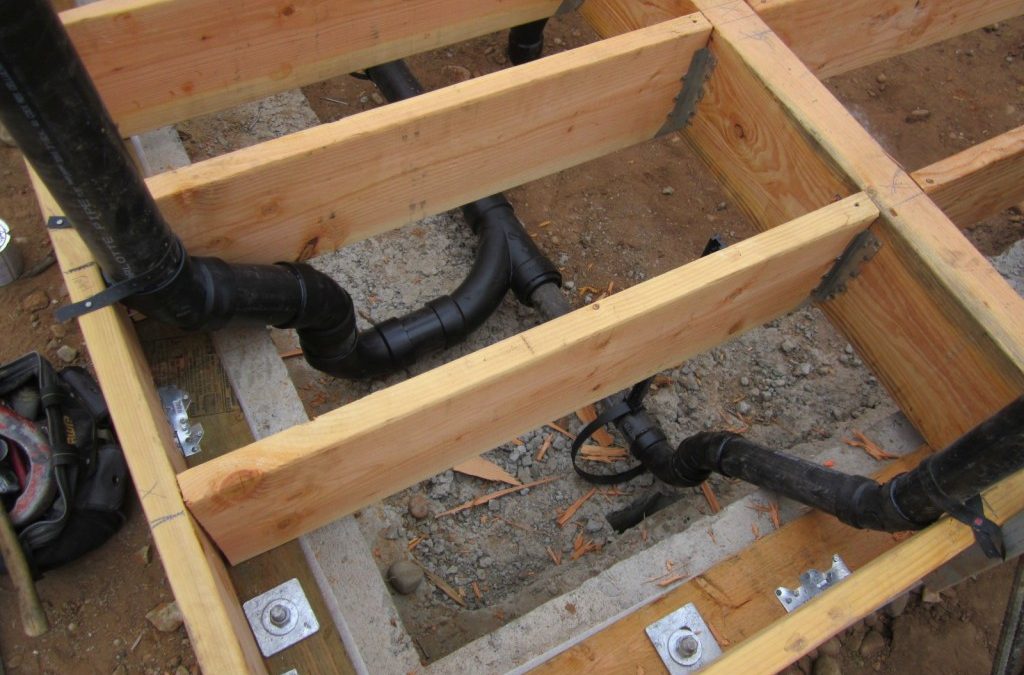
My plumber got a great start too working alongside the framers, all the ABS waste lines and black iron pipe gas lines are done. Everything inside is real close and we even got the stairs finished.
The electrician and HVAC sub contractors can also start once all rough framing is totally done. There’s a cool new construction project in Encinitas called The Leucadia Collection I want to check out, similar idea to what I’m doing. We might drive by this weekend and see if they’ve started framing or have a model home up.
Modern Bungalow Framing

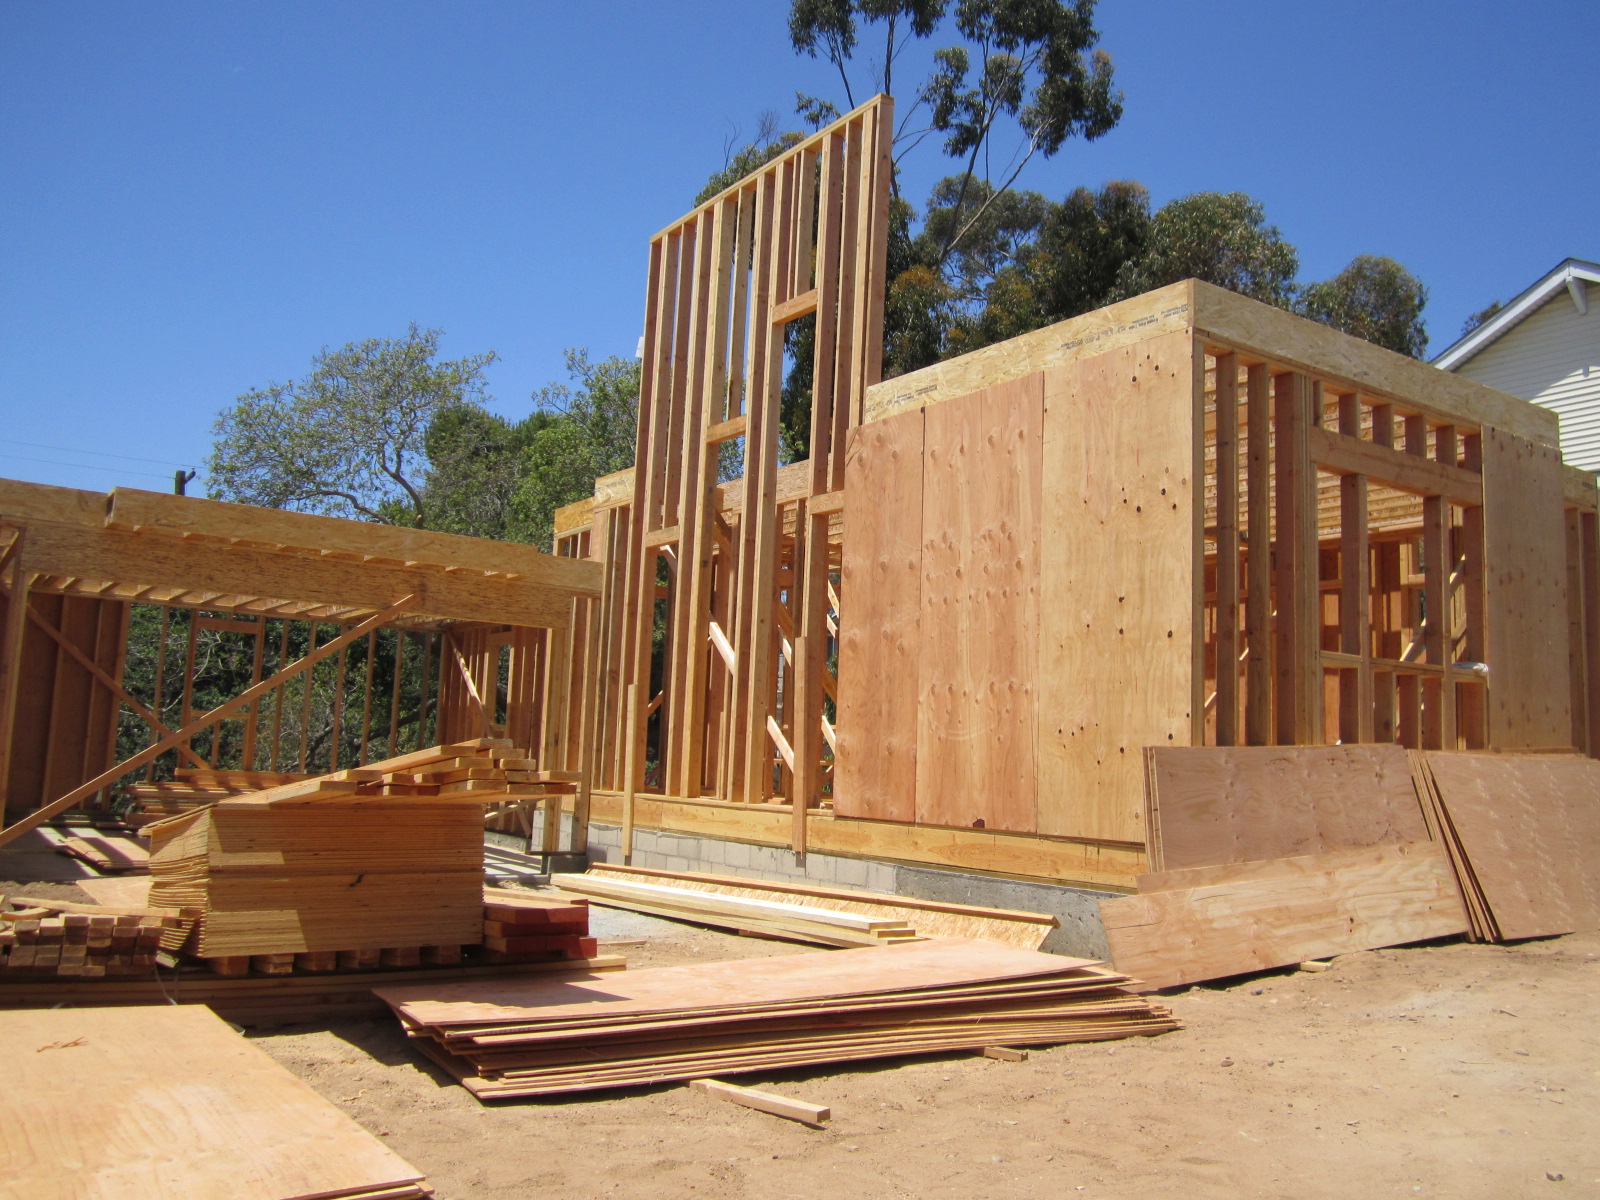
Huge progress this week in only 4 and a half days of framing, the Modern Bungalow is starting to take shape now with the whole first floor and garage framed up. I haven’t seen anyone doing this in San Diego, my architect is doing these in Austin, Texas and this is the hottest new construction style for the old metro neighborhoods.
The house will still have the classic lines of a bungalow but mashed with modern construction and design features. Everyone loves bungalows but this twist is going to give you the best of both worlds with contemporary style being the most popular right now in the home design world.
The underground plumbing, floor system and insulation inspection went a little better the second time on Monday, my regular inspector said everything looked good and he wouldn’t have made me change the sanitee fitting to pass. 3 more signatures on the card and we were able to get the 3/4″ T&G CDX subfloor down.

We put up the North living room wall first and then the front, or East kitchen wall. Notice the 10 foot ceilings downstairs and the 8 foot door heights. We also made all the windows a little taller and lined them up at the 8 foot door height as well. The doors and windows are as high as most peoples ceilings, it makes the house feel so much more expansive.
My framers thought I was crazy and never even do 8 foot doors, normally its reserved for McMansions and is popular in Phoenix and Texas so its probably safe to say this is a first for South Park. The coolest thing ever is walking in the front door and looking straight back at the green canyon through the custom 9 foot wide by 8 foot high patio slider doors.

The highlight of the week was lifting up the 19′ balloon wall. Its the exterior wall on the driveway side of the house that reaches all the way to the roof trusses because there is a stairway in this location. You can see the 3 headers that follow the staircase up.
It took 9 guys to lift the wall in place it was so heavy with my over sized material. For this house I’m using 2×6 framing for all exterior walls instead of standard 2×4. Besides being structurally superior, this will give me room for a greater insulation barrier for huge energy savings and provide better sound proofing from the nearby flight pattern.
Some builders move spacing on wall studs out to 24″ when they go to 2×6 but I left them at 16″ on center. A friend of mine who works for a large National home builder called it a energy saving fortress.

In order to do the wide open modern floorplan, I used Parallam beams to span the 22 foot living room and then hung the joists off the beams. You can see us here lifting the largest beam up which measures 7″x14″x22′

Upstairs I used engineered I joists from Trus Joist. These TJI joists are the highest quality available and resist warping, twisting and shrinking to prevent bouncy or squeaky floors.
Besides allowing greater spans from the engineering, one nice thing is you don’t have to crown the wood, they are all perfectly straight and will give a perfectly flat floor upstairs. I’ll fir down each joist so the 14″ beam wont show when we drywall the ceiling in the living room.
In the shear wall locations I’m also using CDX instead of OSB. You can see how large the house is looking here with just the first floor up. It’s going to dwarf the 2-story bungalow next door. Seeing this huge 2-car attached garage and wide driveway is also very atypical for the neighborhood, of course I did a 8′ high garage door to accommodate my truck.
Notice also here how the 9′ high garage ceiling height is lower than the second floor, this is where steps lead down to the master suite from the secondary living space to provide a little more interest and privacy. I’m so happy with this cutting edge design, there’s going to be so many cool things going on when its complete to make this a real cool property.
We are ready to start the second floor framing this week, there are more cool design features that I cant wait to see take shape. I planned on 2 weeks for rough framing but it will probably stretch out a little longer with all the small pick up work to be done at the end.
You’re The Boss

In any other state I could have been all the way up to the second floor framing this week but here in San Diego the City inspector wants to see your floor system framed up first, verify the hold downs and framing, then come back and inspect the underfloor plumbing lines, then come back again and inspect the insulation. You lose a day in between each inspection so this would have dragged out for a week. It really makes sense to do it this way because its easier to do the under house plumbing now, rather than crawling under the house later to do it but the reason the inspector wants it done in this order really just comes down to the fact that he’s not crawling under the house no matter what.

After framing up the floor system in a day I had my plumber come and set all the under floor ABS waste lines and fill them again with water to make sure there’s no leaks. Lastly the insulation got dropped in on nylon netting we strung between the floor joists. Its a real trick way to insulate the floor on a new construction raised foundation house. I’ve used wires in the past but the insulation always ends up falling down in some places. Once we pass then we just sheet over it. The threaded rod you see sticking up is for the Simpson HDU hold downs that secure 4X6 posts in the exterior walls all the way down into the concrete foundation footing. This is to securely hold the structure on the foundation in case of an earthquake and they are strategically placed in shear wall areas by the engineer on the plans.

Of course I had a better idea. I tried to speed things up by only calling once to have him come do all 3 inspections simultaneously. I had the insulation pulled back along the sides so he could see the framing, plumbing and hold downs thinking this would be fine, unfortunately he wasn’t really that excited about my idea. My regular inspector didn’t show up but rather a Senior Inspector who happens to be very thorough and whom I’ve dealt with before. He almost gave me the signature required in order for me to sheet the floor with CDX and start putting walls up, but he found one plumbing fitting that he said wasn’t correct so he’s coming back Monday after we change it and also wants me to pull more of the insulation back for a better look. Uggghhh. My plumber swears the fitting he used is allowed, its a Sanitee on its back for a 2″ vent pipe. The inspector wanted a sweep which is weird cause its only a vent, not a waste line. Who knows but I wasn’t going to argue with him, I told him he’s the boss but I kinda want to check the code book now though just out of curiosity.
The senior inspector asked who the general contractor was. Hesitantly, I told him I was an owner/builder. Seeming surprised he said it looked better than most jobs and kept congratulating me on doing such good work. Maybe he was just trying to make me feel better because he could see it on my face that I was bummed not being able to start putting up the walls. He knew I was totally ready to go, as he was doing his inspection I received the first delivery of truss material for the second story. I should pass on Monday and we’ll be back in action. I’m a Chevy guy but how cool is this early Ford extra cab delivery truck from La Mesa Lumber?

More Concrete and Inspections

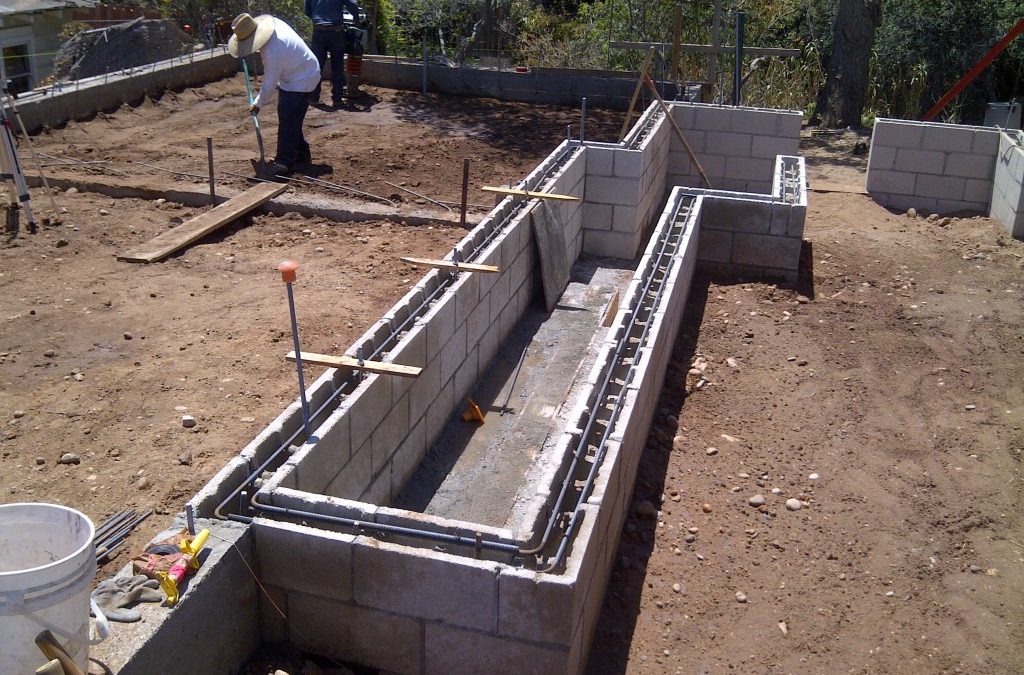
Just a little more concrete last week and now its time for framing. The first thing I did was have a third party inspector come and sign off on the construction of my block stem wall. He personally witnessed the mortar mixture and rebar placement inside. Then I called the City inspector also to sign off on it once it was completed. The reason for the extra stemwall is because the outside wall is the balloon wall and the inside wall supports the load from the upstairs floor joists. The stairs go up in between these two foundation walls and each has its own footing.

When the truck came to fill it up we also had to have the third party “special inspector” on site to take a sample of the mixture that came out of the truck. He packaged it into a small box that he’ll send to a lab for analysis. They test part of it at 7 days and the balance at 28 days for compression strength by putting it in a crushing machine. Inside the stem wall I used 2500 PSI grout mix. I only normally use big rock but this is the only place that its o.k. to use the pea gravel mix. I would never use it in a concrete footing , foundation or driveway. The cost for the 2 trips from the special inspector and the lab test was about 500 bucks. I don’t know what would happen if the lab discovered I got a bad batch from the concrete company, probably make me tear down the wall and start over. I’d rather know now though before I move in that’s for sure!

Next I poured the garage floor. First I rented a compaction machine for the dirt, then put down plastic moisture barrier, topped it with 3-4 inches of manufactured sand and then my #4 rebar 18″ on center tied into the perimeter footing as the plans called for. Once the City came and inspected it we just backed the truck right up to it and poured 7 more yards of 3000 PSI 3/4″ concrete. Once again you’ll see a lot of guys using pea gravel mix but its not nearly as good and tends to crack faster. The larger the rock size in concrete the better. I’m ready for framing now and getting material price quotes from Home Depot, Lowes and Dixieline. Hopefully we’ll be starting on the floor system by mid week if I can get a quick delivery, the framers are anxious and cant wait to get started. I’ll order my custom Milgard windows and exterior doors this week as week so they will arrive about the same time we are done with framing.