Hidden Surprises for Fathers Day

Hidden Surprises for Fathers Day

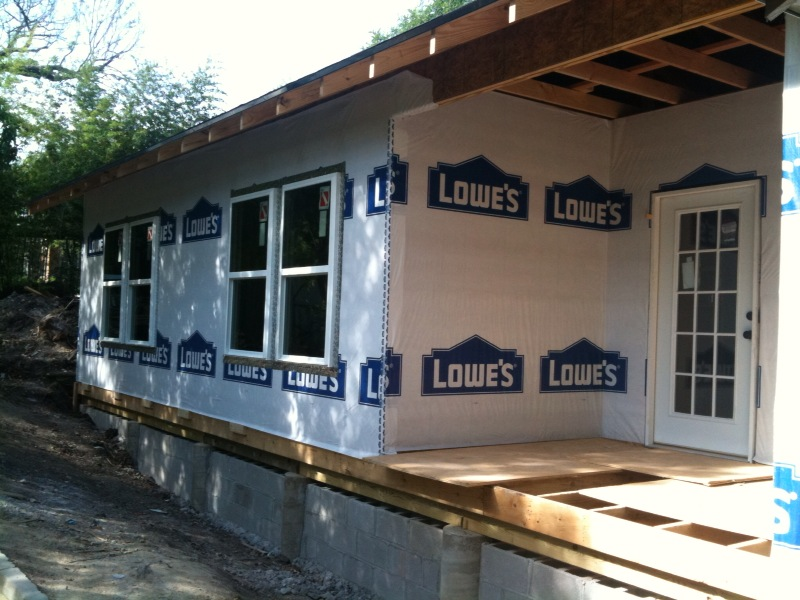
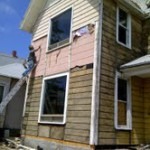
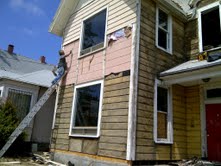
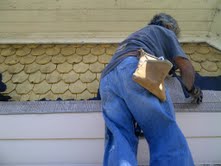
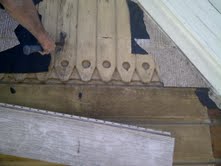
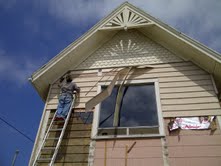
First and foremost, Happy Fathers Day to all the dads out there! The coolest thing we did this week at The Painted Lady was to remove all of the 1970’s Sears metal siding, of course we recycled it to help save the planet. This is the third time I’ve done this on a historic house but I’ve never removed 2 different layers to get down to the original wood. It’s always a gamble because you never know of the condition underneath but its been my experience that the asbestos or vinyl that’s on top actually preserves and protects the old wood and I’ve always been surprised to see near perfect siding with minimal paint jobs buried underneath. The more the homes get painted over the years, the harder it is to prep so in this case when I found the original yellow paint job with nothing cracking or peeling I was excited.  As we removed it, I found tons more hidden architectural details that these Victorian houses are famous for so I had to tell myself it must have been a pretty good salesman in a polyester jacket who was able to convince the homeowner with his “never paint your house again” pitch years ago to cover all the character of their house up. These cool details in the trim on the house are going to put my paint job over the top.

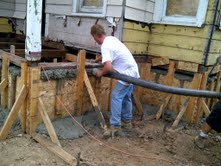
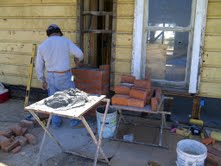
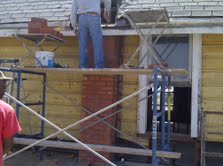
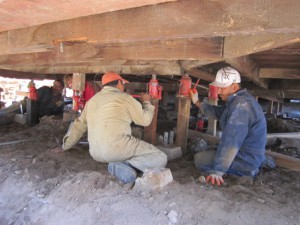
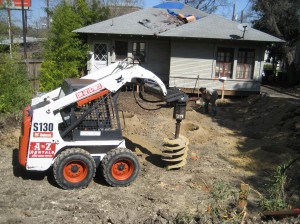
We also finally got the foundation poured, it took 2 full trucks with almost 20 yards of concrete total, as well as a pumper rig to fill up the spaces we left open around the house in the forms. Once filled we removed the forms while it was still green and hand troweled the finish. Its harder to work with but I used the 1.5″ rock aggregate although most guys use the pea gravel mix. Since the stem wall is 3 feet high in some spots I wanted it to be as strong as possible. This house isn’t going anywhere now for another 100 years. The Historical Review Board also asked me to replace the visable portions of the old chimneys in order to keep the house period correct. The old ones were crumbling and dangerous and I deleted them from inside the house to maximize my floorspace and intended not to re stack the exterior, they weren’t fireplaces inside but only basically a brick flue for stove exhaust. I found some used bricks on Craigslist and had them re-stacked just from the roof line up, I had to knock this out before the roofers show up on Monday.

I finally met with some sub contractor drama this week from one of my subs, I knew everything was going too good to be true. It’s crazy, but unfortunately I cant share the story although it involves the FBI. Hopefully he’ll have his helper finish up next week so I can call for rough in inspection and be ready to insulate and drywall after the new roof goes on.

Painted Lady Week 6

Here’s a walk through to show the progress of The Painted Lady at week 6. After waiting 4 weeks for historical board approval we finally got the green light so we started calling for inspections. It was quite interesting to say the least, initially we failed both the foundation and framing because of a few small issues. The trench for the foundation was 2″ too shallow,  the plans I drew noted a 24″ deep trench which is overkill because a 2 story house only requires 18″ deep footings but I wanted to beef it up a little.

I also upgraded the rebar size from the nominal 1/2″ as code requires to 5/8″ just do make it stronger. None of this mattered when the inspector showed up, he failed me anyway for lack of the 2″ to make it match what the plans called for. On the framing I was missing a few nails as the plans called for. I knew it wasn’t a big deal to make these few changes so it really didn’t bother me to fail. We fixed them quick and called the inspector back out 2 days later.

This is when I learned that nothing is going to just get signed off on that quick. When he arrived it took him all of about 10 minutes to measure the trench depth and check for the framing nails. He then proceeds to tell me that he can only pass me on the foundation but I’ll have to wait to pass on the framing. Really, didn’t you just look and see I made the corrections?  I’ve heard that they commonly show up and will only sign off on one or two things due to time restraints. The framing inspection includes about 4 categories; roof, floor, wall construction and sheer panels and could take up to 40 minutes in theory. Although he already verified everything was o.k. he only passed me on the roof portion “so I could stay busy and put my roof on.” 

As you can imagine there’s not much new construction going on, so last year half of the inspectors got laid off so I don’t think morale is at its highest level.  With half of the staff now the inspectors are covering twice the territories so there’s not much time when they show up. When dealing with inspectors always tread lightly, give respect and remember not to rock the boat. The best rule is to close your mouth and just listen.

This is exactly why most rehabbers look for the cosmetic flips or sneak by without permits.  Next week will be big, plumbing is now completely done, hvac done and electrical 75% done. Monday we are finally pouring the foundation after waiting forever for the City. Even with the slow downs I’m still pushing,  small set backs are just part of the business.

Several other cool things in TomTarrant.com land for this week;

1. There is a new contest at REIClub.com that I am nominated for. It’s another Best Real Estate Investing Blog shoot out. I’m up against some really popular sites so please go and cast your vote for me. Voting doesn’t begin until Monday, June 13 and goes through midnight on Friday June 17. This one is big, I could win a $250 Apple gift card which my wife would love. I need your help on this one guys, if you like the info I share here for you, please take a second and go vote for me!

http://www.reiclub.com/realestateblog/best-real-estate-investing-blogs-2011/

2. Joshua Dorkin over at Biggerpockets.com asked me to do an off the cuff Skype video interview for him where we’ll cover general real estate investing stuff and info about my house flipping business.  Make sure and go by his site next week and look for the interview. I’ll probably spill all the secrets you’ve been wanting to know.

http://www.biggerpockets.com/renewsblog/real-estate-interviews/

Master Sweet Framing

Master Sweet Framing

I’m getting close to the stem wall pour, the guys worked on the forms all week. Inside the forms we hung 12″ j-bolts that will anchor the house to the foundation once it’s poured. Then we laid 4 rows of #5 rebar and secured it to the screw jacks with tie wire. Anywhere the stem wall is more than 24″ high we will hang vertical rebar 24″ on center as well. This is over and above local building codes but  worth the extra expense. All the load from the weight of a house is carried on the exterior walls and down to the footings, it’s totally different for me here doing this as in Texas when building a pier and beam room addition you don’t do this perimeter foundation. The plastic sheeting you see is to keep the concrete from blowing out the back once we pump it into the form cavity. All that’s left now is to set the outside forms, we’ll cut windows along the top of the outside so we can pump the concrete in.

I also got the new master suite all framed up, it’s 375 s.f. and includes 9′ ceilings, a big bathroom that fits dual vanities, soaker tub, stand up shower and water closet. There’s also a generous sized walk in closet and french doors off the back. While the framers were there I also had them raise the kitchen ceiling, move some closets around upstairs and add some really cool tray ceilings in the living room and dining room that I’ll use for my mechanicals and central heat ducting to get upstairs. We also added fire blocking to the entire house since I had all the walls open. I bumped up the room addition ceiling  joist size to 2×8 and the roof rafters to 2×10 just to ensure the inspector likes what he sees and I get off on the right foot with him. It’s coming out pretty trick, I’m excited about how easy it was to really modernize this 100-year-old floor plan and am confident it’s going to help sell the house. The prices I’m nailing down for mechanicals on this 2000 s.f. house so far are as follows: Complete electrical with new 200 amp service: $5300. Complete plumbing with copper supply, gas lines and all new ABS waste lines: $5000. Complete new central heat system with new furnace and ducting: $1800. New roof: $2000 labor.  These are killer prices and all from legal, licensed sub contractors, I couldn’t have done better in Texas. Thanks to everyone locally who has sent me referrals, after this huge project I’ll have a great team ready for any size project!

Skinny legs, old yellow dress

Skinny legs, old yellow dress

So we finally got started this week on the huge foundation repair in which we are completely leveling the house and adding a new perimeter concrete stem wall. Before this huge stem wall can be formed and poured, we had to level the house and dig the 24″ trench around the sides. The house was only 2″ off at the most so the leveling was easy and we got the entire house within 1/4″ with a digital level going from one side to the other.  I hired a foundation guy who has worked for me in the past even though I had a cheaper bid from a new guy, I just felt it’s such an important part of the rehab and I didn’t want to go down that road with a new sub contractor, especially on my first project back in San Diego. The only downside was I had to wait for him to finish another job so it slowed me down a bit. I’m not sure that I would have wanted to be under this huge house with jacks on a Friday the 13th! The next step now will be to set all the wood forms for the stem wall and tie all the rebar inside per building code.

My sub contractor has been doing foundations for over 25 years so he’s got cool little tricks to make things easier for himself. I always enjoy learning these little tidbits from a true experienced professional in their field. As you can see here he’s got the outside of my house sitting on “sacrificial homemade screw jacks” we made out of 3/4″ galvanized pipe with 5/8″ all-thread inside and nuts and washers for the adjustments. Once everything is level he uses these jacks to hang the rebar on, and they’ll actually remain inside the new 8″ wide concrete stem wall permanently. Inside the trench they are sitting on small 8″ pier blocks, additionally he’ll hang the j-bolts from the new treated bottom plates so the house will be anchored to the new stem wall once its poured. It’s looks crazy to see this huge, heavy house sitting on these skinny legs but most of the weight is actually on the beams underneath a short distance away. Hopefully by the end of this week we’ll have the forms built and new foundation poured so we can get on to the framing.  After the framing I’ll do the roof, plumbing, hvac and electric. Everyone is ready to go for these trades so stay tuned as things shall move along a little faster soon. I pulled off some of the Sears metal siding that’s probably been on the house since the 70’s and as I guessed, the original 1909 ship lap wood was in perfect preserved condition with only one coat of faded yellow paint.  I’m pretty stoked as this could have gone either way with what I was going to find under there. On a side note, I had to rent a temporary construction fence this week to keep out the local kids who’ve evidently adopted the house as their local hang out at night. Every morning I’ve arrived to small surprises such as spilled ice cream, candy and even an egging. While nothings been stolen, construction sites are just not safe places to play so for the first time I’ve had to go on total lock down. This flimsy fence wouldn’t have kept me out 30 years ago but it gives me a little more piece of mind now knowing it’s not wide open.

Moonshine Jugs

Moonshine Jugs

I had a  productive week starting out by hanging all the OSB plywood on the room addition exterior, it really starts looking like a house once it has something on the framing. After the OSB I wrapped it with Tyvek, wow does Lowes like to advertise! Its amazing how many local rehabbers I see that dont use house wrapping on their additions. They’ll go straight over the OSB with the siding. For $88 bucks you cant go wrong and it really makes a difference on your electric bill and keeps the drafts out. The windows arrived Friday and I got most of them in along with the back door so now it all locks up again. As you can also see I had a retaining wall built this week from CMU block under the perimeter of the new addition. There was such a deep below grade cavity from my excavation that this was necessary for correct drainage and to prevent water intrusion under the house. I’ll backfill the sides now and we’ll be good to go. Another example of how we are doing things right, some guys would have thrown down some plywood and backfilled. The back porch is really neat, cant wait to see everything now with the historic waterfall style #117 siding on it to match the house.

The original owner of the house stopped by and said that their dad build it back in the 20’s. She’s going to give us all the info on the home and story behind it so we can pass it along to the new owner eventually. I am hoping she has some vintage photos of the front so when I go to rebuild the columns and porch area I can replicate it correctly. While I was under the house this week I found some old moonshine jugs, a 1927 Good Housekeeping magazine and a Texas automobile license plate from 1933. Since last weekend we’ve had 10 showings at Neighbor’s House and more offers as well. Spring buyers are out in full force. Cool stuff, stay tuned …

Foundation Complete!

Foundation Complete!

We had a buyer come back for a third time on the Neighbor’s House this week as well as tons of calls and another new showing. Nothing in writing yet so we are still patiently waiting.

I got alot done this week on the Target House, with another day rental on the Bobcat but this time with the 2 foot auger attachment I drilled the holes for the 28 piers. The City of SA wants to see them 2 feet deep with #4 rebar at the bottom of each hole. I found a new engineer that came out and inspected the footings before the concrete pour. My old guy tried to raise his prices from 400 to 600 bucks for the inspection but the new guy’s price is only 350 so I am happy. The City of SA doesn’t inspect foundations for room additions anymore themselves, it’s up to the builder to supply his or her own engineers cerificate to satisfy that portion of the building permit.

After the footings were finished Friday I placed all the piers on Saturday so now I am all ready for the framers to come in and knock this puppy out. I used 12″ sonitubes for the piers but the City only calls for 8″. For the small extra cost I just think it provides for a way better product with the larger diameter piers so I always upgrade. We hand mixed 48 bags on 4000 psi concrete and poured them to the top. I’ll lay the 4×6 treated sills (beams) across the top next week before the framers get started. Stay tuned, we’ll be showing you some cool videos of the whole framing process soon!