Farmhouse Style remodel is complete and on the market for sale $999,000! True and authentic Modern Farm House home design with exquisite attention to detail. Nothing was left to the imagination down to the Shed dormers, Black Grid windows, Board and Batten siding and black accent half-round gutters! We had over 200 people through the open house the first weekend on the market, someone is going to make this their very special home soon! MLS# 180056834
We thoughtfully reimagined and redesigned this property into a fully permitted open concept floor plan, 9′ Island kitchen, Undercabinet lighting, Walk-In food pantry, Open shelving, 36″ Italian commercial range, Board and Batten interior and exterior feature walls, Industrial lighting fixtures, Brushed Gold hardware, High variation French Oak hardwood flooring, and Farmhouse X design custom fabricated handrail. This Farm House style is very specific and we stayed true to the theme with every material choice we made.
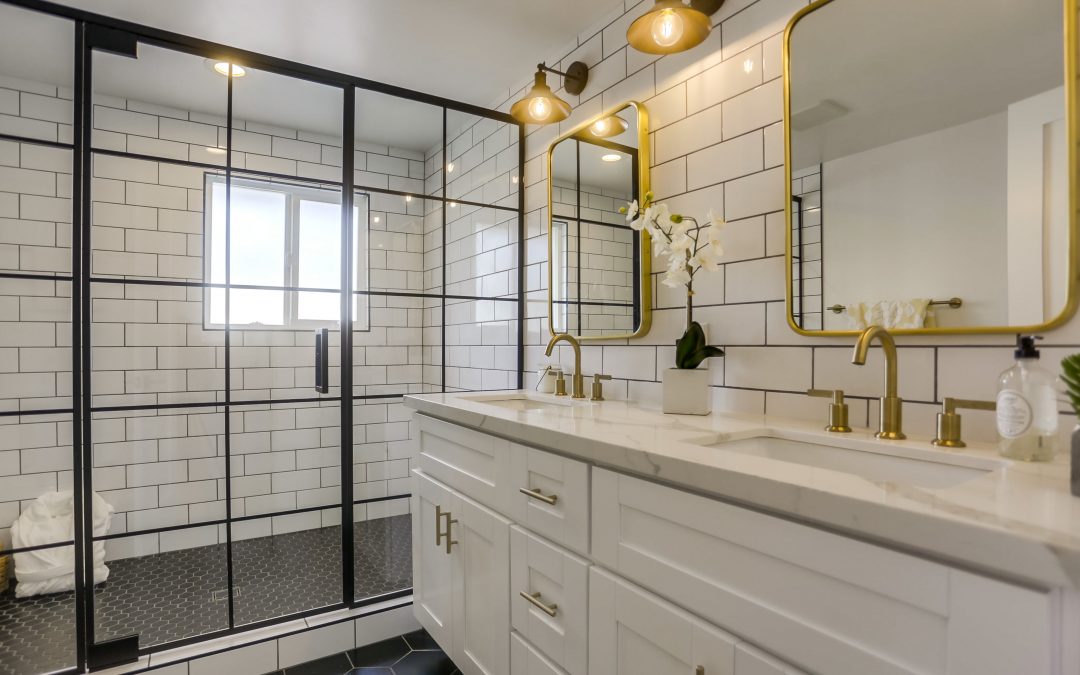
The Bathrooms in this South Oceanside farmhouse are incredible and done in a White/Black/Gold theme with Big 8″ Black Matte Hexagon tile on the floor, matching 2″ Black Matte Hexagon tile on the shower pan, White Subway walls, Brushed Gold hardware and mirrors, and a custom black grid shower enclosure that was fabricated by hand right onsite by our master tradesmen.
We reallocated the upstairs loft into a Giant private master suite with tons of light flowing in the numerous windows. The old upstairs bedroom was transformed into a new 10′ x 10′ walk-in closet. There is so much room upstairs its perfect for a office or additional sitting area.
What a difference a week makes. Our new hardwood floor refinishing guys came in and did an incredible job on the Modern Bungalow in South Park. Instead of the usual rag on, rag off method for applying the stain, these guys used a lambs wool applicator and drug the stain across the floor. Of course we did not water pop the wood first this time!
The stain came out perfect the second time around, no spots or blotchy areas and this application method actually left more color on the wood. After the stain dried they did 3 coats of semi-gloss clear, buffing in between coats. I’m really happy with the results, this is how Golden Pecan on Red Oak should look, it gives a modern loft feel.
Here is the finished product on the floors, finally I am back on track now. The cabinet finishers are coming in next to stain the uppers to match and paint the bases, island and bathroom vanities.
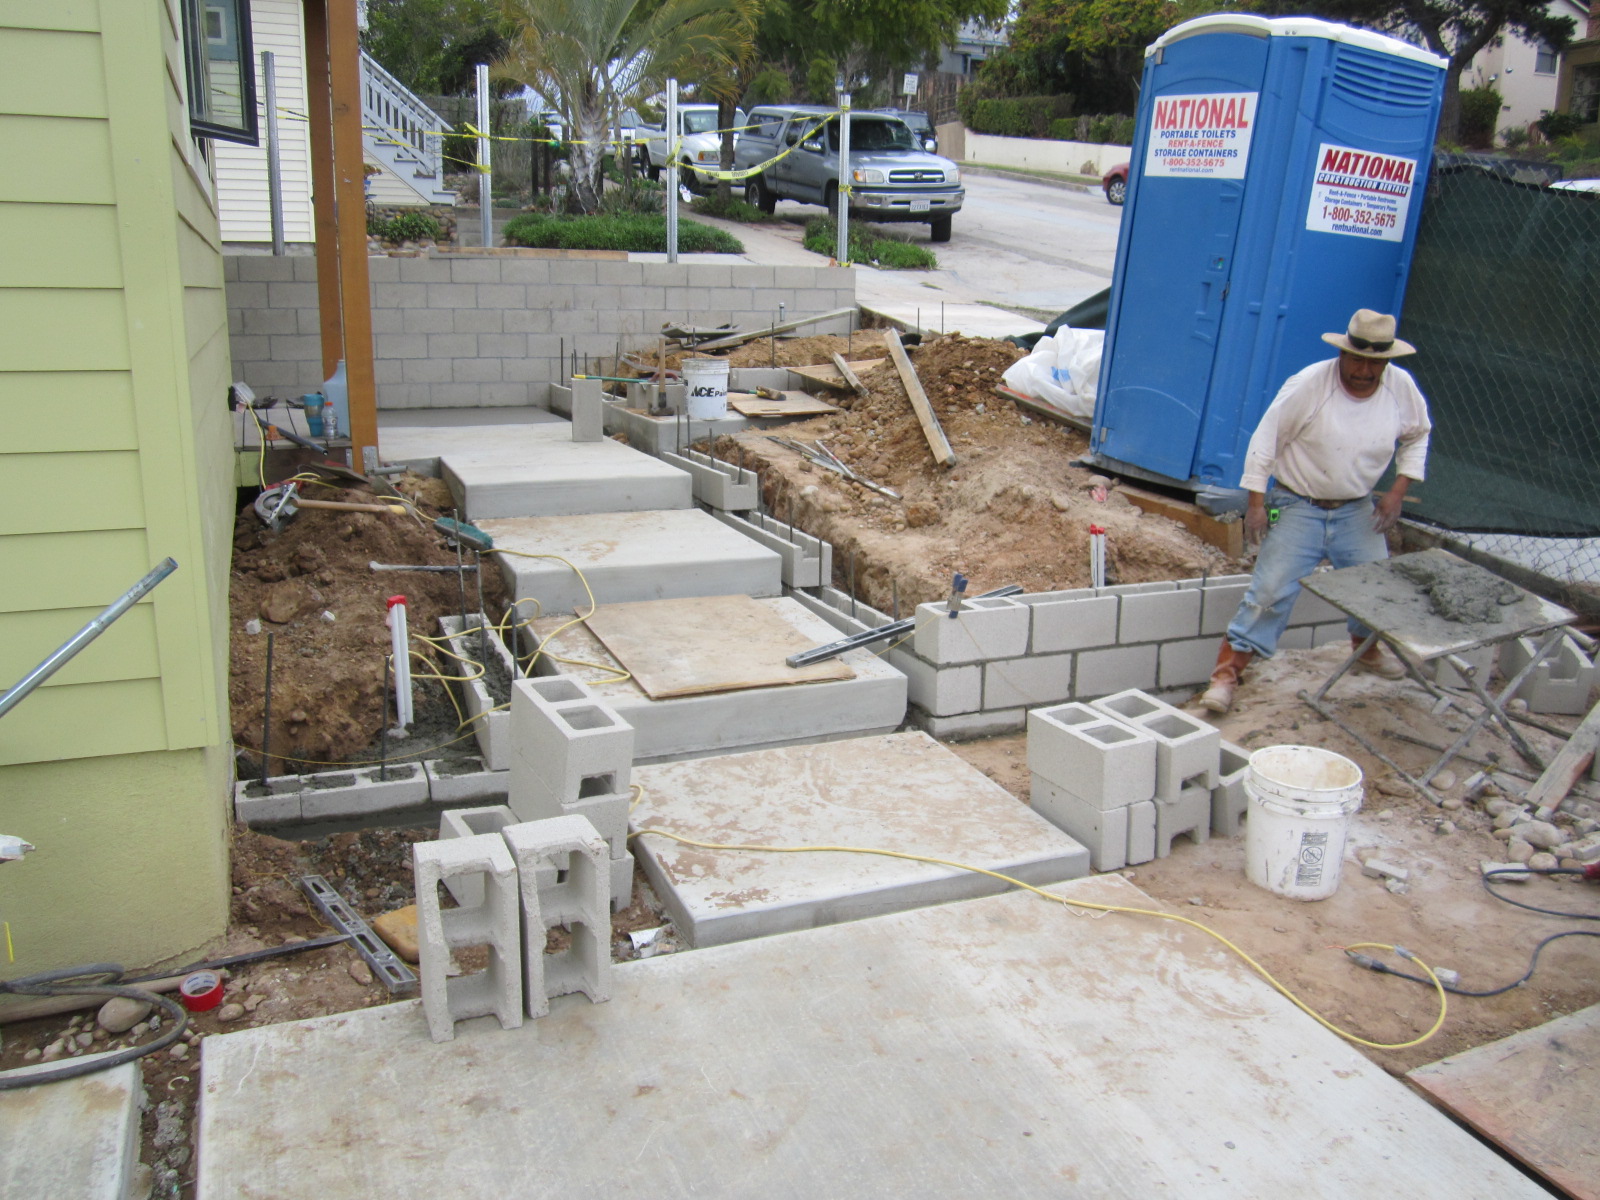
The weather finally cooperated enough to get most of our hardscape in this week. I poured about 20 yards of flat work. The modern design I created will lend itself well to my overall theme, the driveway area was so large, so by cutting it up I brought the space more into scale. Stay tuned for the finishing stretch after the holidays & Merry Christmas!
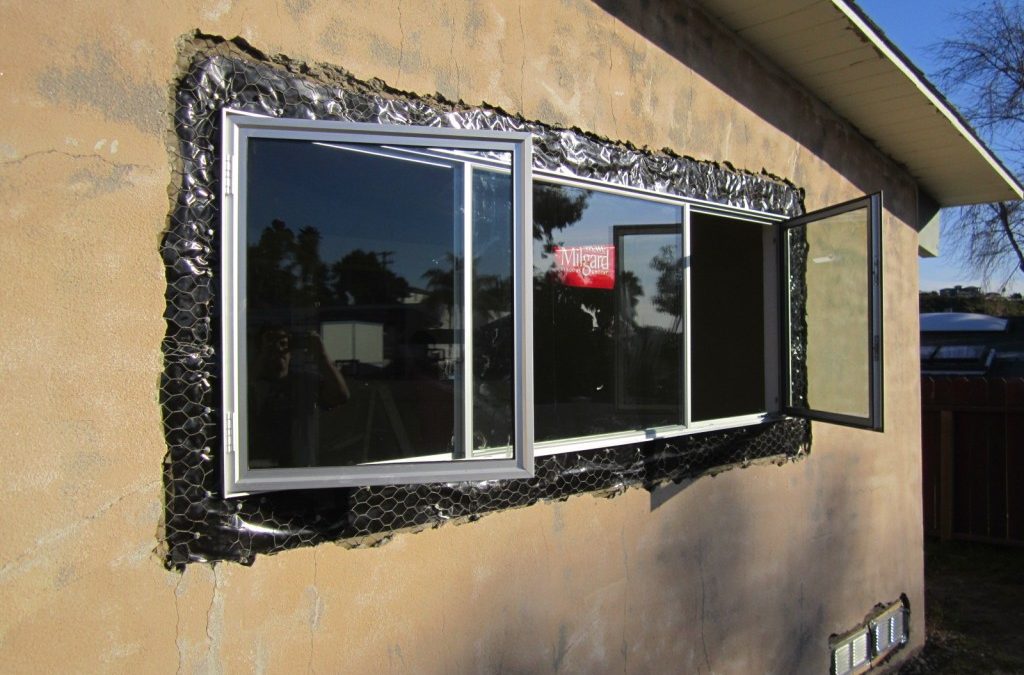
I’m really excited about the Milgard aluminum windows I picked out for this house and have to say I’ve removed tons of aluminum windows but this is the first time I’ve ever put them In. They are a modern energy efficient version of what we took out. With my right hand man Barney, we got them all installed including the 6 foot and 8 foot patio doors in a day and a half. These are new construction windows meaning you have to break the stucco back to install them using nailing fins. Putting them in is easy but the most important part is getting new flashing behind the old felt paper and using Jiffy Seal around them for a good seal. When breaking out your old ones try not to damage the wire mesh or felt paper. There’s a lot of guys flipping houses in San Diego and throwing in retrofit or vinyl lip windows. Believe me, you don’t want to put in vinyl retrofit windows, they will not hold air and warp in less than 10 years. I know because I have them in my house!
For our Mid Century project I wanted to get the stream-lined modern minimalist look so the aluminum was a clear choice. I wanted to use a mixture of casement and awning windows on this project so the master bedroom window was a perfect candidate to replace the old huge slider with a fixed window and 2 casements on the sides. I was able to put together a custom front window also with an awning on the bottom and slider on the top as seen here. I almost went with a really cool look – triple awning on the front, but thought there might not be enough air flow on those hot San Diego summer nights with no A/C so I played it functionally safe and put sliders in the secondary bedrooms as well. Since we are re-stuccoing the whole house I also took this opportunity to break out and replace all the old crawl space vents as you can see at the bottom of the top picture.
After price shopping around at 4 places I ended up getting the best deal at Home Depot. These are special order windows and take 3-4 weeks to arrive so you want to order them as soon as possible so they don’t slow your project down. For orders over $2500 you can request special pricing from the Home Depot Bid Room. Just ask to do so at the Millworks or Contractors desk. In my case they knocked off another 14% and with no delivery charge I ended up paying about $3600 for all the windows including a 6 foot and 8 foot patio door. These windows are of course low E and dual pane. The patio doors were a little more tricky because the frames come in 4 pieces but easy for anyone to do and they installed like a dream. They shut so good it sounds like an airplane door.
I tried out a new drywall patching crew this time and am super happy with the results. They cut out everything square, patched all my Swiss cheese holes from running the mechanicals, and then skim coated the entire house with a new 90% smooth texture. They also had to redo some of the window and door returns from our install, so it was nice to have them there fixing stuff as we were putting in the windows. The inside is ready for paint now, everything is really going smooth with this house. I’m off to the recycle yard with the old aluminum windows now for a nice bonus check for helping the environment!
Well I wish I had some images of cool flat panel cabinets, modern fixtures, new hardwood floors, glass tile back-splashes and shiny new objects but first things first. Normally, I do the concrete flat work last but since its part of the structural scope of this job I wanted to get it out of the way so when I get inside and start patching I know nothing is going to move.
We removed the entire garage floor, driveway and even part of the City sidewalk due to the Pepper tree roots. Once the floor was out we fixed 6 cracks in the stem wall and then removed 6″ of soil to make room for the new thicker slab. First we laid down plastic sheeting for moisture and then 6″ of clean sand to prevent possible expanding soils to pop up the new floor later. Finally we doweled #4 rebar into the existing house foundation, stem wall and all perimeter concrete flat work securing it with epoxy. It took 25 yards of the best 2500 psi big rock concrete you can buy and 6 finishers but we completed the pour in one day.
The big exterior load bearing beam was also rotten from water damage. Looking around the neighborhood at the same floor plan houses, a lot of homeowners just added a post and cut the long beam off. I wanted to really retain the original look of the house so we rebuilt it as it was originally done. I’m probably the only one on the block that has it back correctly now. This beam was a 4″x12″x26′ and weighed 400 pounds. It only cost 200 bucks and was easy to replace once we broke the stucco and supported the roof with a temporary wall. Windows, exterior doors and garage door are all on special order. The new roof is coming next, believe it or not I haven’t even done demo yet inside, stay tuned we’ll eventually get to the shiny new objects!
What’s an urban restoration project like without adding just a tad more hardscape to blend in with the mass expanses of paved metropolitan living? There is always a danger of adding too much concrete and having your house look like a parking lot but I think I pulled it off and managed to give the new owners a place for 4 cars to park securely while also enhancing the landscaping design with the sweeping walkway around the side yard. After receiving multiple bids in the $5 – $7 per square foot range, I managed to pull off the 22 yard pour for just around $3.75/s.f.
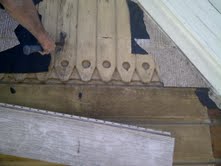
There was a block wall that was cracked and leaning over out front so we formed and poured around it after some reinforcing with rebar. Once I crack off the forms we’ll give it a swipe with spec mix for a sanded stucco finish to match the foundation walls. I thought this was a good quick fix as opposed to demolishing everything and having someone stack a whole new block wall which technically would also have to be permitted with the City. Inside this week, we also stripped all the paint from the 100-year-old staircase after deciding it will look better in its natural redwood state rather than painting it with all the trims.
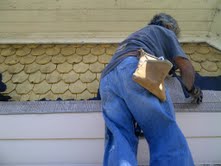
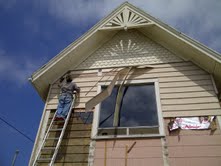
First and foremost, Happy Fathers Day to all the dads out there! The coolest thing we did this week at The Painted Lady was to remove all of the 1970’s Sears metal siding, of course we recycled it to help save the planet. This is the third time I’ve done this on a historic house but I’ve never removed 2 different layers to get down to the original wood. It’s always a gamble because you never know of the condition underneath but its been my experience that the asbestos or vinyl that’s on top actually preserves and protects the old wood and I’ve always been surprised to see near perfect siding with minimal paint jobs buried underneath. The more the homes get painted over the years, the harder it is to prep so in this case when I found the original yellow paint job with nothing cracking or peeling I was excited. As we removed it, I found tons more hidden architectural details that these Victorian houses are famous for so I had to tell myself it must have been a pretty good salesman in a polyester jacket who was able to convince the homeowner with his “never paint your house again” pitch years ago to cover all the character of their house up. These cool details in the trim on the house are going to put my paint job over the top.
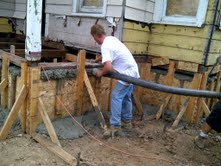
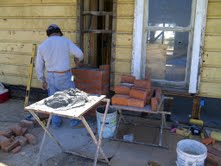
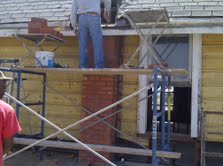
We also finally got the foundation poured, it took 2 full trucks with almost 20 yards of concrete total, as well as a pumper rig to fill up the spaces we left open around the house in the forms. Once filled we removed the forms while it was still green and hand troweled the finish. Its harder to work with but I used the 1.5″ rock aggregate although most guys use the pea gravel mix. Since the stem wall is 3 feet high in some spots I wanted it to be as strong as possible. This house isn’t going anywhere now for another 100 years. The Historical Review Board also asked me to replace the visable portions of the old chimneys in order to keep the house period correct. The old ones were crumbling and dangerous and I deleted them from inside the house to maximize my floorspace and intended not to re stack the exterior, they weren’t fireplaces inside but only basically a brick flue for stove exhaust. I found some used bricks on Craigslist and had them re-stacked just from the roof line up, I had to knock this out before the roofers show up on Monday.
I finally met with some sub contractor drama this week from one of my subs, I knew everything was going too good to be true. It’s crazy, but unfortunately I cant share the story although it involves the FBI. Hopefully he’ll have his helper finish up next week so I can call for rough in inspection and be ready to insulate and drywall after the new roof goes on.