What a difference a week makes. Our new hardwood floor refinishing guys came in and did an incredible job on the Modern Bungalow in South Park. Instead of the usual rag on, rag off method for applying the stain, these guys used a lambs wool applicator and drug the stain across the floor. Of course we did not water pop the wood first this time!
The stain came out perfect the second time around, no spots or blotchy areas and this application method actually left more color on the wood. After the stain dried they did 3 coats of semi-gloss clear, buffing in between coats. I’m really happy with the results, this is how Golden Pecan on Red Oak should look, it gives a modern loft feel.
Here is the finished product on the floors, finally I am back on track now. The cabinet finishers are coming in next to stain the uppers to match and paint the bases, island and bathroom vanities.
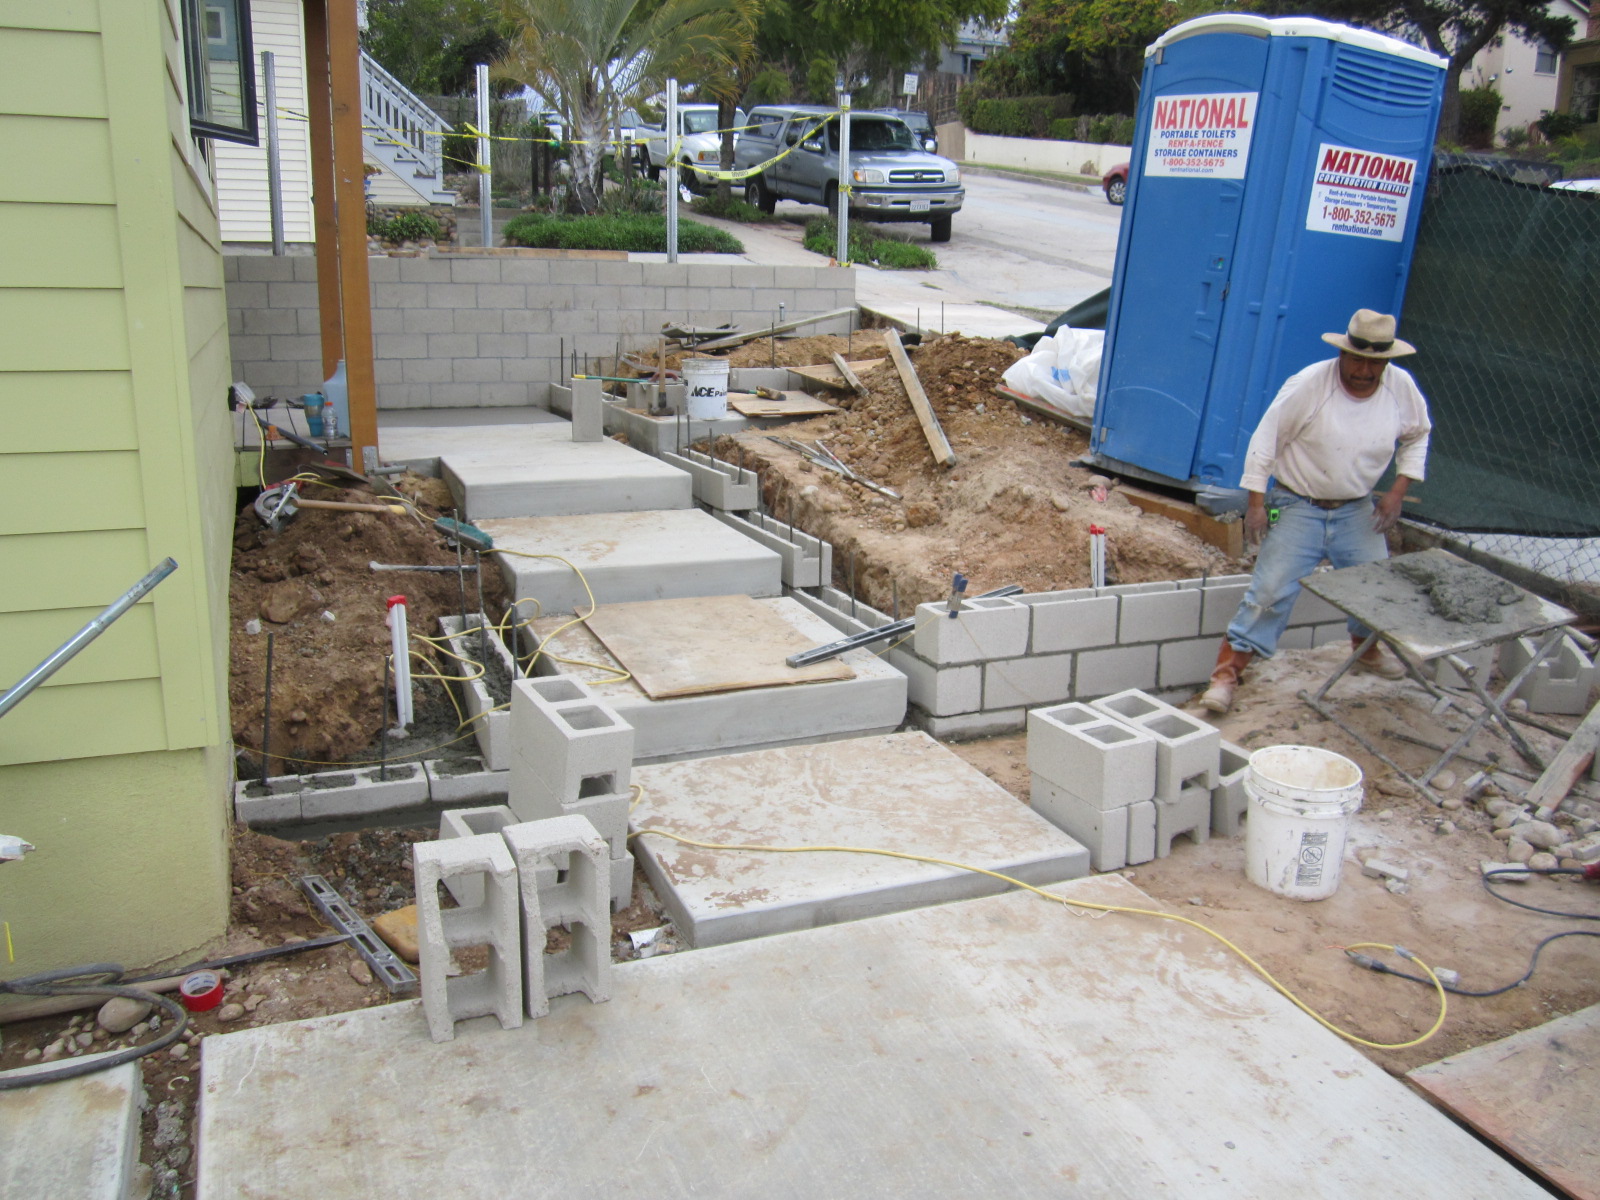
The weather finally cooperated enough to get most of our hardscape in this week. I poured about 20 yards of flat work. The modern design I created will lend itself well to my overall theme, the driveway area was so large, so by cutting it up I brought the space more into scale. Stay tuned for the finishing stretch after the holidays & Merry Christmas!
We are still making progress on the Modern Bungalow trying to wrap this house up, but with the holidays its been hard to keep up the pace. Since my last update inside we got the central air conditioning installed, hot water heater, red oak stair treads and risers, and all the electrical trim and fixtures. Custom tile job.
The fire sprinkler guy came back and trimmed out too, installing all the sprinkler heads and bell box. There’s nothing left inside except for the tile setting while I wait for another week for the cabinets to arrive and get installed.
The countertop fabricator is on standby to come right in after the cabinets, then its only hardwood floor refinishing and carpet in the 2 bedrooms. Garage door is also on order. I could have had it wrapped inside by now if I would have ordered cabinets before the drywall went up.
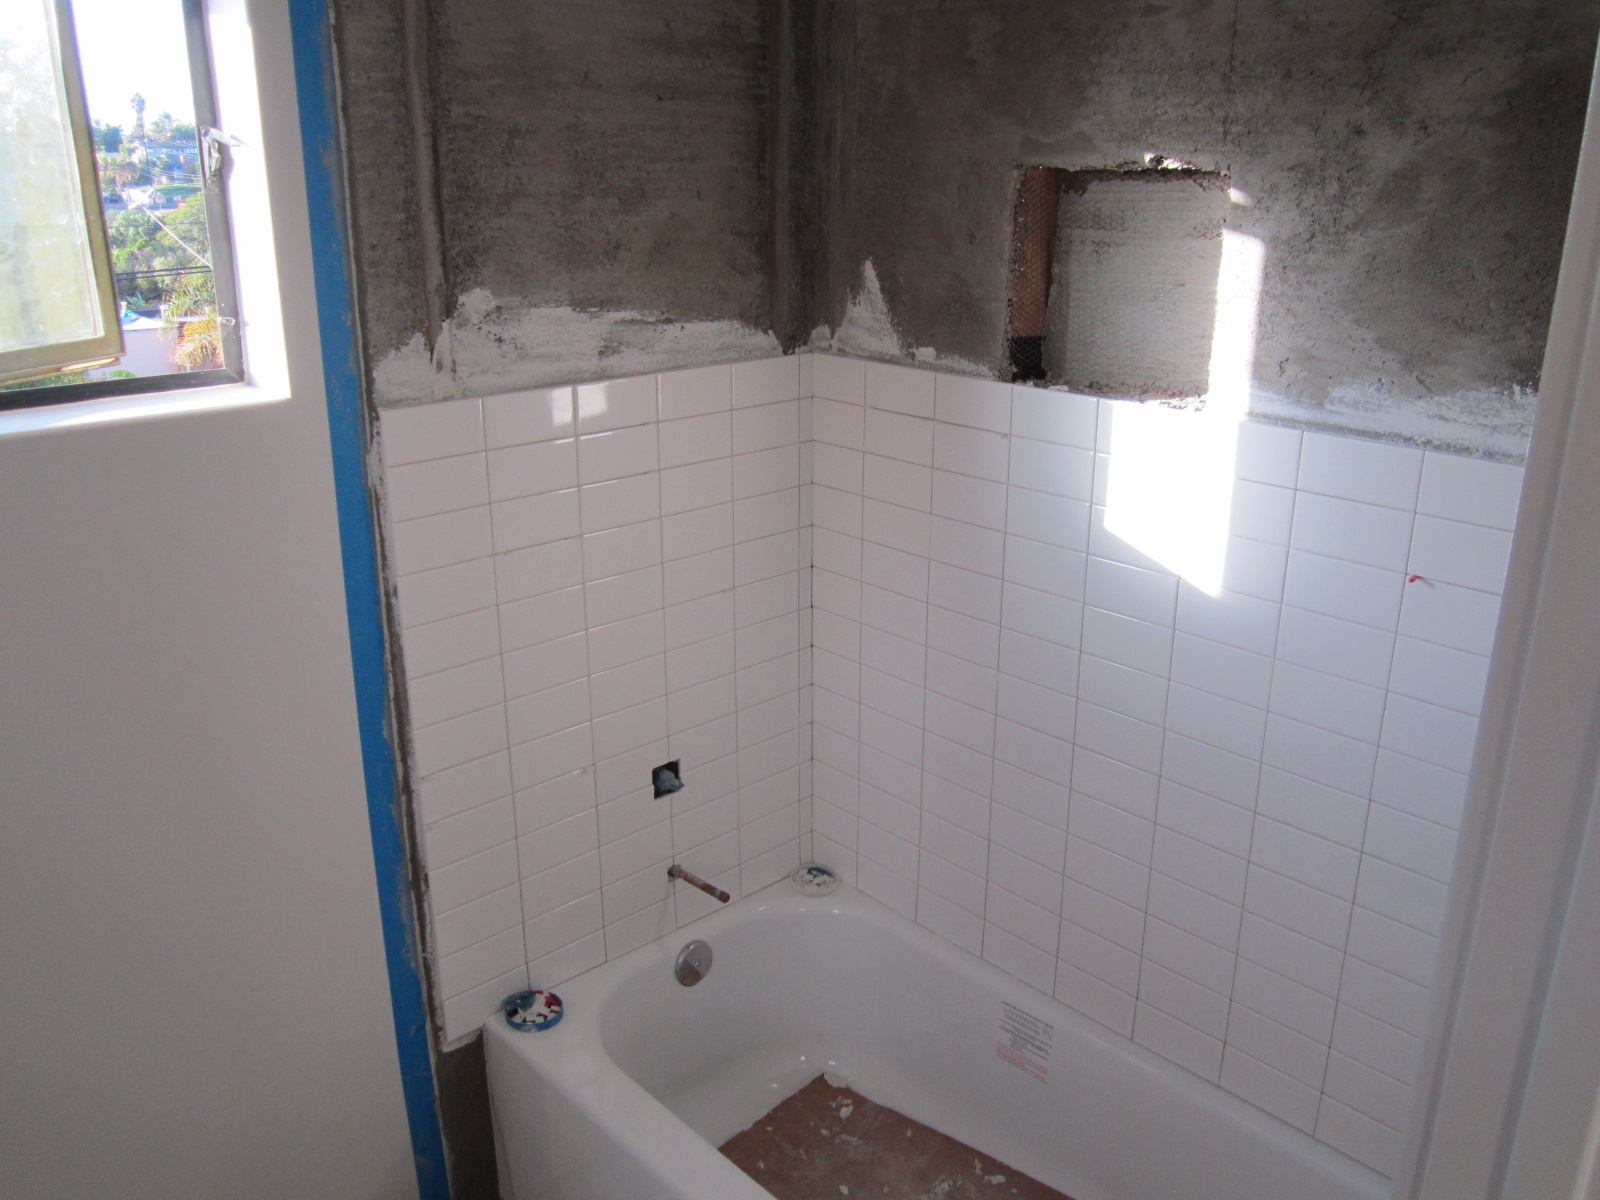
The new tile contractor I hired is done now with mud floating all the walls and getting into tile setting with his wife. This is the second husband and wife team we’ve had on this job, my exterior painters’ wife also was a painter. Mud set tile job is the best method and common in San Diego with real tile setters.
These ladies know what they are doing too, they are not just sweeping up! Instead of Hardi backer we opted for the mud float method where you do moisture barrier paper, metal lathe and then float out the walls with spec mix. The City comes and inspects paper and lath before you can start floating the walls. Mud set is definitely the way to go.
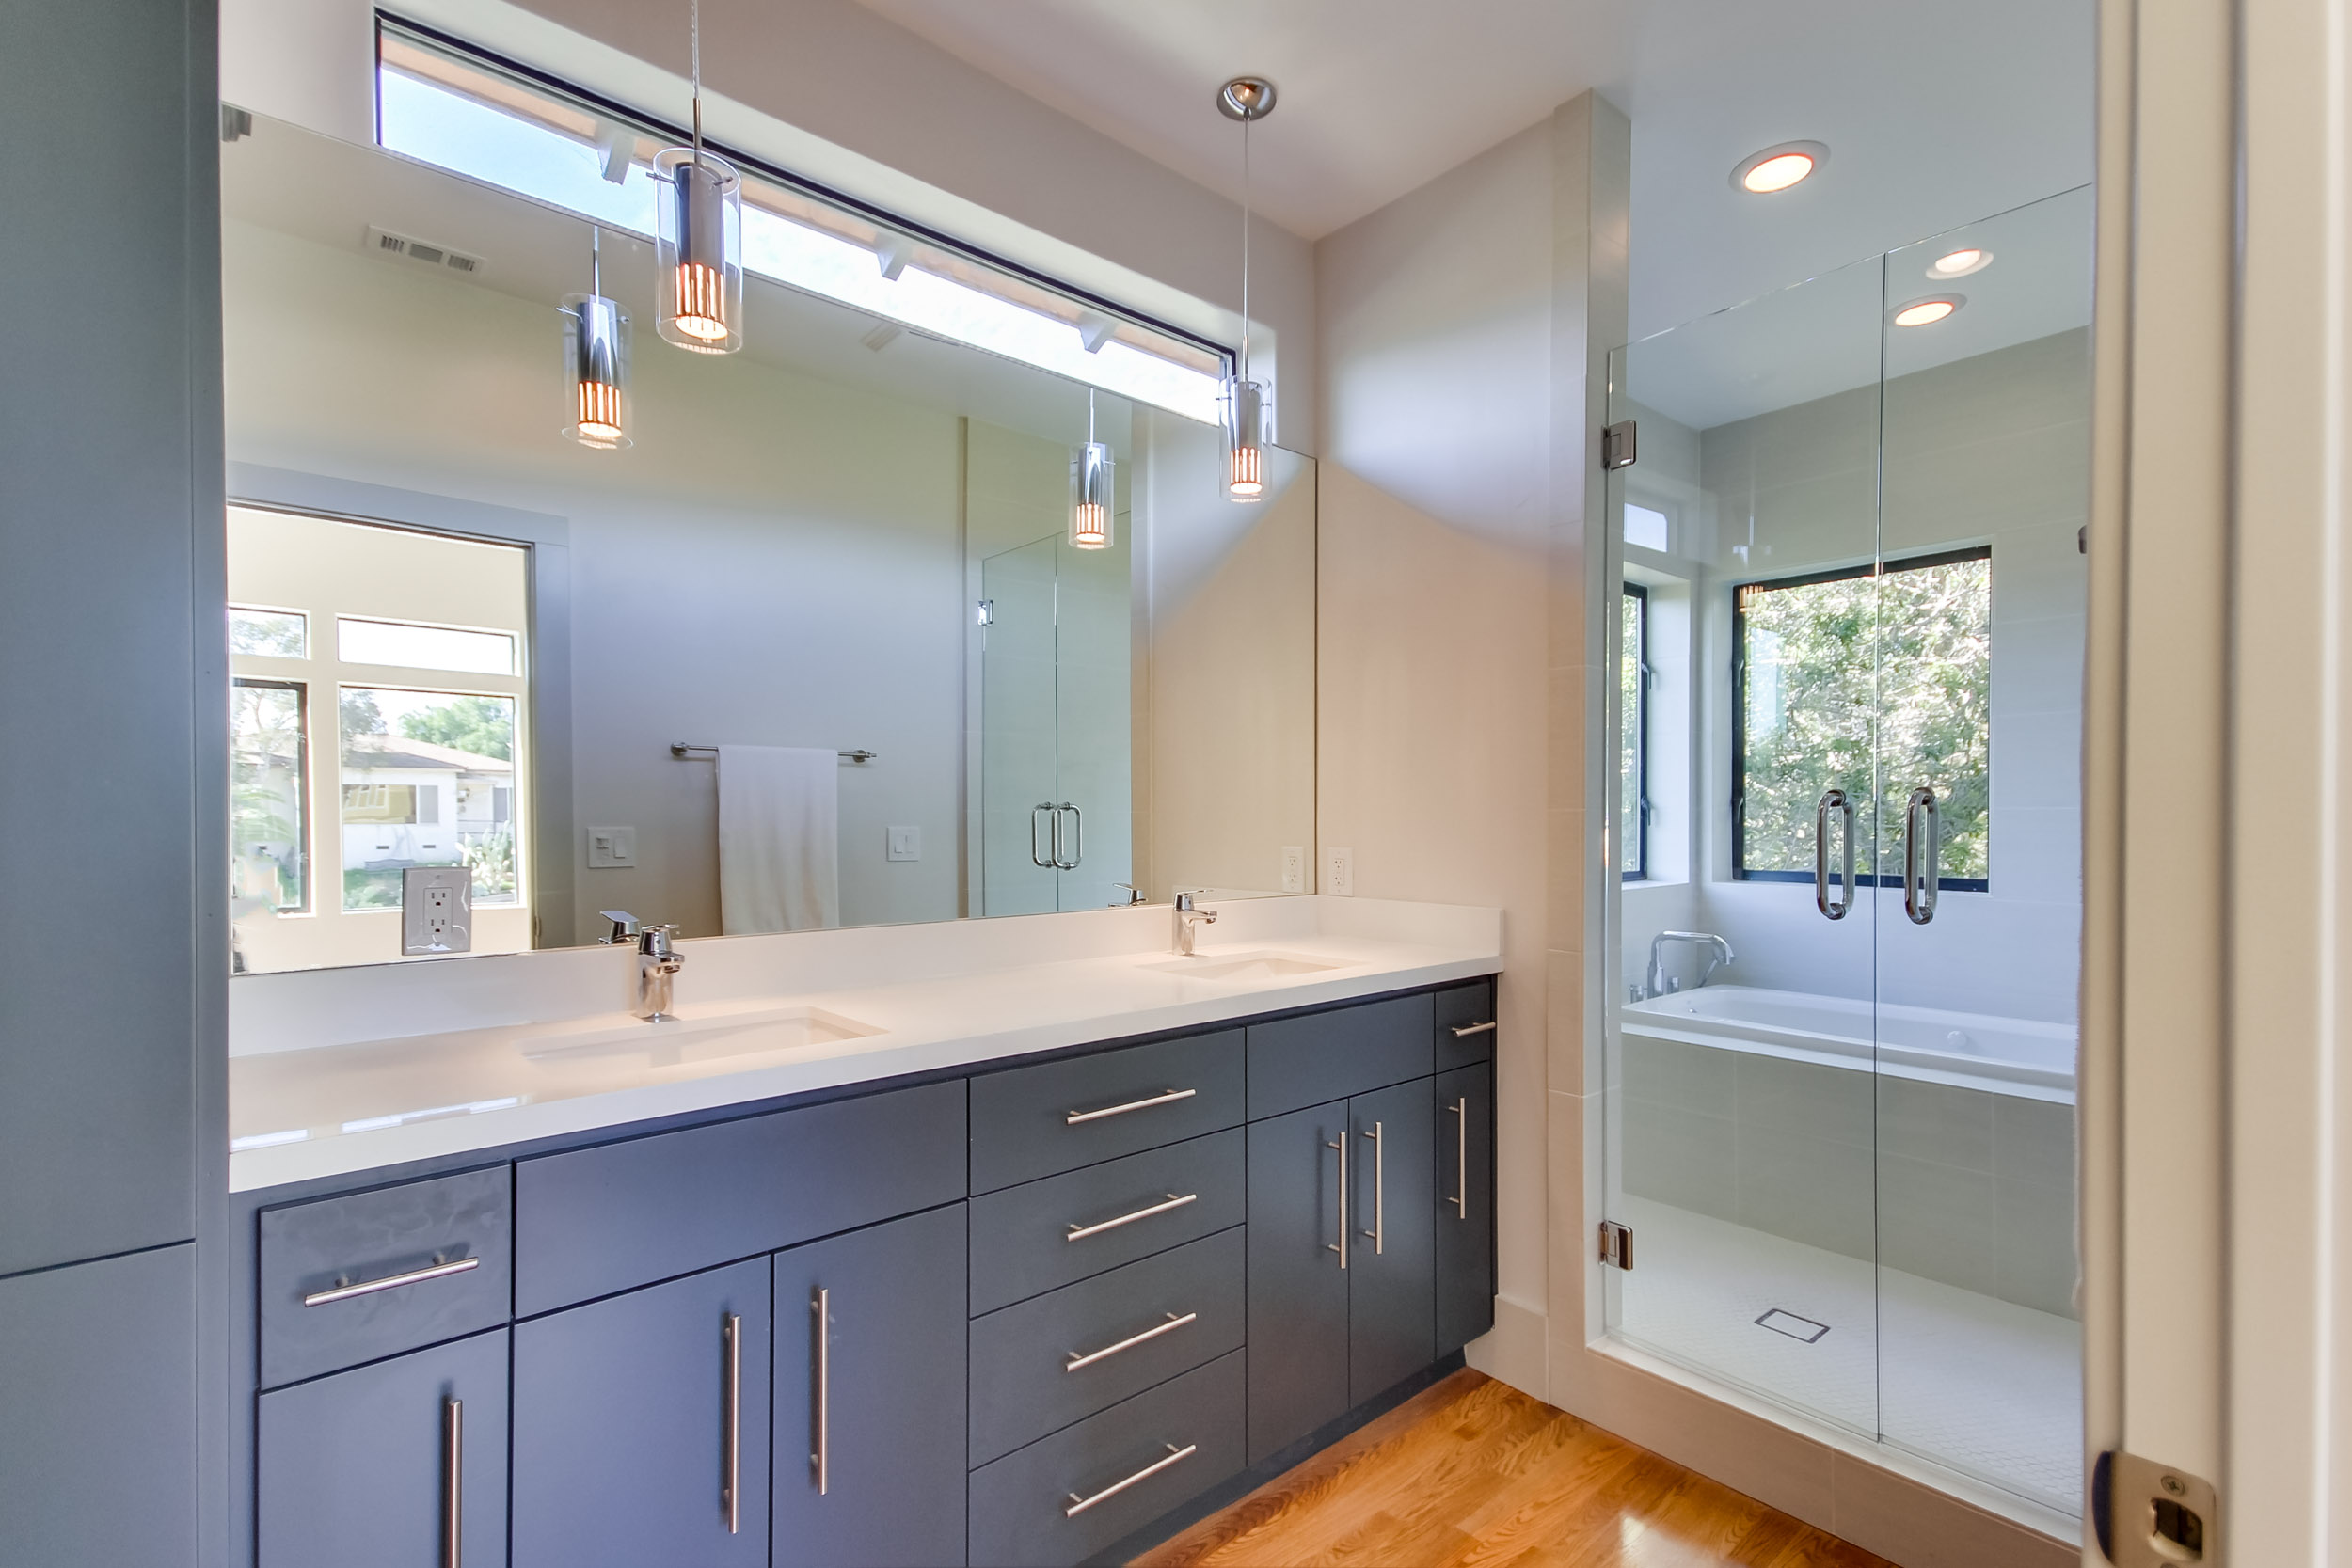
It gives a perfectly flat and plumb surface but definitely more work, he spent 4 days floating the walls with mud when I could have put up Hardi backer board in a few hours. The tile I went with in the master is a modern 12 x 24 light grey designer porcelain and I stacked it square to give a more clean minimalist and contemporary look.
In the hall bath I went with the 3×6 ceramic but also opted not do do a subway pattern so it will be more of a clean look with a period material, working well with our home design. Both bathrooms got great niches in the wall for soap and shampoo bottles.
I thought by now I would have been done with the house but things always drag out at then end, time is on my side with Christmas and New Years coming up now so we’ll move in after the holidays.
The San Diego real estate market is still very hot. No signs of slowing even through the typically slow Fall season. With only a little over 2 months inventory it is a sellers market again and we are seeing bidding wars and multiple offers in all price tiers.
I don’t see things changing through 2013 because interest rates will stay low and there’s no more huge waves of foreclosures coming as all the adjustable loans have reset already. Banks will continue to trickle out a few REO’s here and there, but even short sale volume is dropping fast. House flippers in San Diego will have a tough time competing with large, well funded buy and hold groups investing for appreciation.
Some flippers are moving up the price range and flipping million dollar homes where there is less competition. There’s a lot of investor and first time buyer activity and prices are being affected by it, October was up 13% from last year and in some areas have reached 2005 peak home price levels again.
Just over 4 months since I poured the foundation on our Modern Bungalow, we are making progress over in South Park, walk through with me and let me know what you think. The grey interior colors might appear a little soft but don’t let that fool you.
Once I get the warmth from the hardwood floor refinishing, and my bold surprise cabinet choices, it will all work. I’m moving straight into tile now and concrete flat work outside. My electrician is trimming out and we just passed the meter inspection Friday so I can call SDG&E now to get the power moved from my temporary pole to the house. Construction rough in is complete.
Have a Happy Thanksgiving and thanks for following!
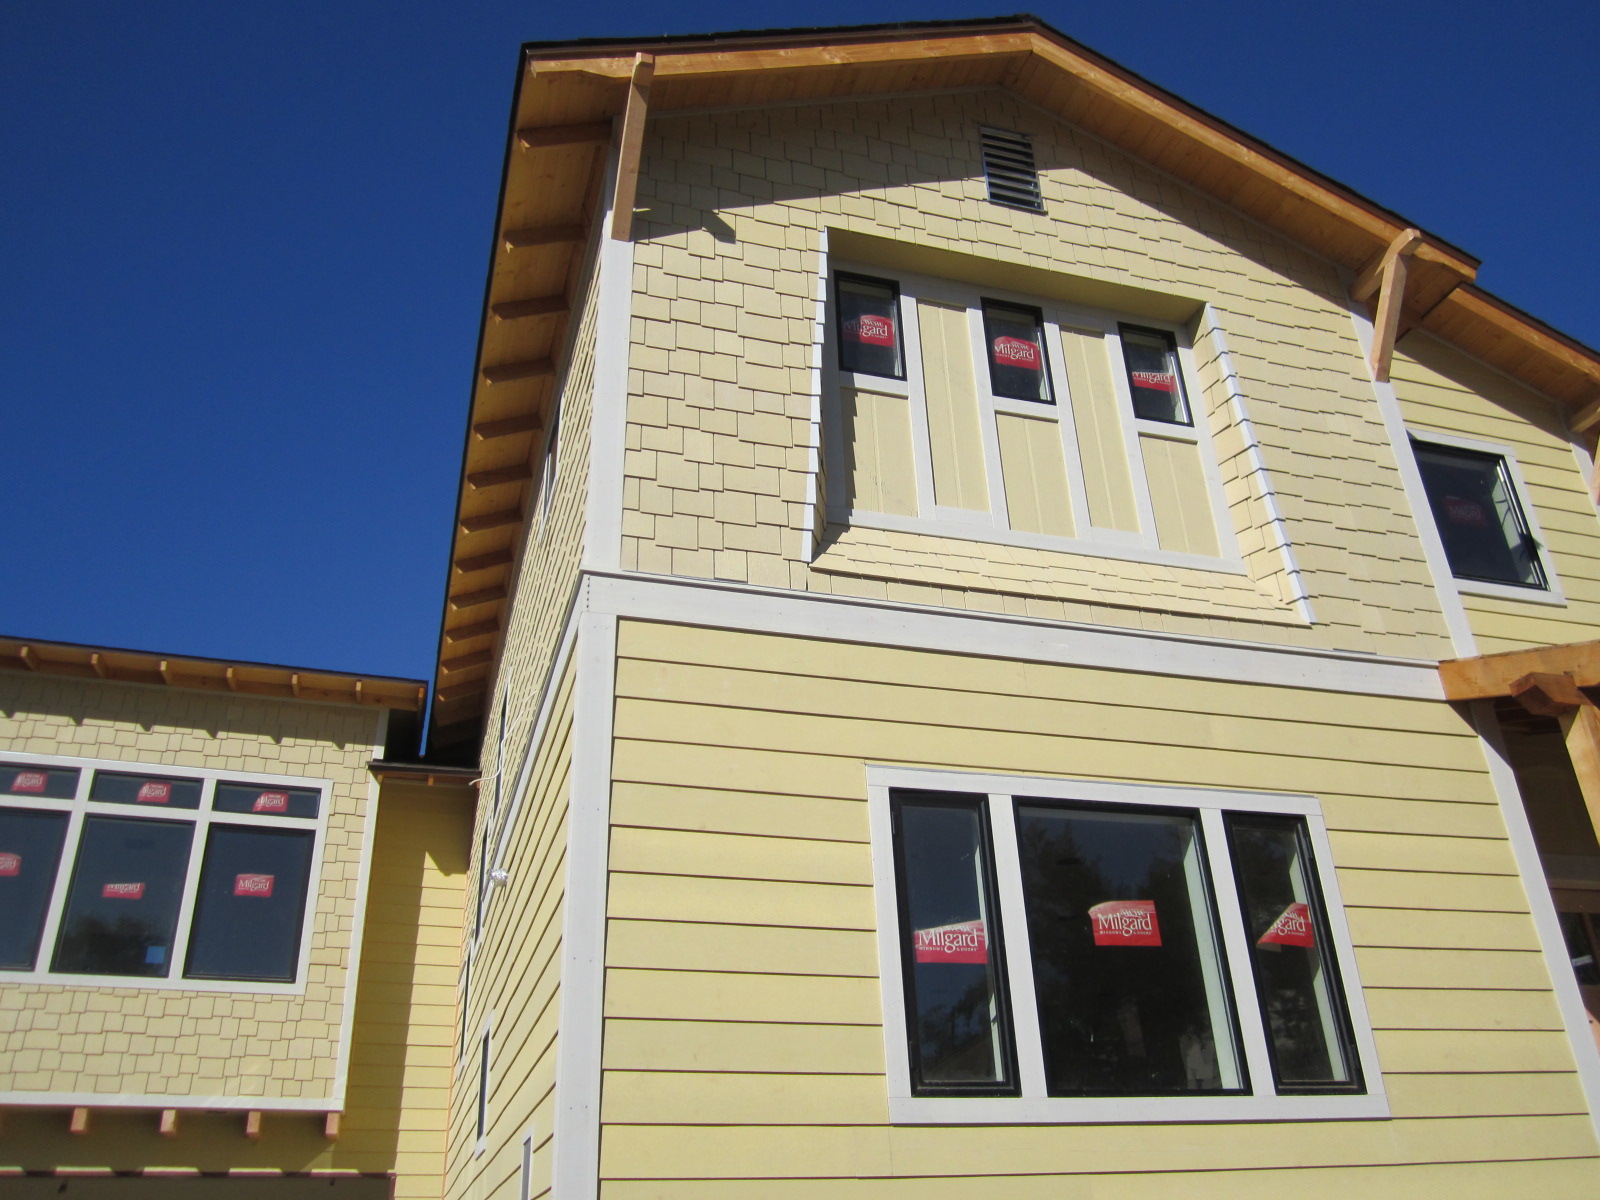
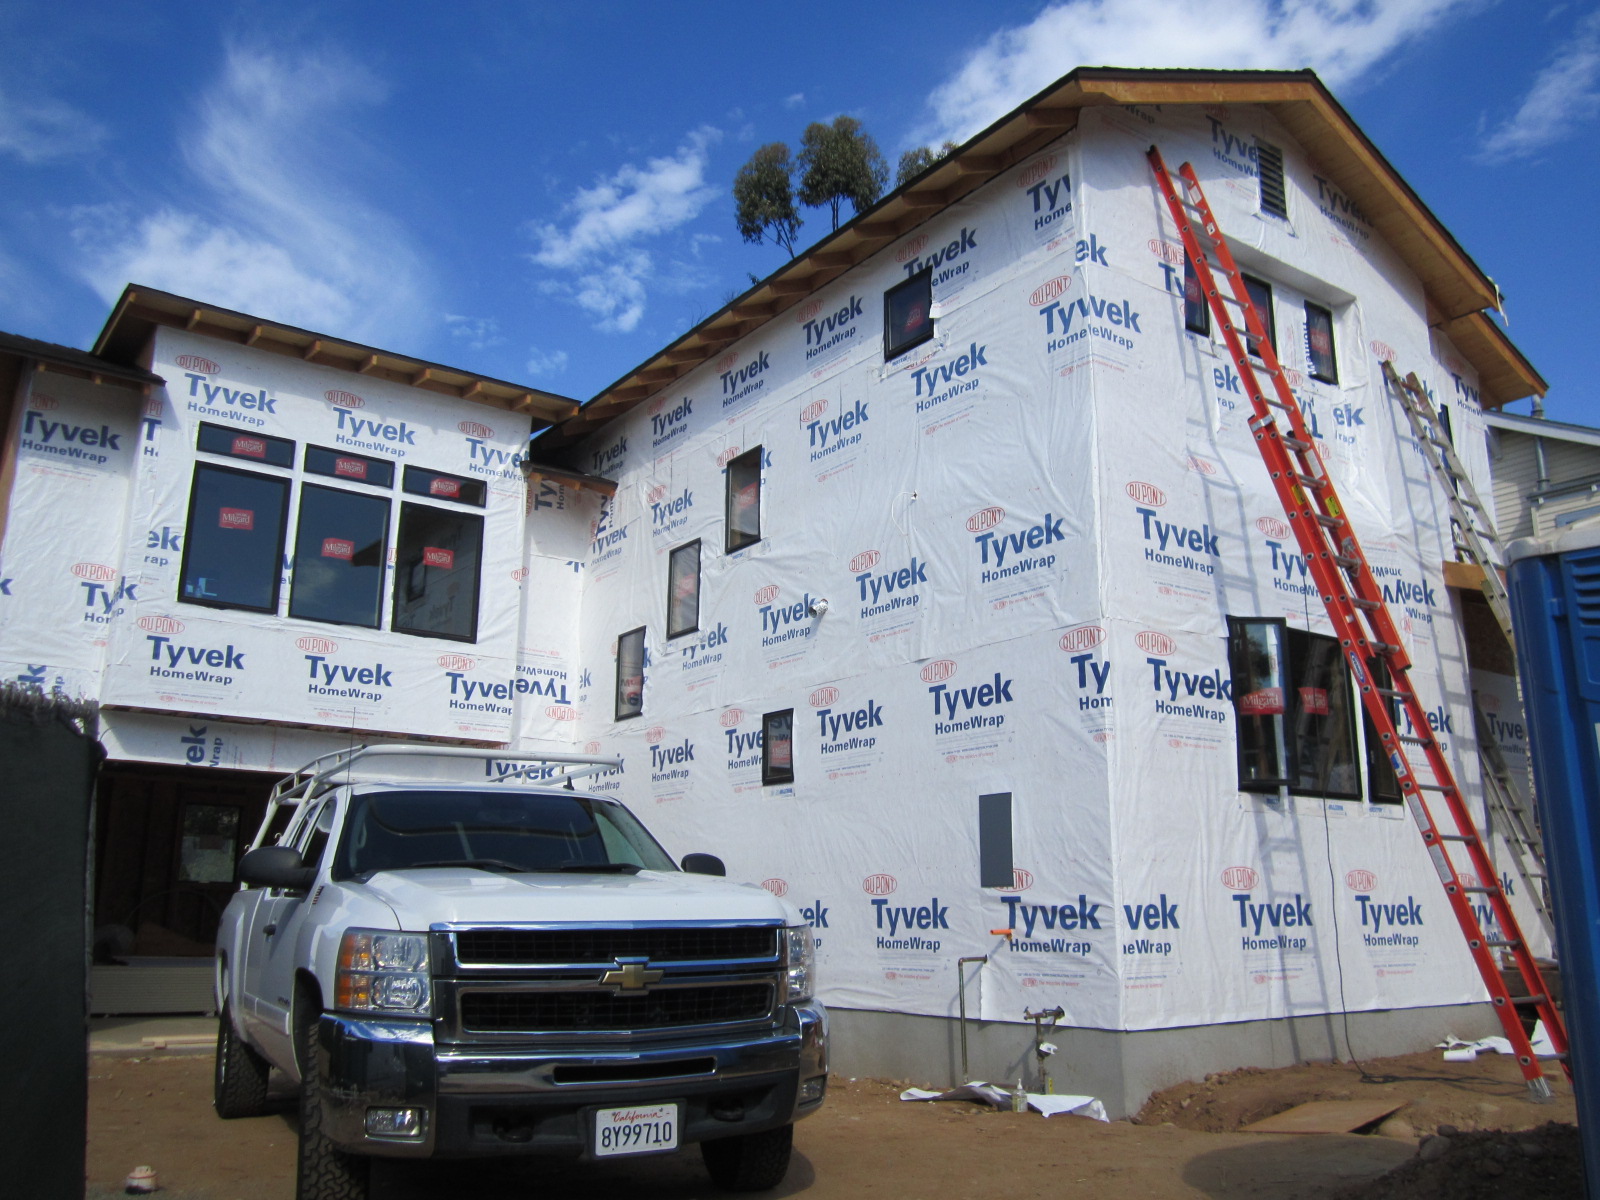
My new construction project is running very smoothly. After passing the inspection on my house wrap Monday, we were finally able to start putting the Hardi Siding up. I have really been anxious to see what the house will finally look like after all the rough work that gets buried and nobody will see. Now comes the fun part, which actually gives the house its personality. What’s inside the walls is just as good as you guys know, but this part is what I’ll look at every day.
First, I framed the windows with 1 x4″ Hardi Trim. The Hardi Lap Siding on the bottom goes up pretty fast in 12 foot lengths with a 7″ reveal, I went with the smooth version to look clean. The Hardishingle Staggered Edge style up top on the other hand, is quite labor intensive. The pieces are only 48″ wide and go up with a 6″ reveal, but really give the house some dimension and texture.
I ran a 1×8″ dividing band board with a 1×2″ shelf on top to separate the styles and add even more detail. The siding comes in primer, but oddly enough the color is similar to what we will actually be using for paint. We are now on our second wall, I can see this siding project stretching out to several weeks as there is tons of detail work and not much room around the house for the scaffolding, but its looking great!
The second inspection we passed this week was on Thursday, for the drywall screw spacing. The mud crew was on standby to start taping and floating everything once the inspector signed off on the hanging job. Once again, this is an extremely specialized crew. Different guys than the drywall hangers last week. We are putting one of the best drywall crews in San Diego on this project and after the whole house is taped and floated we’ll be doing 2 coats of a level 4 smooth hand-troweled texture.
In order to keep up my construction pace, I ordered all the pre-hung interior doors last week, bought the Red Oak unfinished hardwood flooring material this week, and am currently about ready to pull the trigger on the millworks package. It’s all about thinking 2 steps ahead to make sure you don’t run into a 3-week wait for a special order, which in my case is just about everything.
It seems most sub-contractors are having a busy summer. Building is definitely picking up by talking to everyone in the industry. Because of this, my regular electrician couldn’t get to my project right away so I brought in a new crew.
These guys are new construction, not messin’ around, real-deal electricians. 5 guys showed up on Saturday and by Sunday at 4pm the whole house was 90% done including 200 amp service, riser, all 24 branch circuits, home runs, under cabinet lighting, multiple 3-way switching and 24 can lights.
I went with LED recessed lighting for energy savings, having just used it on a customers kitchen remodel I was surprised that the light quality is far superior to the florescent cans we were using last year to conform to Title 24 requirements. For only 9 watts of power usage you get 65 watts of clean lighting, a huge savings on your electric bill. Just another green feature on this project.
We took the drywall delivery this week, too. I like to get it in the house and stacked in all the rooms ready to go before we close everything up outside. It would have been impossible to carry the 12′ sheets upstairs later so this is essentially planning ahead.
I measured 160 12′ 1/2″ sheets of drywall for the house and 5/8″ for the garage and under the stairwell per City Code. Material cost was $2021.00 not including tape, mud and corner bead.
For more energy savings we always foam the doors and windows before drywall. Some guys still wont do this because they think it will warp the window frames, but its the only way to get a complete seal after the new construction windows go in. We learned this in the hot Texas climate.
After it dries you just remove the excess that comes out and then you have a great energy seal. Per Building Code you also have to use the Fire Block foam on all the holes you drilled through the top plate for mechanicals. The inspector will look for this at my insulation inspection.
After the electrician was done I brought in my last and final mechanical sub-contractor, the Fire Sprinkler guy. Fire sprinklers on all San Diego residential new construction, and some addition/remodels in fact, has been mandatory since 2007 after we had the big Cedar and Witch Fires.
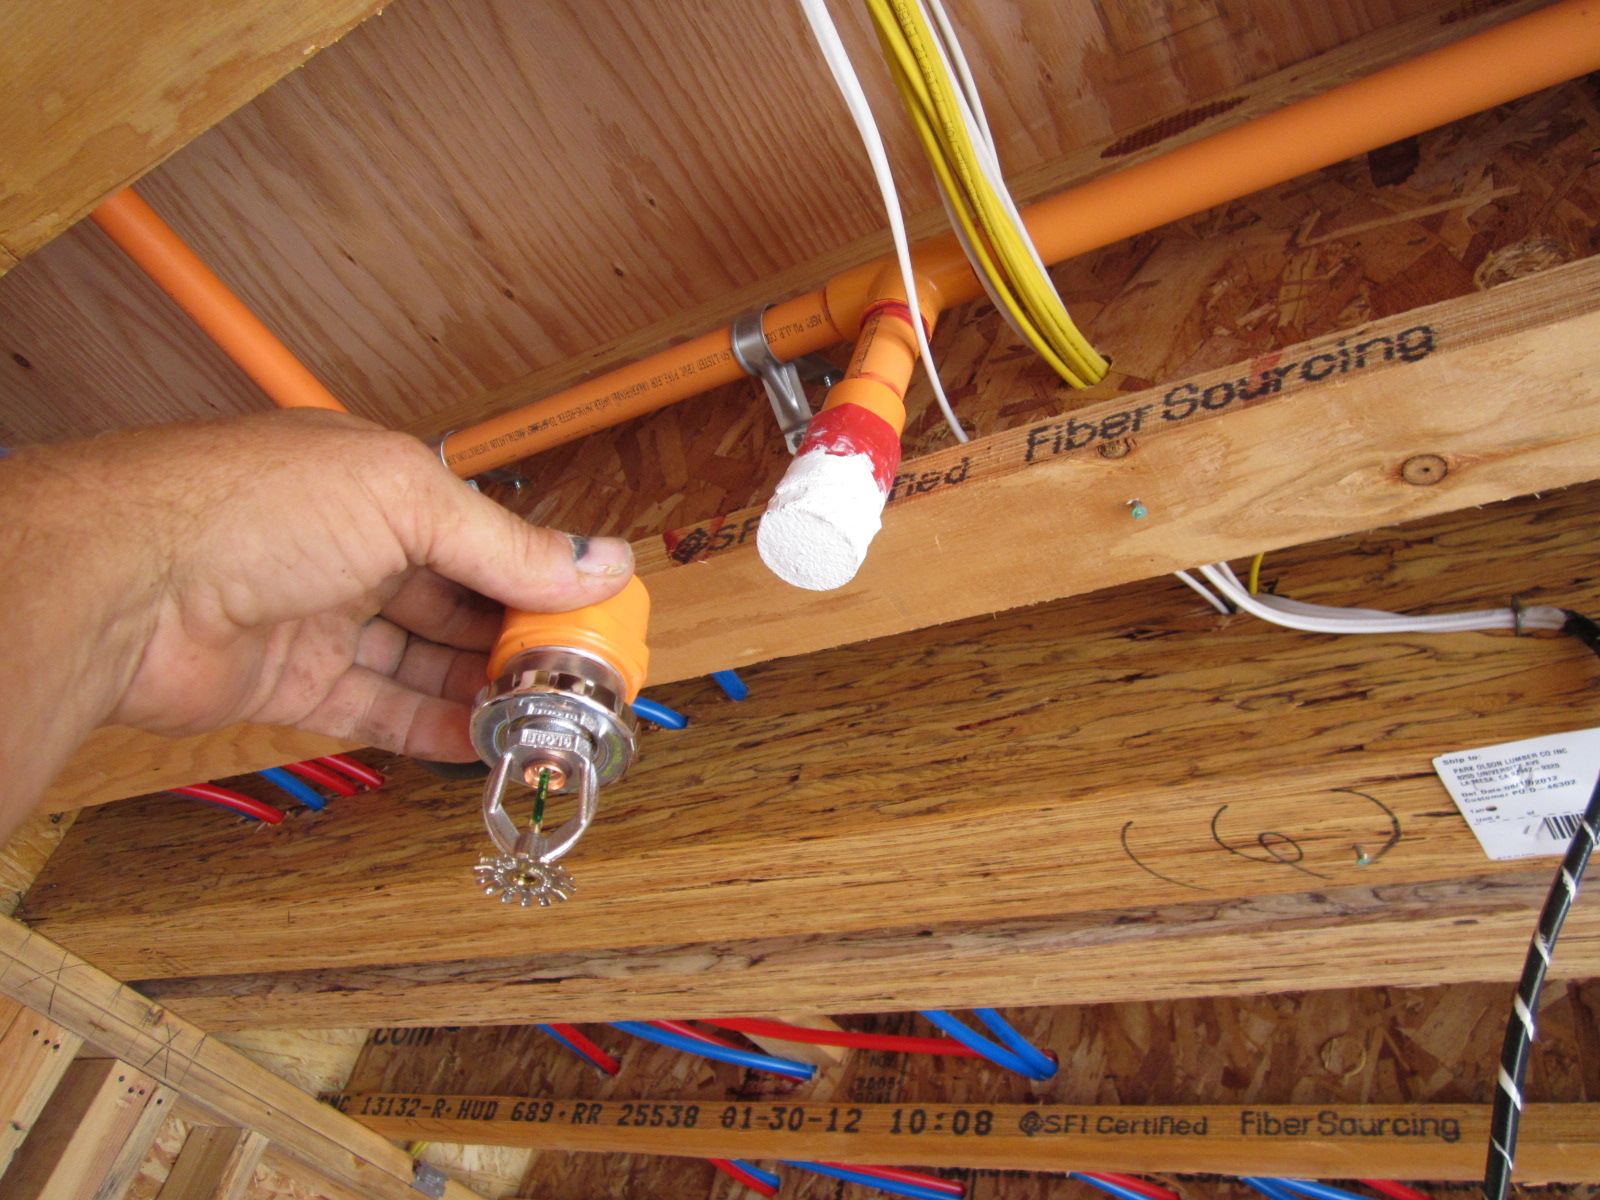
The supply lines come from a panel location near your water service. To handle the increased volume, water supply size is stepped up to 1 1/4″ to the house and 1″ at the cut off. The fire sprinkler lines are 1″ CVPC that is orange in color, its ran throughout the entire house keeping heads around 8 feet apart and away from A/C registers and lighting, and the calculations call for a certain number of sprinkler heads per room size.
Per his City permitted design, my sub-contractor has 4 heads in the great room, 1 in each bedroom and bathroom, and even 1 in the walk-in closet, water heater closet and HVAC closet. The master bedroom got 2 heads. The fire sprinkler heads will not be visible in the living areas and look like flush mounted white discs after trim out.
The fire sprinklers in the garage go by different calculations and are a bit different, visible sprinkler heads will be in place after drywall. The requirement is 1 head for every 150 s.f. of garage space.
This is the fire sprinkler riser that is located in a panel accessible from the outside of my house near the water service. It also feeds the bell box which gets mounted high on the house in an area where bedrooms can hear it easily.
Once the system is pressurized with water the Fire Marshall will come inspect it and give me a card, which in turn I will give to the City Inspector at the Frame and Rough inspection this week. The cost for this complete fire sprinkler system installed, with design and permits was $2,200.00. I’m ready for this big monumental inspection this week, its all going to be downhill after we get to start insulating and hanging drywall, stay tuned!
Here’s a Sneak Peek of the new build we are doing in South Park. Rough framing is now complete, roof on, Milgard aluminum windows in, plumbing done, HVAC almost complete, next up is electrical and fire sprinklers then I can call for the big “rough-in” City inspection.
Building new construction is actually a lot easier than remodeling an old home. I liken it to model building when I was a kid. Its all about doing things in a certain order and planning ahead with ordering materials and taking deliveries.