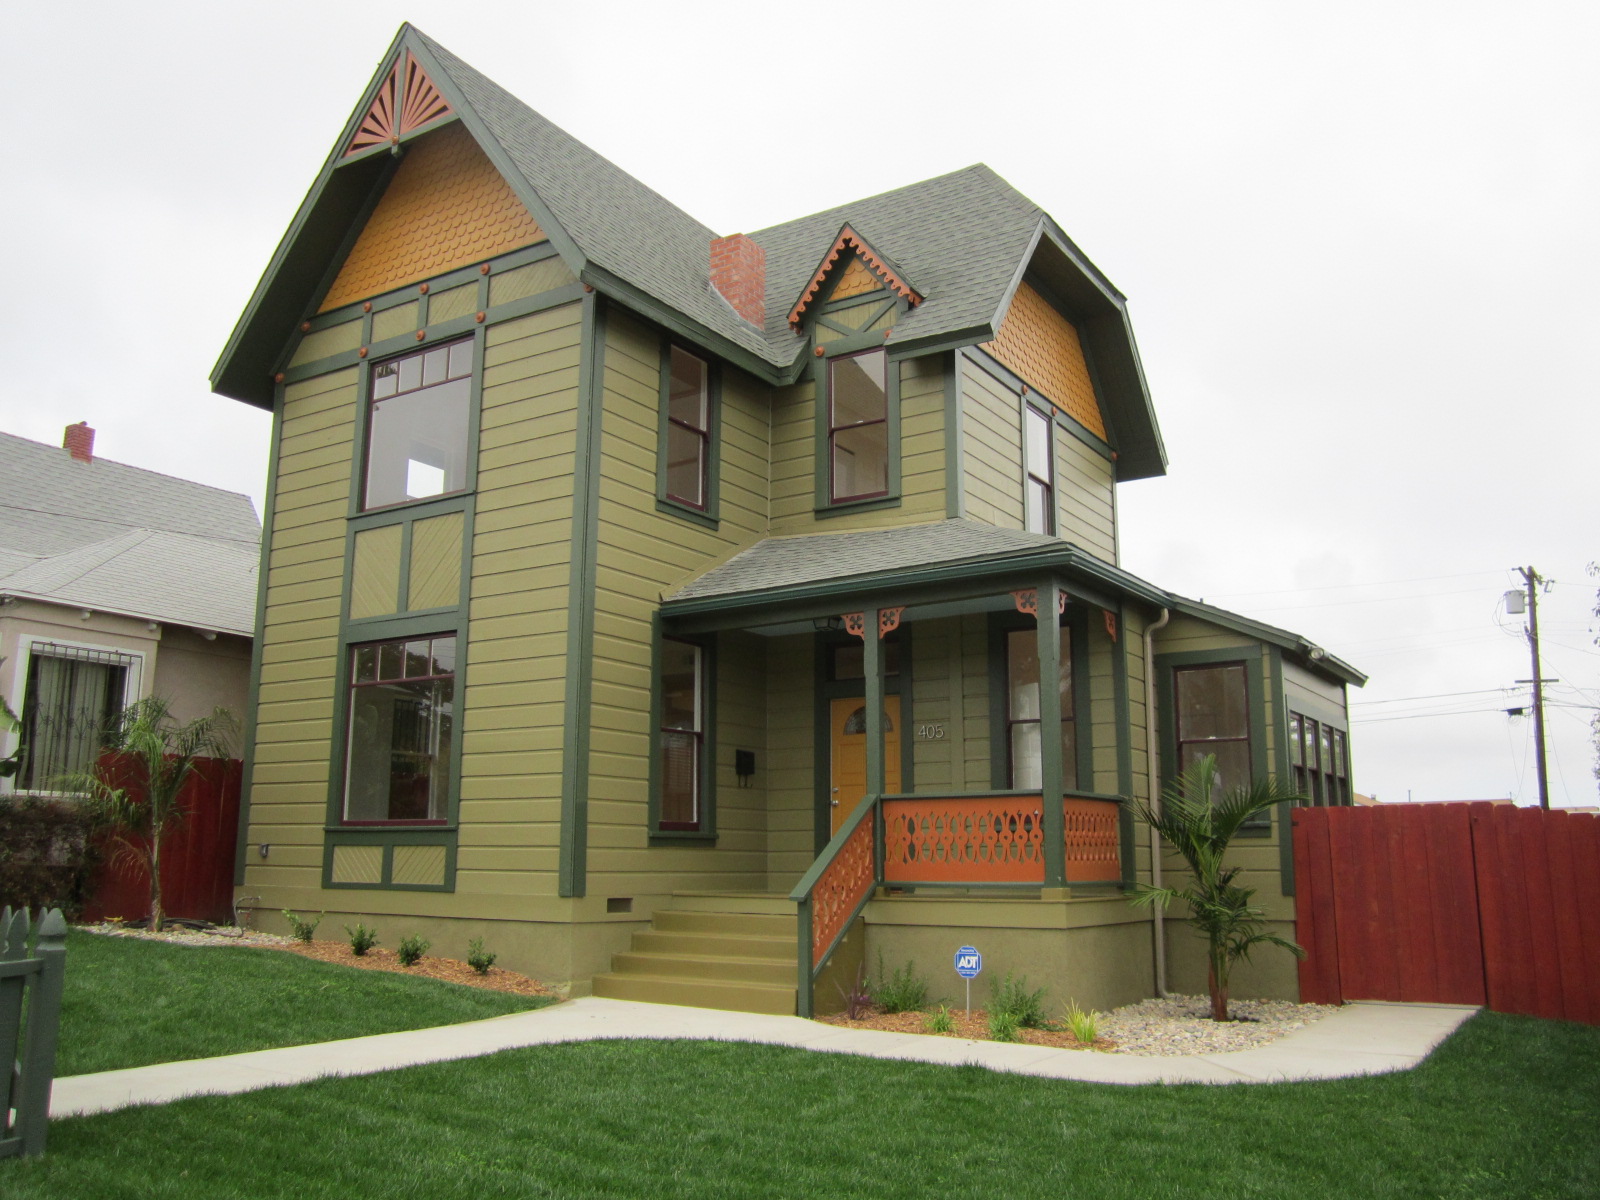
It’s finally done! Green Button Homes presents: “The Painted Lady” for $499k, she’s a 5 bedroom, 2.5 bath, 2044 s.f. 1909 Victorian Gingerbread that we totally restored over the summer. There’s nothing like this property in San Diego right now on the market for the price. I’m having an Open House this Sunday October 23rd from 1-3 pm.
If you are in the market or just want to see the Painted Lady please feel free to stop by after the Charger game. The address is 405 27th Street 92102 in Historic Grant Hill Park.
Here’s a walk through video of the Painted Lady from Jim The Realtor, he’ll also be onsite Sunday to assist any potential buyers. I’ll post more pics, back stories on the property and a before and after video soon.
*Realtors, we are showing this fine property by appointment only. There is no lock box onsite. If you have a buyer and want to schedule a showing please call Jim Klinge (760) 434-5000 or myself at (619) 565-7475. See ya Sunday!
What’s an urban restoration project like without adding just a tad more hardscape to blend in with the mass expanses of paved metropolitan living? There is always a danger of adding too much concrete and having your house look like a parking lot but I think I pulled it off and managed to give the new owners a place for 4 cars to park securely while also enhancing the landscaping design with the sweeping walkway around the side yard. After receiving multiple bids in the $5 – $7 per square foot range, I managed to pull off the 22 yard pour for just around $3.75/s.f.
There was a block wall that was cracked and leaning over out front so we formed and poured around it after some reinforcing with rebar. Once I crack off the forms we’ll give it a swipe with spec mix for a sanded stucco finish to match the foundation walls. I thought this was a good quick fix as opposed to demolishing everything and having someone stack a whole new block wall which technically would also have to be permitted with the City. Inside this week, we also stripped all the paint from the 100-year-old staircase after deciding it will look better in its natural redwood state rather than painting it with all the trims.
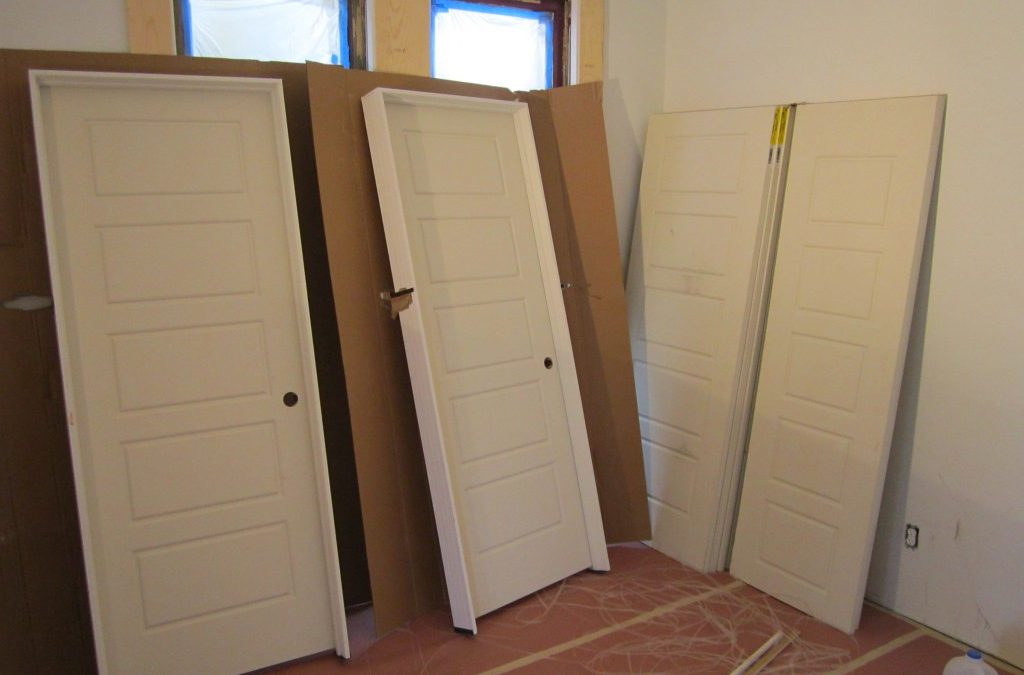
My special order interior doors from Home Depot came in so I jumped right into trim carpentry all week so I could get one step closer to painting the inside of the house. As you saw last week, my hardwood floors went in first, after protecting them with rosin paper I then trimmed out the entire house on top of the floors (baseboards, doors and door casings). That way you don’t have to notch the floors around door jambs and casings or undercut everything and you actually get the wood floors under the baseboards for a better finished product. I am using the same style door as on the Target House called “Riverside” from the Masonite Anniversary Collection. They are a 5-panel raised profile that look good with historic homes. These hollow core MDF doors are cool and are fit within my budget at $80.00 each for the complete pre-hung door with jamb. I also bought matching door slabs for the bedroom closet sliders so everything is consistent. You get to choose the finish on your hinges so I ordered chrome again so I can use brushed nickel knobs and still match modern chrome bathroom and kitchen hardware. They come pre-primed so after everything is installed, caulked and holes filled I will spray them along with all baseboards, window trims and closet shelving in place then lastly, apply the wall color with brush and roller.
For those of you do-it-your-selfers out there, here’s a good trick for ya. Install one side of the door casing with the door on the ground, then tip the pre-hung unit into place and secure it with the finish nailer. Afterwards go to the other side and install the door casing. This is way faster and easier than hassling with shims and battling it for an hour to get it straight. This is how the pro’s do it so give it a try next time you’re hanging doors and you’ll never use shims again. For my door casings I used square profile MDF in a 1 x 4″ to match the original period mouldings that would have been in the home.
I had to go with the huge 1 x 8″ baseboards on this house, I’ve used them before but with the giant room sizes and high ceilings it was a clear choice, not to mention its close to the size that were originally there. After asking all around town I finally found out where everybody gets their trims and its not Home Depot. Builders Moulding Supply in El Cajon has just about any style and size moulding you could want, that’s all they sell and you get it in bulk 16 footers right on spot from their warehouse at a price 30% less than the big box stores. I spent about $1,000 for everything I needed for my trim job minus the closet build-outs which I’ll use pine for because it seems more durable and holds more weight then the MDF. I was pretty happy to see that they also come pre-primed because my old supplier used to only offer them raw. After everything is painted I’ll peel up the paper on the floor and lastly nail in the shoe moulding on the bottom of the baseboards to complete the historic look I’m going for. We’re getting alot of attention at the house now, several interested parties stopped by this week asking when it was going to be done. I’m pushing for late September but its going to be tight especially because I’m doing an equity grab and not paying out a bunch of labor costs in the final stretch. I figured either way it wont be prime selling season so I might as well save the money. The good thing about the timing is that If I get into the next project soon I can stay busy this winter and hit the Spring selling season perfectly. There are so many things about this project that I write off to warming up in San Diego, I’m ready now to dial in my system on the next house. It’s been 100 degrees for months in Texas, it’s been nice to finally be home and we’re having fun!
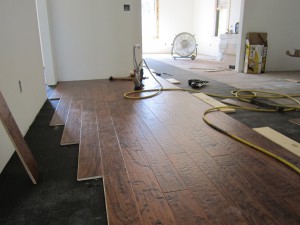
It’s really nice to be able to try new materials when you are flipping houses, I’m really happy with the hand scraped and distressed hardwoods as an alternative to what style I usually use. In the big expansive space they look bold and fresh. With the large rooms and white walls I still get the expansive feel but with the warmth of the darker wood. Before nailing down the wood you can see I put down 15 pound felt paper as a moisture barrier. With one helper I installed 1400 s.f. in 3 days. Sub contractors were charging $2-3 bucks a foot so by doing this myself I shaved 3k in expenses. The walls are primer now so you can start to visualize how the white interior paint will look. I chose Benjamin Moore Cloud White and hopefully will get it put up soon.
We also installed the 2 new front fixed windows. I made some historic replicas with the mullion across the top. Now the house is finally aluminum window free and all evidence of the former owners 1980 remodel are removed except for the black interior paint on the staircase handrail which will disappear soon enough. My electrician stopped by and made up all the switches and receptacles so now I can have light inside while we paint. We also spent the majority of last week still re-hanging the original windows and trimming them out, there is so much little stuff to do it really seems like its slowing down but I cant pull in a bunch of subs because it will blow the budget so with the help of my right hand man we are tackling everything ourselves. I ordered the interior pre-hung doors so hopefully next week I can get them in and trim out the whole house with casings and baseboards.
Currently up on deck I’m planning on interior paint, tile and kitchen cabinets. From what I’m noticing on the streets it seems like the market is slowing down and inventory is not moving as quickly, I’m not really bothered by it because we have such a specialty project but if I was one of the high volume, run-of-the- mill San Diego house flippers I would be careful. Home prices are down 8% from last year so its extremely important to use recent comps when looking at investing in San Diego real estate. This is when quality over quantity pays off. We buy houses in San Diego and do the renovations ourself. Let us know if you are thinking of selling.
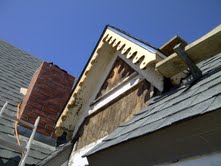
This is the craziest roof I’ve ever done and it didn’t help that my roofer only saw it necessary to bring one helper. The pitch is a very steep 12′ on 10′ so it makes walking on it humanly impossible. Not to mention that there were 3 layers including the original wood cedar shake shingle that needed to be removed before we could even install the new roof decking made this an all consuming job. It was slow going all week due to the steep pitch, they even had to hand carry the individual shingles up the 32′ ladder as we couldn’t load the bundles anywhere on the roof. It’s always good to pick your roof color to go with what exterior paint colors you’ve got planned, I can’t tell you how many times I’ve seen rehabbers make this crucial mistake, like a brown roof with a green house. I usually use the Owens Corning 30-Year Estate Grey but this time I went with something new its the Lifetime GAF shingle in the color called Slate. It’s mostly grey but with a hint of blueish green to make it look like slate on an old house. I think its going to tie in nicely with my paint color scheme. The roof on this house is real important to get right because its so visible. I took this opportunity to remake the historic scalloped decorative facia board also on the mini front gable and it came out sweet.
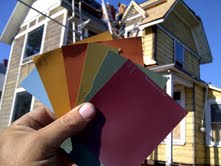
I also picked up my new wood historic style double-hung sashed windows by TM Cobb this week. These windows are so cool I wish I could replace all of them but the budget just doesn’t permit it. I’m putting in 8 new ones that are either unsavable or someone had already replaced with aluminum and refurbishing the rest of the original windows per the historic board guidelines. I cant put them in until I pass framing inspection. The electrician finished up this week so I’m now finally ready to call for rough-in inspections on framing, electrical, plumbing and hvac all at once. I think I’ve got 7 killer historic colors nailed down for the exterior, they are from the Sherman Williams Victorian House color collection. If the Historic Board approves it, I’ll be using a lighter green body, dark green trim, burnt orange accent on the sunburst, plum windows, medium orange for some accents, and light blue for the porch ceiling. There will also be a grey wood front porch to keep it period correct. These are some heavy colors but I think the Lady will hold them well as long as I use the accents sparingly and in the right places.
Here’s a walk through to show the progress of The Painted Lady at week 6. After waiting 4 weeks for historical board approval we finally got the green light so we started calling for inspections. It was quite interesting to say the least, initially we failed both the foundation and framing because of a few small issues. The trench for the foundation was 2″ too shallow, the plans I drew noted a 24″ deep trench which is overkill because a 2 story house only requires 18″ deep footings but I wanted to beef it up a little.
I also upgraded the rebar size from the nominal 1/2″ as code requires to 5/8″ just do make it stronger. None of this mattered when the inspector showed up, he failed me anyway for lack of the 2″ to make it match what the plans called for. On the framing I was missing a few nails as the plans called for. I knew it wasn’t a big deal to make these few changes so it really didn’t bother me to fail. We fixed them quick and called the inspector back out 2 days later.
This is when I learned that nothing is going to just get signed off on that quick. When he arrived it took him all of about 10 minutes to measure the trench depth and check for the framing nails. He then proceeds to tell me that he can only pass me on the foundation but I’ll have to wait to pass on the framing. Really, didn’t you just look and see I made the corrections? I’ve heard that they commonly show up and will only sign off on one or two things due to time restraints. The framing inspection includes about 4 categories; roof, floor, wall construction and sheer panels and could take up to 40 minutes in theory. Although he already verified everything was o.k. he only passed me on the roof portion “so I could stay busy and put my roof on.”
As you can imagine there’s not much new construction going on, so last year half of the inspectors got laid off so I don’t think morale is at its highest level. With half of the staff now the inspectors are covering twice the territories so there’s not much time when they show up. When dealing with inspectors always tread lightly, give respect and remember not to rock the boat. The best rule is to close your mouth and just listen.
This is exactly why most rehabbers look for the cosmetic flips or sneak by without permits. Next week will be big, plumbing is now completely done, hvac done and electrical 75% done. Monday we are finally pouring the foundation after waiting forever for the City. Even with the slow downs I’m still pushing, small set backs are just part of the business.
Several other cool things in TomTarrant.com land for this week;
1. There is a new contest at REIClub.com that I am nominated for. It’s another Best Real Estate Investing Blog shoot out. I’m up against some really popular sites so please go and cast your vote for me. Voting doesn’t begin until Monday, June 13 and goes through midnight on Friday June 17. This one is big, I could win a $250 Apple gift card which my wife would love. I need your help on this one guys, if you like the info I share here for you, please take a second and go vote for me!
2. Joshua Dorkin over at Biggerpockets.com asked me to do an off the cuff Skype video interview for him where we’ll cover general real estate investing stuff and info about my house flipping business. Make sure and go by his site next week and look for the interview. I’ll probably spill all the secrets you’ve been wanting to know.


