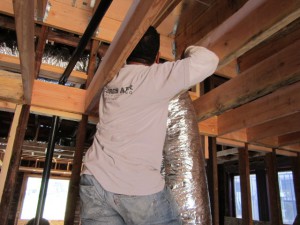
We finally passed all rough-in inspections and have now hung all the insulation. It took 2 tries with my hvac sub contractor, he forgot to strap down the furnace and didn’t run hard pipe gas line through the unit so we had to call for a second inspection after having him come fix the two issues. These are small details which he should have caught but nonetheless we got all the signatures now on our inspection card and the City inspector is starting to warm up to me a bit now that he sees we know what we are doing. Right after passing I scheduled the insulation to be hung the next day and its called in for an inspection for tomorrow. I insulated the exterior walls and complete sub floor. This is over and above what my permit called for but having all the walls opens provides such an obvious opportunity to save energy and provide someone with a product we can be proud of. I’m sure the new homeowner will unknowingly be thanking me every month when they pay their electric bill. With all the walls open I also ran Cat-6 and cable wires to all the bedrooms. We are in a heat wave right now in San Diego, I wouldn’t have wanted to be the guy under the house all day itching and scratching trying to hang this stuff. I jumped outside and started trimming out the exterior also, I re-framed the front porch and used 1×3 tongue and groove for the decking that’s historically correct. It’s a little more than I could have spent on another material but its details like this that will pay off in the end and especially since its on the front of the house which is always the most important to focus on.
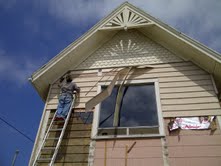
I also got some of my windows installed and I’m telling you they are so neat. TM Cobb makes a mighty fine wooden double hung window for historic homes. I’m totally happy and cant wait for the missing 2 to arrive with the Victorian front door so I can install them too.
Here’s the bank of 4 windows on the study or optional 5th bedroom. This room is going to be killer with all the light that’s coming in. There was a lot of missing trim on the corners of the house that was probably removed when the metal siding went on. This stuff is easy to replace so we’ve been working our way around the house getting everything back to how it should be.
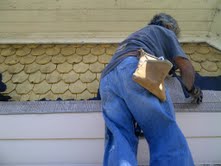
For the rear master suite room addition I purchased 10″ cedar beveled channel siding from La Mesa Lumber at $2.50/foot. This is the first time I’ve used it and boy is it nice. It comes pre-primed and its very straight, unlike the T117 siding I’ve frequently used on the Craftsman bungalows. We wrapped the room addition with Tyvek first of course and are now putting the 773 siding up. It’s great to use all the correct materials, in this case its costing me about $1400.00 for this siding but its going to be worth it. The historical review board here in San Diego wouldn’t even have let me use Hardi Siding if I wanted to. My colors were also approved this week so once the exterior trim and siding is all complete I’m going to have 2 crews in simultaneously painting the exterior of the house and hanging the drywall on the inside. Once the drywall is hung we have to get a nailing inspection where they verify spacing on the screws before we tape and float over it. Stay tuned, we’re going to see some dramatic changes soon. Also, Get on over to Biggerpockets.com and check out the video interview I did with Josh. I break down our business model and explain what kind of projects we look for.
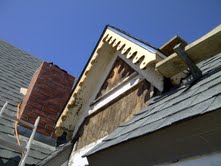
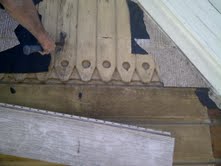
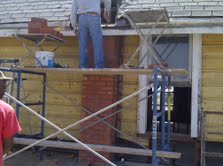
This is the craziest roof I’ve ever done and it didn’t help that my roofer only saw it necessary to bring one helper. The pitch is a very steep 12′ on 10′ so it makes walking on it humanly impossible. Not to mention that there were 3 layers including the original wood cedar shake shingle that needed to be removed before we could even install the new roof decking made this an all consuming job. It was slow going all week due to the steep pitch, they even had to hand carry the individual shingles up the 32′ ladder as we couldn’t load the bundles anywhere on the roof. It’s always good to pick your roof color to go with what exterior paint colors you’ve got planned, I can’t tell you how many times I’ve seen rehabbers make this crucial mistake, like a brown roof with a green house. I usually use the Owens Corning 30-Year Estate Grey but this time I went with something new its the Lifetime GAF shingle in the color called Slate. It’s mostly grey but with a hint of blueish green to make it look like slate on an old house. I think its going to tie in nicely with my paint color scheme. The roof on this house is real important to get right because its so visible. I took this opportunity to remake the historic scalloped decorative facia board also on the mini front gable and it came out sweet.
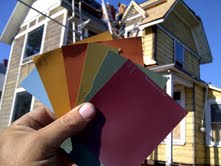
I also picked up my new wood historic style double-hung sashed windows by TM Cobb this week. These windows are so cool I wish I could replace all of them but the budget just doesn’t permit it. I’m putting in 8 new ones that are either unsavable or someone had already replaced with aluminum and refurbishing the rest of the original windows per the historic board guidelines. I cant put them in until I pass framing inspection. The electrician finished up this week so I’m now finally ready to call for rough-in inspections on framing, electrical, plumbing and hvac all at once. I think I’ve got 7 killer historic colors nailed down for the exterior, they are from the Sherman Williams Victorian House color collection. If the Historic Board approves it, I’ll be using a lighter green body, dark green trim, burnt orange accent on the sunburst, plum windows, medium orange for some accents, and light blue for the porch ceiling. There will also be a grey wood front porch to keep it period correct. These are some heavy colors but I think the Lady will hold them well as long as I use the accents sparingly and in the right places.
First and foremost, Happy Fathers Day to all the dads out there! The coolest thing we did this week at The Painted Lady was to remove all of the 1970’s Sears metal siding, of course we recycled it to help save the planet. This is the third time I’ve done this on a historic house but I’ve never removed 2 different layers to get down to the original wood. It’s always a gamble because you never know of the condition underneath but its been my experience that the asbestos or vinyl that’s on top actually preserves and protects the old wood and I’ve always been surprised to see near perfect siding with minimal paint jobs buried underneath. The more the homes get painted over the years, the harder it is to prep so in this case when I found the original yellow paint job with nothing cracking or peeling I was excited. As we removed it, I found tons more hidden architectural details that these Victorian houses are famous for so I had to tell myself it must have been a pretty good salesman in a polyester jacket who was able to convince the homeowner with his “never paint your house again” pitch years ago to cover all the character of their house up. These cool details in the trim on the house are going to put my paint job over the top.
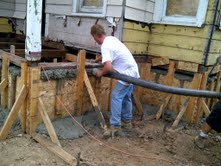
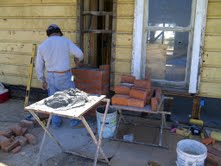
We also finally got the foundation poured, it took 2 full trucks with almost 20 yards of concrete total, as well as a pumper rig to fill up the spaces we left open around the house in the forms. Once filled we removed the forms while it was still green and hand troweled the finish. Its harder to work with but I used the 1.5″ rock aggregate although most guys use the pea gravel mix. Since the stem wall is 3 feet high in some spots I wanted it to be as strong as possible. This house isn’t going anywhere now for another 100 years. The Historical Review Board also asked me to replace the visable portions of the old chimneys in order to keep the house period correct. The old ones were crumbling and dangerous and I deleted them from inside the house to maximize my floorspace and intended not to re stack the exterior, they weren’t fireplaces inside but only basically a brick flue for stove exhaust. I found some used bricks on Craigslist and had them re-stacked just from the roof line up, I had to knock this out before the roofers show up on Monday.
I finally met with some sub contractor drama this week from one of my subs, I knew everything was going too good to be true. It’s crazy, but unfortunately I cant share the story although it involves the FBI. Hopefully he’ll have his helper finish up next week so I can call for rough in inspection and be ready to insulate and drywall after the new roof goes on.
Here’s a walk through to show the progress of The Painted Lady at week 6. After waiting 4 weeks for historical board approval we finally got the green light so we started calling for inspections. It was quite interesting to say the least, initially we failed both the foundation and framing because of a few small issues. The trench for the foundation was 2″ too shallow, the plans I drew noted a 24″ deep trench which is overkill because a 2 story house only requires 18″ deep footings but I wanted to beef it up a little.
I also upgraded the rebar size from the nominal 1/2″ as code requires to 5/8″ just do make it stronger. None of this mattered when the inspector showed up, he failed me anyway for lack of the 2″ to make it match what the plans called for. On the framing I was missing a few nails as the plans called for. I knew it wasn’t a big deal to make these few changes so it really didn’t bother me to fail. We fixed them quick and called the inspector back out 2 days later.
This is when I learned that nothing is going to just get signed off on that quick. When he arrived it took him all of about 10 minutes to measure the trench depth and check for the framing nails. He then proceeds to tell me that he can only pass me on the foundation but I’ll have to wait to pass on the framing. Really, didn’t you just look and see I made the corrections? I’ve heard that they commonly show up and will only sign off on one or two things due to time restraints. The framing inspection includes about 4 categories; roof, floor, wall construction and sheer panels and could take up to 40 minutes in theory. Although he already verified everything was o.k. he only passed me on the roof portion “so I could stay busy and put my roof on.”
As you can imagine there’s not much new construction going on, so last year half of the inspectors got laid off so I don’t think morale is at its highest level. With half of the staff now the inspectors are covering twice the territories so there’s not much time when they show up. When dealing with inspectors always tread lightly, give respect and remember not to rock the boat. The best rule is to close your mouth and just listen.
This is exactly why most rehabbers look for the cosmetic flips or sneak by without permits. Next week will be big, plumbing is now completely done, hvac done and electrical 75% done. Monday we are finally pouring the foundation after waiting forever for the City. Even with the slow downs I’m still pushing, small set backs are just part of the business.
Several other cool things in TomTarrant.com land for this week;
1. There is a new contest at REIClub.com that I am nominated for. It’s another Best Real Estate Investing Blog shoot out. I’m up against some really popular sites so please go and cast your vote for me. Voting doesn’t begin until Monday, June 13 and goes through midnight on Friday June 17. This one is big, I could win a $250 Apple gift card which my wife would love. I need your help on this one guys, if you like the info I share here for you, please take a second and go vote for me!
2. Joshua Dorkin over at Biggerpockets.com asked me to do an off the cuff Skype video interview for him where we’ll cover general real estate investing stuff and info about my house flipping business. Make sure and go by his site next week and look for the interview. I’ll probably spill all the secrets you’ve been wanting to know.
Even with the short week we still managed to get a lot done. The plumber is almost done now and I had the hvac guy come through and he roughed in the whole house in 2 days. I installed a Goodman 70,000 btu central heat system only with all new ducts. It was a breath of fresh “air” not to have to do the full central air system because in most areas in San Diego you don’t even need air conditioning. These guys don’t mess around in this town, he rolled in with 6 helpers and they knocked it out. What a change from “Land of Manana” as we called San Antonio, where most workers only did the bare minimum, never showed up and just squeaked by since the cost of living is so low there. Thanks to my buddy Curtis Gabhart from Gabhart Investments for the referral! Check out his site if you want to see how the big boys are rehabbing here in San Diego.
I always bring the hvac sub contractor through second, then finally my electrician will come Monday and start with my 200 amp rewire and new service. The best news all week was that I finally appear to have approval from the Historical Review Board. The City Planner emailed me late Friday and said I could come pick up my plans. My project has been under review for over 4 weeks now, luckily they stamped my structural and mechanical plans right away so I could get started. If everything was approved then I officially have the permit and I’m free to start calling for inspections and can move forward faster. I’ll call for the foundation inspection first so he can check our forms and rebar, then we can pour Wednesday. Next I’ll call in for framing inspection so I can then put the roof on. Finally I’ll call for rough-in inspections on all 3 trades so I can then hang insulation and drywall the house up. It seems like a lot but I’m really not that far away from getting it sealed up.
I was a little surprised about code differences between here and in Texas, seems with all the regulations here in California they would be a little more strict on the duct work but evidently you don’t even have to put “pookie” on the registers or plenum. In Texas with the summer heat they were really strict on the system install but then again this is heat only and no a/c. Right now it’s 68 degrees and sunny. Sorry, to my friends in San Antonio already sweating in 100 degree, 80% humidity.. its going to be a long summer!
The San Diego Real Estate market saw some price slippage, in May there was a 4% decrease from year-over-year prices. Nationally, the 20-City Case Shiller Metro home prices are already in double-dip territory but we aren’t there yet even with the large decrease. I attribute most of this to the artificial market and tax credit last Spring, if the government would just stay out of everything and let the markets correct naturally I think we’d be in a better place. Here’s a good article by Rich Toscano over at Voice of San Diego.org.
Lately I’ve been fielding some great questions privately and have always kinda thought everyone else would benefit from hearing my answers so I’m taking this email public as a test to see how it goes. It’s from Steve Parry, location unknown.
Hi Tom,
First off let me say I love your website. I’ve been following it for a while now and it is the most informative, honest flipping blog I can find.
The reason for the email is I’m a young guy. My dream has always been to flip houses. I went to Columbia university, majored in engineering, minored in business. I work now for a construction management company as a superintendent so I am getting more and more familiar with construction techniques. I have the capital to start but think I need more experience to be anywhere as close to successful as you are.
My question for you is:
1) How did you get started?
and
2) What would you recommend for a guy like me just starting out trying to get the experience to successfully do what you do? Would you get involved, hands on as a superintendent so that later down the road I can act as my own contractor, or as a project manager so that I know the contracts and estimation side of the job or an engineer so I can pull virtually every permit I need and stamp my own drawings?
Any other advice you want to shed on me that maybe you would have done differently if you started over now….feel free to school me.
I know you’re a busy guy so I’ll keep my many questions to just those two.
Thanks for taking the time.
Steve
Thanks for the comments Steve and I’m glad you find inspiration here. It sounds like you have a great start to building the skills you would need to succeed in house flipping. Engineering and business will both help you tons. Having the capital to get started is also something that alot of other guys are not lucky enough to enjoy and they still make it happen using hard money loans, so here’s another strong point you have on your side.
1. I never set out to become a house flipper. Its been told, do what you love and the money will follow. I grew up around tools my whole life and was lucky enough to have a dad (r.i.p.) that took the time to teach me how to use them. He always was taking on remodeling projects around the house although his profession was a computer programmer. I always found myself helping even if it was just cleaning up. At an early age I learned about tools and I think it led me to be more mechanically inclined than other kids later on in life. I’ve had a lifetime of other careers in sales, manufacturing, construction, marketing, real estate and more. I think at some point everything just clicks and you take experiences and skills you’ve learned throughout life and they all come together and your path becomes clear.
Having tool knowledge and odd construction jobs throughout college enabled me to take on my own projects when I first became a homeowner. I was never really taught the right way to do anything (except painting) but rather just jumped in and did it the best I could, figuring it out as I went along. I always say you can learn how to do anything you want by asking questions (at home depot). In addition to growing up around tools with my dad, I was also lucky enough to have a mother who was a Real Estate Broker. I didn’t realize it at the time but I was absorbing everything from my parents that I would be using today being self employed.
Don’t quit your day job to become a house flipper. Build it up slowly and jump in full time after you’ve proved to yourself mentally and financially you can do it. After buying and rehabbing several homes for myself I took on my first official flip while still working a 9-5 job. It was a full gut 3 bedroom, 1 bath house in my neighborhood. You can find a video of it here called The Probate House. It was in my neighborhood and I new the local market like the back of my hand. I spent evenings and weekends rehabbing that house and had all my friends help me. I made more from that house in those 4 months than my job paid all year. To buy that first house I sold all my fun toys to raise the down payment and rehab money. After the first one went so well I rolled straight into 2 more. All 3 I made great money on. I had once heard somewhere If you make money on your first 3 real estate deals then you’ve got it wired. Looking back on it that was a bit naive, but it gave me the courage to quit my job and jump in full time.
2. This is a great question. You see on my site that I do alot of the work myself. This business model is not scalable however, so in theory you want to just oversee everything at some level but be able to delegate the work. Not to say that its not valuable to get your feet wet on the first few deals by doing some of the work if you are capable. There’s nothing like knowing how its suppose to be done, even if you are overseeing it. In todays market its important to produce a good product so dont compromise on quality just so you can learn how to do tile jobs yourself. I found it appealing initially that I could do alot of the work thus saving me tons of money on the rehab budget and hedging my bet for making a profit. This model works, but you’ll never be able to do 10-15 house a a year. Most of the construction knowledge you need revolves around what order to do things in. It’s really not that hard to do a big rehab if you just break it down into steps and hire qualified sub contractors for each step. Being a project manager is great but you probably wont need an engineers designation and if you do rarely need one, you can easily pay a few hundred bucks. You cant do everything yourself and thats one thing I’ve rarely had to use. I’d say being a draftsman would rank very high on the personal skill wish list. Being able to use auto-cad and draw up your own floor plans would definitely aid you down the road. If you have time I would learn this. Just about every house we do now needs floorplan changes and being able to put it all on paper is great. My last recommendation for you is to get your real estate license. Knowledge in this field is just as, or more important, than the construction side. Also, network with other local investors and investment clubs. Its great to surround yourself with like minded people. Be prepared also to hear negative reactions from some friends about your new career idea, its best to not even associate with anyone who expresses negative feelings on this because it could make you second guess your actions. People don’t like to see you make money, especially when they are stuck in their crappy low paying jobs, that they hate, just waiting for the day they are going to get laid off. What I do is not rocket science, anyone who puts their mind to it, and has passion for it, can be successful.
Good luck in your future and thanks for the great questions!
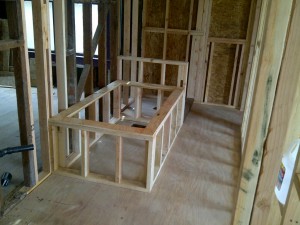
My new master bathroom in The Painted Lady is coming together nicely, it’s generous in size at 6′ x 15.’ Every time I frame up one of these tub boxes for the drop in tub I get a sense of Deja Vu, like seeing an old friend. It seems like just yesterday when I was doing a similar configuration on the Target House project only this time I’m just going with a standard 3′ high pony wall separating the tub and the shower instead of the full wall with the window opening, which will also also keep my tile price down. Every bathroom I design is a bit different, this time I’ve got everything in a line down the left hand wall and then the water closet at the end on the right. You kinda just gottta play with the space and do what works best. I’ve also got the whole right hand wall available for towel bars with this design, I’ve learned this the hard way after doing killer bathrooms and then finding out there no place for towel bars. The door swings in and onto the right hand wall, a 60″ dual vanity is first on the left, then the jacuzzi tub in the middle with a 3′ x 4′ shower at the back. I planned on dropping in a regular soaker tub with no jets to keep the budget down but after pricing them I could get the American Standard Plebe model 32″ x 60″ jetted tub for the same price of $399.00 so it’s a no brainer. There’s a window in the center of the back wall but I’ve got it temporarily sealed now. Natural light is key for bathrooms, ideally I probably would have had another window in the shower and one in the water closet too but I’m trying to stay within budget so I’m forced to pull back in some areas. Code states that if you don’t have an opening window you must have an exhaust fan but I’ll have both.
As you can see we got started roughing in the plumbing this week, I got a great quote of $4800.00 for the complete new system with gas lines, I supply the fixtures. I was also reminded that black ABS is used here in California and not white PVC as in Texas and on the East Coast for the waste lines. I think PVC is better and cheaper but the only upside on ABS is that you don’t have to use primer with the glue. ABS also gets brittle from UV exposure so it’s now common place to paint the roof stacks in California. I still like PVC better, even though it takes more time to install using the primer but I’m sure there’s some tree hugger issue with it so that’s why California uses ABS. After framing I always get the plumber in first before the electrician or hvac sub contractors, it works best because the vent pipes and waste lines are not flexible. I also wait until the plumber is done before putting on the new roof so we don’t have to butcher the new roof for the vent pipe roof jacks. Your roof job comes out far superior if all jacks are in place before install, this trick came with experience. After these waste lines are complete we’ll run the new black pipe gas lines and then finally the copper supply side lines. I’m still going back and forth with the San Diego Historical Review Board, they have made me change 13 items on my plans including window type, siding material, roof type & color and they even want to know the exterior paint colors. Furthermore, they are making me re-stack the exterior brick chimneys even though they’ve been eliminated inside the house. It’s really slowing me down because until I get everything approved from them I cant call for any inspections. As frustrating as it is, I’m stoked to learn exactly what needs to be done to pull off a renovation of this caliber in San Diego so I’ll chalk the delay up to contractor school.
Don’t forget the men and women who died while serving in the American military protecting our great country, this holiday weekend is not just all about beer and barbeques in the park. Have a happy and safe Memorial Day and God Bless our troops!
I’m getting close to the stem wall pour, the guys worked on the forms all week. Inside the forms we hung 12″ j-bolts that will anchor the house to the foundation once it’s poured. Then we laid 4 rows of #5 rebar and secured it to the screw jacks with tie wire. Anywhere the stem wall is more than 24″ high we will hang vertical rebar 24″ on center as well. This is over and above local building codes but worth the extra expense. All the load from the weight of a house is carried on the exterior walls and down to the footings, it’s totally different for me here doing this as in Texas when building a pier and beam room addition you don’t do this perimeter foundation. The plastic sheeting you see is to keep the concrete from blowing out the back once we pump it into the form cavity. All that’s left now is to set the outside forms, we’ll cut windows along the top of the outside so we can pump the concrete in.
I also got the new master suite all framed up, it’s 375 s.f. and includes 9′ ceilings, a big bathroom that fits dual vanities, soaker tub, stand up shower and water closet. There’s also a generous sized walk in closet and french doors off the back. While the framers were there I also had them raise the kitchen ceiling, move some closets around upstairs and add some really cool tray ceilings in the living room and dining room that I’ll use for my mechanicals and central heat ducting to get upstairs. We also added fire blocking to the entire house since I had all the walls open. I bumped up the room addition ceiling joist size to 2×8 and the roof rafters to 2×10 just to ensure the inspector likes what he sees and I get off on the right foot with him. It’s coming out pretty trick, I’m excited about how easy it was to really modernize this 100-year-old floor plan and am confident it’s going to help sell the house. The prices I’m nailing down for mechanicals on this 2000 s.f. house so far are as follows: Complete electrical with new 200 amp service: $5300. Complete plumbing with copper supply, gas lines and all new ABS waste lines: $5000. Complete new central heat system with new furnace and ducting: $1800. New roof: $2000 labor. These are killer prices and all from legal, licensed sub contractors, I couldn’t have done better in Texas. Thanks to everyone locally who has sent me referrals, after this huge project I’ll have a great team ready for any size project!
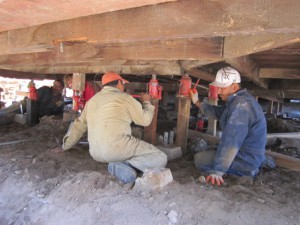
So we finally got started this week on the huge foundation repair in which we are completely leveling the house and adding a new perimeter concrete stem wall. Before this huge stem wall can be formed and poured, we had to level the house and dig the 24″ trench around the sides. The house was only 2″ off at the most so the leveling was easy and we got the entire house within 1/4″ with a digital level going from one side to the other. I hired a foundation guy who has worked for me in the past even though I had a cheaper bid from a new guy, I just felt it’s such an important part of the rehab and I didn’t want to go down that road with a new sub contractor, especially on my first project back in San Diego. The only downside was I had to wait for him to finish another job so it slowed me down a bit. I’m not sure that I would have wanted to be under this huge house with jacks on a Friday the 13th! The next step now will be to set all the wood forms for the stem wall and tie all the rebar inside per building code.
My sub contractor has been doing foundations for over 25 years so he’s got cool little tricks to make things easier for himself. I always enjoy learning these little tidbits from a true experienced professional in their field. As you can see here he’s got the outside of my house sitting on “sacrificial homemade screw jacks” we made out of 3/4″ galvanized pipe with 5/8″ all-thread inside and nuts and washers for the adjustments. Once everything is level he uses these jacks to hang the rebar on, and they’ll actually remain inside the new 8″ wide concrete stem wall permanently. Inside the trench they are sitting on small 8″ pier blocks, additionally he’ll hang the j-bolts from the new treated bottom plates so the house will be anchored to the new stem wall once its poured. It’s looks crazy to see this huge, heavy house sitting on these skinny legs but most of the weight is actually on the beams underneath a short distance away. Hopefully by the end of this week we’ll have the forms built and new foundation poured so we can get on to the framing. After the framing I’ll do the roof, plumbing, hvac and electric. Everyone is ready to go for these trades so stay tuned as things shall move along a little faster soon. I pulled off some of the Sears metal siding that’s probably been on the house since the 70’s and as I guessed, the original 1909 ship lap wood was in perfect preserved condition with only one coat of faded yellow paint. I’m pretty stoked as this could have gone either way with what I was going to find under there. On a side note, I had to rent a temporary construction fence this week to keep out the local kids who’ve evidently adopted the house as their local hang out at night. Every morning I’ve arrived to small surprises such as spilled ice cream, candy and even an egging. While nothings been stolen, construction sites are just not safe places to play so for the first time I’ve had to go on total lock down. This flimsy fence wouldn’t have kept me out 30 years ago but it gives me a little more piece of mind now knowing it’s not wide open.
After hearing all the horror stories about how hard it is to work with the City of San Diego with regards to permitting your rehab project I have to say that it really isn’t that bad. After designing my floorplan on graph paper I hired a draftsman to put it together for me. Since my company is the owner of the house I’m able to pull an owner/builder “Combo Permit” myself without being a licensed GC.
I actually found my draftsman’s number on a bandit sign believe it or not, and he’s doing drafting work while putting himself through architecture school downtown. A real smart young guy and his price was great at $700 for a full set of plans showing all mechanicals, framing, foundation, connections, elevations and it even included him to accompany me downtown to submit the plans for approval. It’s always good to have your architect go with you because sometimes they let you make changes on the spot. Here’s my boy making changes to the 3 sets of plans during our appointment.
In order to submit the plans I had to provide 3 complete sets, the County building records and 4 photos of the house, one from each side as well as the jpeg images on disc. Once you arrive downtown you check in with the receptionist and tell them you are there for an over-the-counter permit and plan check. They do take appointments but I opted to just go early in the morning and wait as they open at 7:30.
First you get sent to a preliminary desk that makes sure you have everything you need, then they send you across the building to wait for plan checking. The plan checking is very intensive and I found it to be completely opposite than in Texas. Here they look at every little detail, framing connections and sizes, mechanical placement, setbacks, elevations, demo plans, structural, and even smoke alarm/CO2 placement.
Additionally, there are all these other disclosures you have to show on your plans, you even have to designate trash areas, concrete clean out areas and account for storm water run off with regards to keeping your debris on your lot in case of a downpour. In Texas to the contrary, the City didn’t even want to look at the plans but rather left the responsibility up to the inspectors as they went through for rough-in and final inspections to make sure everything is correct.
It’s a little more red tape up front here but at the end of the day its easier to build it once you have such detailed plans for all your subcontractors to refer to. All in all, we had a great experience with our plan checker and even learned that we can request her in the future if we want to. On the second visit downtown we got stamps on the plans showing approval but now we have to wait the mandatory 10-day historical department review.
The only item on my plans that’s still unclear is with regards to what type of siding they are going to request for the new rear portion of the house. Total cost for the permitting and plan check was about $2700. A far cry from what would have cost $300 in San Antonio.
While we wait for the historical department approval I’ll have my foundation guy start doing some prep work so we are ready to start leveling the house the day we get the permit. With the arrival of dumpster #4 yesterday, all of the big demo work is done minus pulling nails and some small framing stuff which we’ll do at the time I frame the master suite.
I’m still spending a lot of time getting bids from sub contractors, its always one of the most important parts of any project but once I get my team in place on this first project, then I can just improve from there. It’s a lot of work acting as your own GC and now I’m essentially starting over without all my valuable San Antonio contacts but with a good team of subs I’ll be able to really stretch my budget thus enabling me to compete in this competitive market.
How time flies! It was April 28, 2008 when I made my first post in the blogging world as we were starting our renovation called “Craftsman Bungalow.” I thought it would be cool to share my adventures along the way and set up this website for friends and family to enjoy. The first website was custom made in Dreamweaver by my lovely wife but after things grew we moved our content over to a WordPress template so we could add updates easier. We didn’t go unnoticed for long however, I’m now recognized as one of the best house flipping blogs on the web, having won multiple awards and even managed to get the attention of Hollywood and New York production companies for reality show offers last year. Currently our monthly stats are 10,000 page loads and 6000 unique visitors.
Now it’s time to say Thank You to all my followers, subscribers, supporters, emailers, fans and everyone who’s inspired me along the way to keep sharing our projects. Thanks for following and here’s to blogging year #4 in San Diego!
Feels great to be back doing what I love, creating new spaces, and most of all home in San Diego. We spent all week doing demo on The Painted Lady, with 3 laborers I gutted just about the entire house, maybe only a half day left and we’ll be done. I filled nearly (3) 40-yard roll off dumpsters at $427.00 each. I was really worried that we weren’t going to be able to get the dumpsters into the back yard, having to put them on a public street is a pain in the butt as you have to have a permit. My only other choice was paying someone with a dump truck to drive the loads to the dump one by one. This would have been very time consuming and costly.
The house is huge inside, I am really excited and can see the final product already. Next up on deck after the demo is done is the foundation work, then I’ll be ready to re-frame the back of the house and put the new roof on. So far it seems sub contractor prices are not that much higher than I was paying in Texas, although I still haven’t nailed down a good electrical or plumbing contractor. Here’s a walk through video so you can see this great floor plan.
74 days after arriving home in sunny San Diego we’ve finally bought our first rehab project, The Painted Lady. I’m real excited about it, she’s a 1909 Folk Victorian Gingerbread. The house is located in an Urban Redevelopment neighborhood just 1 mile from Petco Park and Downtown, with incredible views of the Coronado Bridge and all the way to Tijuana.
There are original hardwood floors under the carpet, 10 foot ceilings, and a lot of original details still intact. This is a huge project and needs just about everything a rehab could require. I’ll be leveling the foundation by adding a new perimeter stem wall and 40 new footings, new roof, re-framing a 360 square foot master suite on the back, replacing all the mechanicals, new kitchen, 2.5 new baths including adding a half bath under the staircase, some new windows and complete landscaping and fencing with an automatic gate on the alley. The house has aluminum siding that’s probably been on there since the 70’s. I peeked underneath it and there’s fiber shingles probably from the 50-60’s . Under the shingles I found the original wood board and bat siding which I’ll expose and also add some of the missing period details like the gingerbread ornamentation and porch decoration the Victorians are famous for.
The Victorian era began in the 1830’s and ran until roughly 1940. Our house is a Folk Victorian, more simple in design than the ornate Gothic or Italianate Victorians, and was usually built more modestly for the middle class. I’m excited to see the scalloped shingles under the gables which I’ll paint multi-color and the decorative gable bracket. This architecture can really hold color well so I’m planning on using a minimum of 6 bold colors to bring her back to life. I’ve done a lot of Craftsman style houses but this will be my first Victorian and only the second 2-story house we’ve rehabbed. With the huge scope of this project it will be a perfect welcome home project and enable me to become reacquainted with the City permitting, historical and inspection departments this summer as well as dial in my sub contractor team. If you can’t see the potential in what we have here, Google “Painted Ladies San Francisco” and you can get an idea of where I’m going with this project. Stay tuned for demo and a walk through design video!
Yes folks, it’s definitely all about the short sales. With 1 in 6 San Diego houses underwater many homeowners are opting for strategic defaults and walking away from their properties.
The hungry agents out there are simply working the NOD (notice of default) list and finding plenty of anxious sellers who want out as their home is now only worth roughly half of their loan amount. This presents a huge opportunity for investors and home buyers willing to wait out what’s frequently a slow process.
After scouring MLS for weeks for REO’s and swimming with all the sharks out there I decided to switch gears and actually get on the phone and start networking with the short sale agents who are on the front line with all the distressed deals.
I’ve quickly come to realize that you have to make your own deals, not just look for one. Not every agent however who has a short sale listing is capable of influencing the deal, much less even closing it. There are third party professional negotiators who seem to have the process wired though. A good short sale negotiator can hammer the lender and dispute their BPO’s, even sometimes providing their own appraisals and documentation as to the value and condition of the property and build in the margin rehabbers need to make a profit.
The downside is it can take 2-6 months to close a short sale so we are filling our pipeline up with as many as possible. Knowing who these agents are and networking with them is key, once again its not what you know in this market but who you know. If you are a homeowner looking to do a short sale in San Diego, make sure both lien holders give you a “non-deficiency”, it holds you harmless for the portion of the loan amount thats been forgiven. Our short sale agent has 100% success ratio getting this and has done over 150 transactions. If you are interested in a short sale please contact me.
Calling All Contractors! Contact me if you want to be a part of our team!
Moving here I had the long term plan of stepping away from the labor part of the rehabs and just doing design work and overseeing the contractors. Afterall, these arent huge projects, mostly cosmetic stuff. I had given myself a 3 year window to get to that point but after arriving here its evident that this needs to be my new business model right out of the gate.
I’ll be hiring all the construction out so I can do multiple projects simultaneously so if you are a GC or know of a reliable one let me know please. Maybe once the market picks up for move up buyers I’ll do some larger structural projects again but the money to be made now is on the entry level stuff, that only needs light rehabs.
The profits wont be as large as we were used to but with increased volume we should be able to make it up and then some. I’m super excited, our California LLC is set up now, we have over 30 offers out there and some are very close to reaching acceptance so I’m looking forward to finding solid team members on the construction side.
Also, many people are reaching out to me, new blog followers and old alike. I’m stoked to meet all of you, after the machine gets running we’ll be open to joint venturing on some deals, offering some of our overflow deals to you or even using private investment funds so contact me if you are in San Diego and want to chat about all the opportunities we are seeing with the local real estate market.
I’m not totally over the bungalow craze so fast though, I’ve got an offer on this amazing California Craftsman REO, I hope it pans out. I’m competing with conventional retail buyer offers that are higher but hopefully the lender will opt for my all cash offer instead.
I utilized my “write the offer with the listing agent” strategy on this one: ). No matter what we start buying we’ll do some fun stuff and try to set our rehabs apart from the crowd by hopefully offering a little more attention to detail and some cool design sense. I’m really making headway, once we have more deals than we know what to do with I’ll share a little more about how I figured it out.
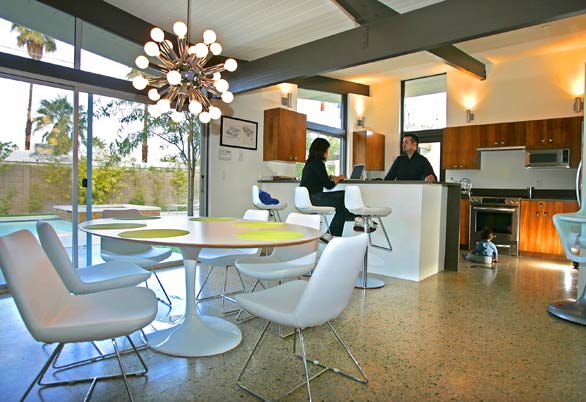
One things for sure, in every city across America you’ll find an abundance of 50’s ranch houses in great established neighborhoods and San Diego is no different. The post war Ranch style house is know for its sprawling lay out and horizontal orientation with the street, usually being single story and having an attached 2 car garage as this was the first decade where families actually had 2 cars. Low profile roof lines and fairly open floorplans are also indicative of this time period as are huge overhanging eaves and exposed beams. Sliding glass doors leading to outdoor patios were first introduced in this era as well. Looking at these homes makes you realize how perfect these traits align themselves with todays homebuyer, even 50 years later.
Recently its become very popular to put the modern twist on these homes. Being in San Diego now I’m not sure if I’ll continue with the Craftsman Bungalow affair we had in Texas but with what I’m seeing done to these 1945-1968 Ranchers its looking pretty fun. You’ve got the large rooms, open beams and open floorplan. To get the modern element into the exterior all you need are aluminum windows, smooth stucco and some natural elements such as stained redwood or teak. These style homes already typically have minimal exterior ornamentation. Metal windows, dark wood and frosted glass, Bam. You got it. I really like this house a friend showed me this week during our property hunt, I’m so excited about this design style I think I’ll try my hand if I land a rancher. The interiors are semi-minimalist but Modern with clean lines, high end finishes and trendy material choices, no travertine here. Formica countertops were also introduced during this period but there’s a variety of other new materials of course that mimic the clean, smooth look for counters.
Hopefully I’ll find the right house to transform into a Mid Century Modern project, were making tons of offers. REO’s, short sales, traditional equity sales and to private party non-mls stuff. Somethings bound to stick soon, stay tuned.

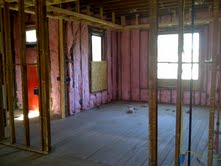
 We finally passed all rough-in inspections and have now hung all the insulation. It took 2 tries with my hvac sub contractor, he forgot to strap down the furnace and didn’t run hard pipe gas line through the unit so we had to call for a second inspection after having him come fix the two issues. These are small details which he should have caught but nonetheless we got all the signatures now on our inspection card and the City inspector is starting to warm up to me a bit now that he sees we know what we are doing. Right after passing I scheduled the insulation to be hung the next day and its called in for an inspection for tomorrow. I insulated the exterior walls and complete sub floor. This is over and above what my permit called for but having all the walls opens provides such an obvious opportunity to save energy and provide someone with a product we can be proud of. I’m sure the new homeowner will unknowingly be thanking me every month when they pay their electric bill.
 I also got some of my windows installed and I’m telling you they are so neat. TM Cobb makes a mighty fine wooden double hung window for historic homes. I’m totally happy and cant wait for the missing 2 to arrive with the Victorian front door so I can install them too.
 Here’s the bank of 4 windows on the study or optional 5th bedroom. This room is going to be killer with all the light that’s coming in. There was a lot of missing trim on the corners of the house that was probably removed when the metal siding went on. This stuff is easy to replace so we’ve been working our way around the house getting everything back to how it should be.
 siding but its going to be worth it. The historical review board here in San Diego wouldn’t even have let me use Hardi Siding if I wanted to. My colors were also approved this week so once the exterior trim and siding is all complete I’m going to have 2 crews in simultaneously painting the exterior of the house and hanging the drywall on the inside. Once the drywall is hung we have to get a nailing inspection where they verify spacing on the screws before we tape and float over it. Stay tuned, we’re going to see some dramatic changes soon. Also, Get on over to Biggerpockets.com and check out the video interview I did with Josh. I break down our business model and explain what kind of projects we look for.


